Configuring PingFederate Single Sign-On Integration with SAML
This document is for:
Invicti Enterprise On-Demand, Invicti Enterprise On-Premises
PingFederate is an enterprise-level federation server that provides users with secure access to applications from any device. PingFederate provides customers with a centralized or ‘global authentication authority’, which means they have a single and consistent way to sign in across all their platforms and domains
- Using Security Assertion Markup Language (SAML), a user can use their managed account credentials to sign in to enterprise cloud applications via Single Sign-On (SSO). An Identity Provider (IdP) service provides administrators with a single place to manage all users and cloud applications.
- You don’t have to manage individual user IDs and passwords tied to individual cloud applications for each of your users. An IdP service provides your users with a unified sign-on across all their enterprise cloud applications.
- You can also create a new user in Invicti Enterprise with the Enable Auto Provisioning option.
If you encounter any problem while setting up SSO integration, see Troubleshooting SSO Issues.
You have to use IdP-initiated SSO if you want to utilize Auto Provisioning.
If you will use SP-initiated SSO, please set the Name ID Format value to the email address on the IdP side.
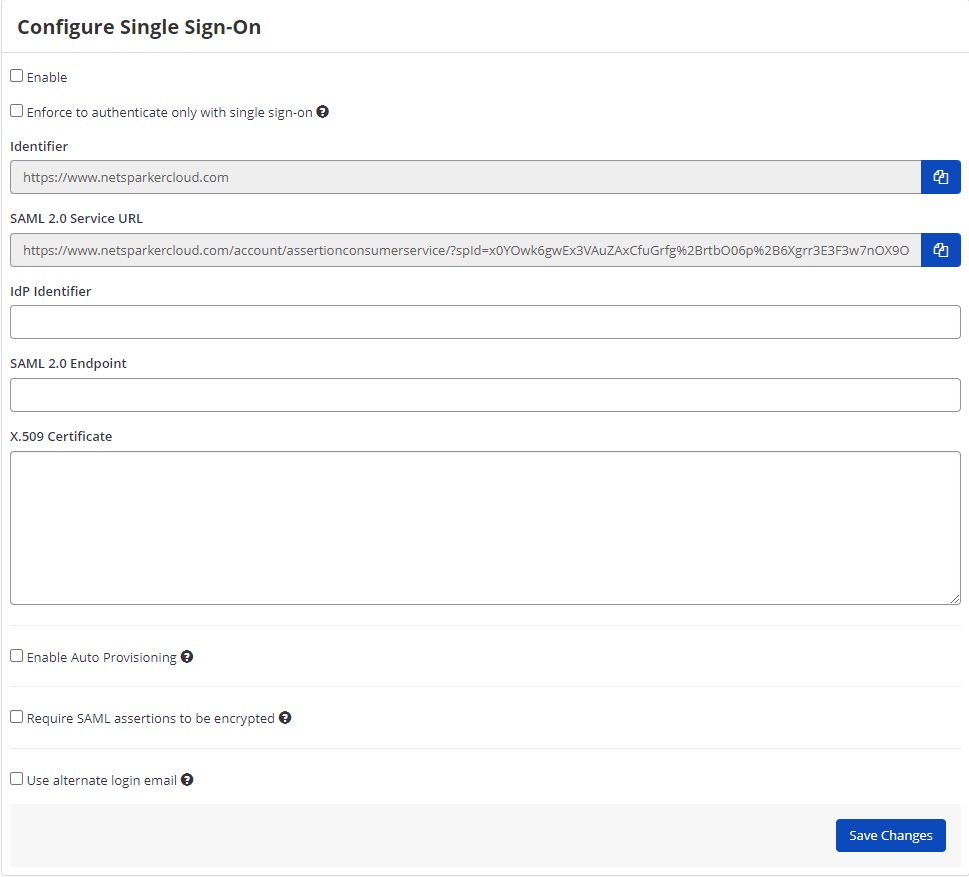
Single Sign-On Fields
This table lists and explains the Single Sign-On fields in the Configure Single Sign-On window.
| Field | Description |
| Enable | Select this option to enable the single sign-on feature. |
| Enforce to authenticate only with single sign-on | Enable this option so only administrator users can authenticate without single sign-on. Users can only sign in to Invicti Enterprise by using the email address that belongs to their employer. |
| IdP Identifier | This is the SAML identity provider’s Identifier value. |
| SAML 2.0 Service URL | This is the Consumer URL value (also called the SSO Endpoint or Recipient URL). |
| SAML 2.0 Endpoint | This is the URL from your IdP’s SSO Endpoint field. |
| X.509 Certificate | This is the X.509 certificate value. |
How to Configure PingFederate Single Sign-On Integration with SAML
- Complete the instructions in Creating an SP Connection with your IdP PingFederate.
- In PingFederate, from SP Connections, select the SP Connection.
- Click Browser SSO, then Configure Browser SSO, then the SAML Profiles tab.

- From the list of profiles, select SP-INITIATED.
- Click Next, then Next again. The Assertion Creationtab is displayed.
- Click Configure Assertion Creation. The Assertion Creation window is displayed.
- Click Attribute Contract. The Attribute Contract tab is displayed.
- Add email as the Attribute Contract.

- In PingFederate, from SP Connections, select SP Connection, then Browser SSO, then Protocol Settings, then Configure Protocol Settings, then Allowable SAML Bindings. The Allowable SSL Bindings tab is displayed.
- From the list of options, select REDIRECT.

- Click Save.
- In PingFederate, click Server Configuration, then ADMINISTRATIVE FUNCTIONS, then Metadata Export.
- Click Next. The Connection Metadata tab is displayed.
- Select SP Connection, and click Next. The Metadata Signing tab is displayed.
- Select the Signing Certificate, and click Next. The Export & Summary tab is displayed.
- Export the metadata file.

- Click Done.
- Open the downloaded SAML metadata file, and copy the URL, exactly as it appears, located in the EntityDescriptor node>entityID attribute:
- Then, log in to Invicti Enterprise, and from the main menu click Settings, then Single Sign-On. The Single Sign-On window is displayed. Select SAMLv2.0 from the drop-down list and then paste the URL into the IdP Identifier field.
- Next, copy the URL from the SingleSignOnService node>Location attribute field.
- Then in Invicti Enterprise’s Single Sign-On window, paste the URL into SAML 2.0 Endpoint field.
- Finally, copy the content of the X509Certificate node (signing).
- Then in Invicti Enterprise’s Single Sign-On window, paste it into the X.509 Certificate field.
- Select one or all of the following options, if necessary:
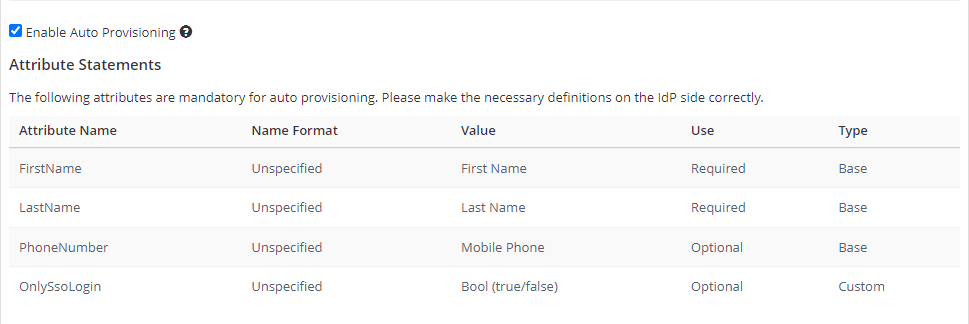
- Enable Auto Provisioning: If enabled, an account will be automatically created for IdP-registered users when they first access Invicti Enterprise. To do so, you must complete the FirstName, LastName, and Phone Number (optional) fields in the Attribute Statements on the IdP side. For further information about OnlySsoLogin, see Provisioning a member.
- Require SAML assertions to be encrypted: If enabled, it prevents third parties from reading private data in transit from assertions. There are two options:
- Generate a new certificate for me: Invicti generates a key pair. Invicti will keep a private key to decrypt received SAML messages and provide you with a certificate so that you can upload it on the IdP side.
- I have an existing certificate: You need to upload your certificate to Invicti by importing a decryption certificate from your files.
- Use Alternate Login Email: If enabled, this lets users use alternative email for SSO. So, you can enter an alternative email on the New Member Invitation page and while editing the user’s details on the Team page.
- On the Invicti Enterprise’s page, select Save Changes.