Deploying Invicti Shark for .NET – AWS Elastic Beanstalk
The following article shows you how you can run a .NET application in AWS Elastic Beanstalk and then use Invicti Shark (IAST) to run an interactive application security testing (IAST) scan for that application.
Step 1. Creating your target in Invicti Enterprise
For this example, we assume that the URL for your target is http://eb.acunetixexample.com. Create a target with your URL, enable Invicti Shark, download the Shark agent file -Shark(IASTandSCA).zip-, and save this file to use later on.
Step 2. Creating your web application using Visual Studio
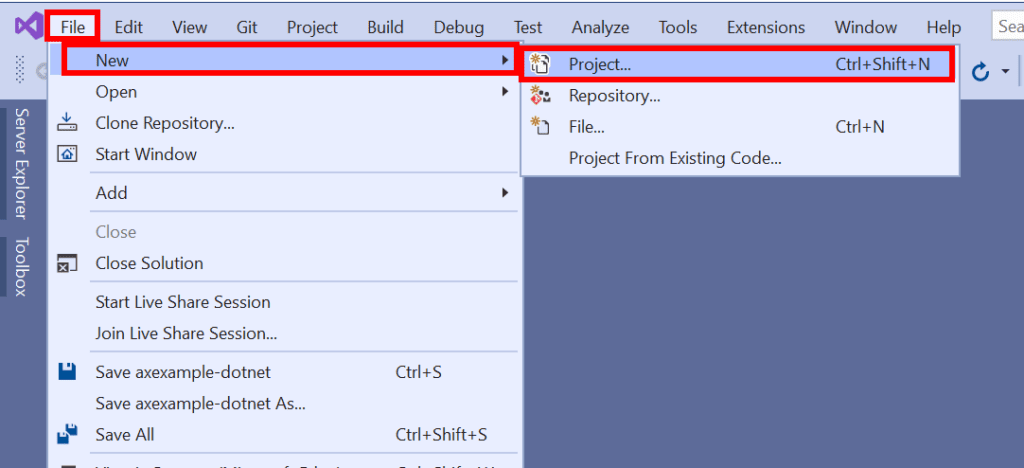
- From the menu, select File > New > Project.
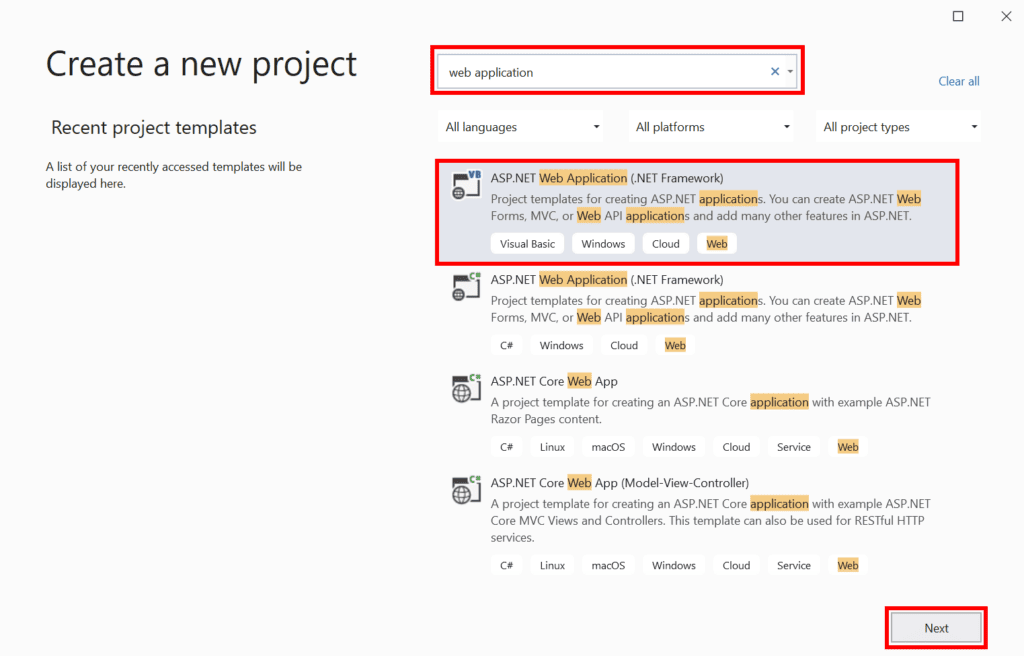
- From the Create a new project window, search for “web application”.
- Select ASP.NET Web Application (.NET Framework), then Next.
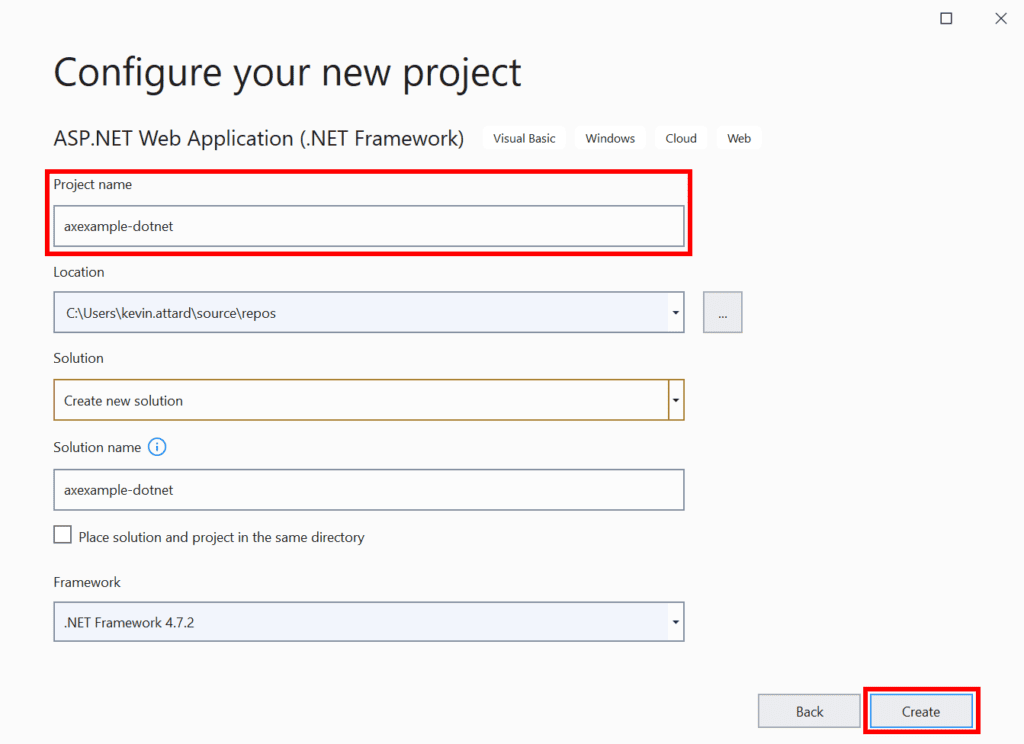
- Enter a friendly name for your project. (For this illustration, we use axexample-dotnet.)
- Select Create.
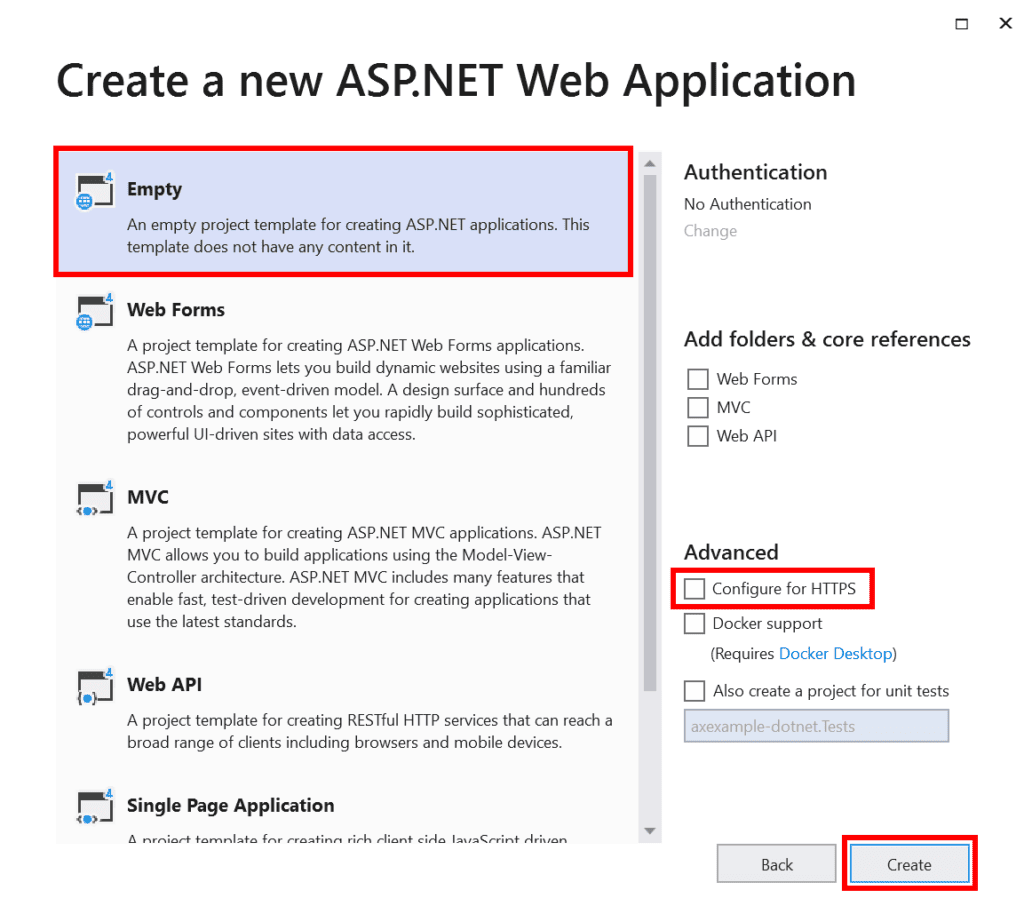
- From the Create a new ASP.NET Web Application window, select Empty, unselect Configure for HTTPS, then select Create.
- Right-click on the axexample-dotnet project name.
- Select Add > HTML Page.

- On the Specify Name for Item dialog, enter index to the Item name field and select OK.
- Edit your index.html file to read as follows:
<!DOCTYPE html>
<html>
<head>
    <meta charset="utf-8" />
    <title></title>
</head>
<body>
    <h1>Test dotNET Site Example for AWS Elastic Beanstalk</h1>
    <br>
    Hello World! - Main Page
    <br>
    <a href="/page1.html">Goto Page 1</a>
</body>
</html>- Do the same to create a page1.html file; edit your page1.html file to read as follows:
<!DOCTYPE html>
<html>
<head>
    <meta charset="utf-8" />
    <title></title>
</head>
<body>
    <h1>Test dotNET Site Example for AWS Elastic Beanstalk</h1>
    <br>
    Hello World! - Page 1
    <br>
    <a href="/">Goto Main Page</a>
</body>
</html>- Save your changes to index.html and page1.html files.
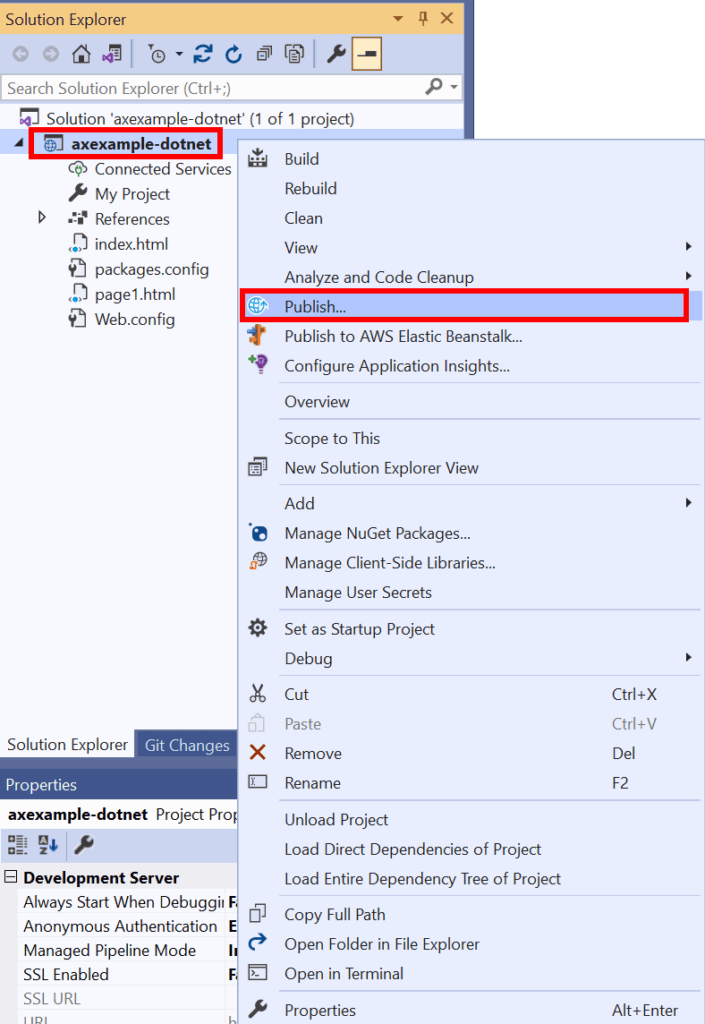
- Right-click on the axexample-dotnet project name and select Publish.
- From the Publish window, select Web Server (IIS), then Next.
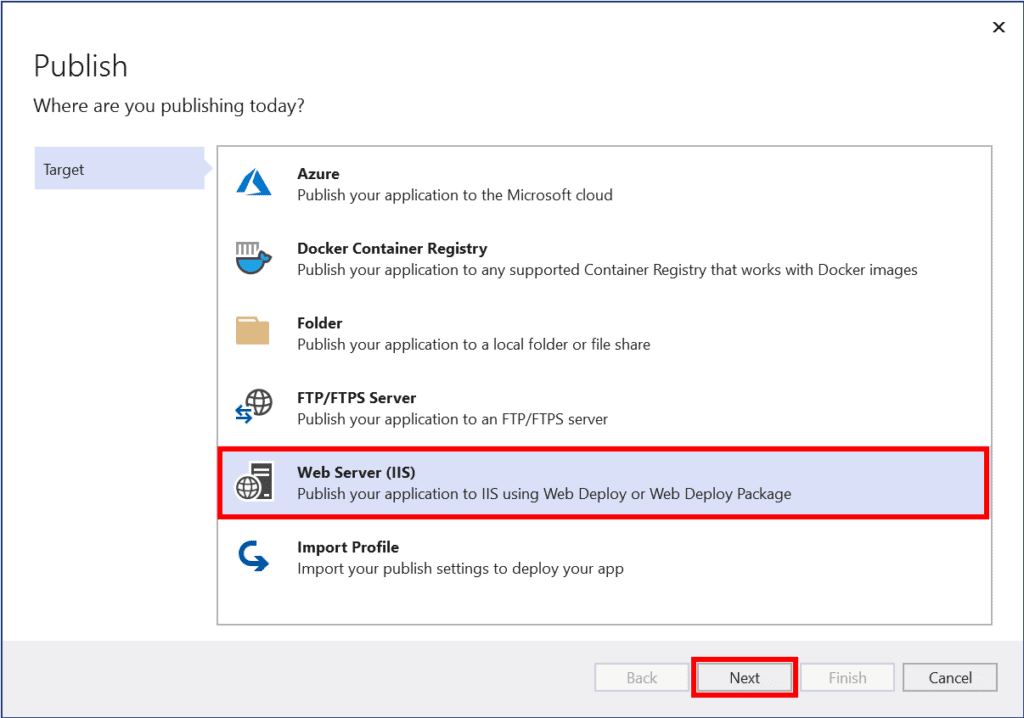
- Select Web Deploy Package.
- Select Next.

- Now, set your Package location to C:\axexample-dotnet\axexample-dotnet.zip, set your site name to axexample-dotnet.
- Select Finish. (If necessary, create the C:\axexample-dotnet folder to hold your files)

- Select Publish.

- Using Windows Explorer, navigate to the C:\axexample-dotnet folder and remove the following files:
- axexample-dotnet.deploy.cmd
- axexample-dotnet.deploy-readme.txt
- axexample-dotnet.SourceManifest.xml
- At this stage, the C:\axexample-dotnet folder should contain the following two files:
- axexample-dotnet.zip
- axexample-dotnet.SetParameters.xml
Step 3. Completing your application source code bundle
This simple web application will be defined through the following file structure:
C:\axexample-dotnet\.ebextensions
C:\axexample-dotnet\.ebextensions\acesensor.config
C:\axexample-dotnet\aws-windows-deployment-manifest.json
C:\axexample-dotnet\axexample-dotnet.SetParameters.xml
C:\axexample-dotnet\axexample-dotnet.zip
C:\axexample-dotnet\Shark(IASTandSCA).zip- Build the source code bundle from the command line with:
files:
  "C:\\Program Files\\Amazon\\ElasticBeanstalk\\hooks\\appdeploy\\post\\90create_folder.bat":
    content: mkdir C:\shark
  "C:\\Program Files\\Amazon\\ElasticBeanstalk\\hooks\\appdeploy\\post\\91extract_shark.bat":
    content: powershell Expand-Archive -force C:\staging-previous\Shark(IASTandSCA).zip -DestinationPath C:\shark
  "C:\\Program Files\\Amazon\\ElasticBeanstalk\\hooks\\appdeploy\\post\\92inject_shark.bat":
content: "C:\shark\.NET Framework\injector.exe" -m inject -t http://localhost:80/- Create your C:\axexample-dotnet\aws-windows-deployment-manifest.json file to read as follows:
{
  "manifestVersion": 1,
  "deployments": {
    "msDeploy": [
      {
        "name": "axexample-dotnet",
        "parameters": {
          "appBundle": "axexample-dotnet.zip",
          "iisPath": "/"
        }
      }
    ]
  }
}- Copy the Shark(IASTandSCA).zip file you created earlier into C:\axexample-dotnet\Shark(IASTandSCA).zip
- Build the source code bundle from the command line with:
powershell Compress-Archive -Path C:\axexample-dotnet\* -DestinationPath %USERPROFILE%\Desktop\axexample-dotnet-aws.zip- Retain your zip file for the deployment steps as specified in the following section.
Step 4. Deploying your web application to AWS Elastic Beanstalk
- From your AWS Dashboard, navigate to Elastic Beanstalk > Environments.
- Select Create a new environment.

- Set your environment tier to the Web server environment.
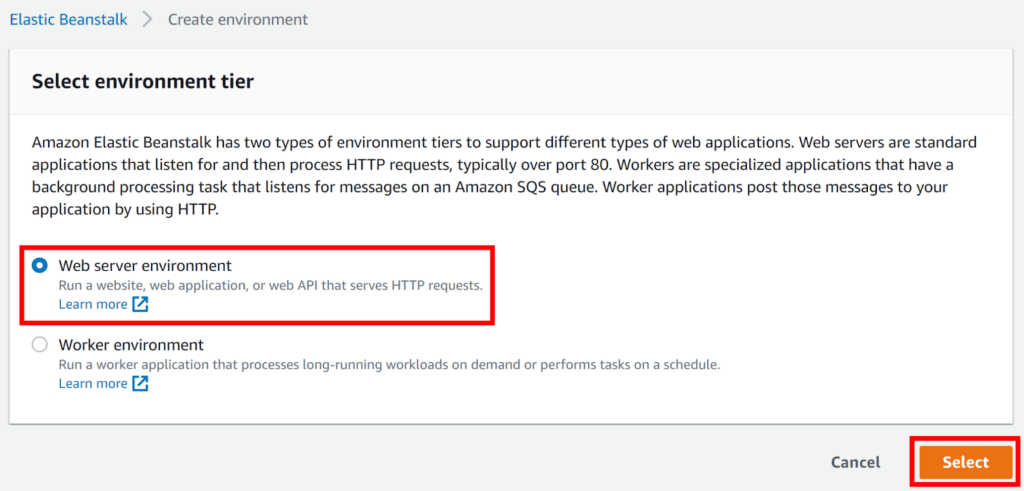
- Click Select.
- In the Elastic Beanstalk > Create environment page:
- Set the Application name field to the name for your web application. (For this illustration, we use axexample-dotnet.)

- From the Platform drop-down, choose .NET on Windows Server.

- Enable Upload your code.
- Select Choose file.

- Select your axexample-dotnet.zip source code bundle for upload.
- Select Create environment.
- Set the Application name field to the name for your web application. (For this illustration, we use axexample-dotnet.)
- AWS Elastic Beanstalk will now create your environment; this can take a few minutes. When the process is complete, you are redirected to your environment’s dashboard.
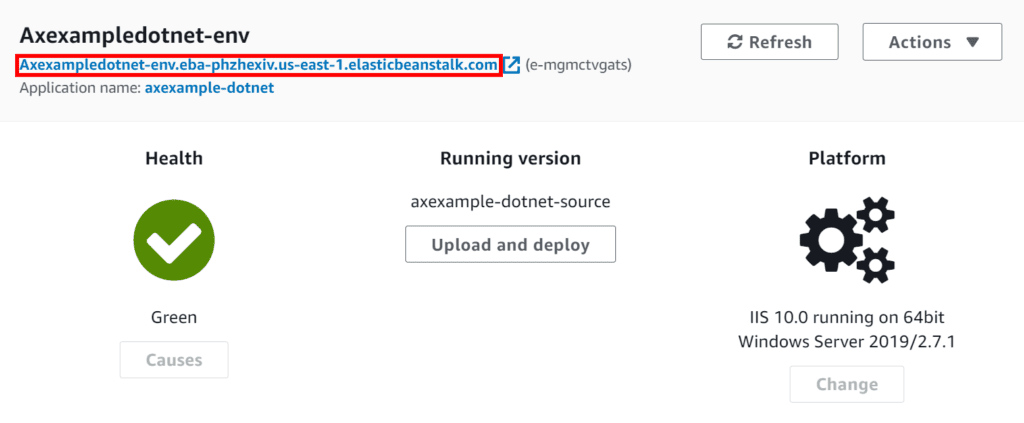
- Take note of your environment’s new URL created by AWS Elastic Beanstalk:
- You need this to create a CNAME to point to this URL.
- In this example, we would create a CNAME for eb.acunetixexample.com to point to axexampledotnet-env.eba-phzhexiv.us-east-1.elasticbeanstalk.com; here is an example using the Namecheap cPanel interface:

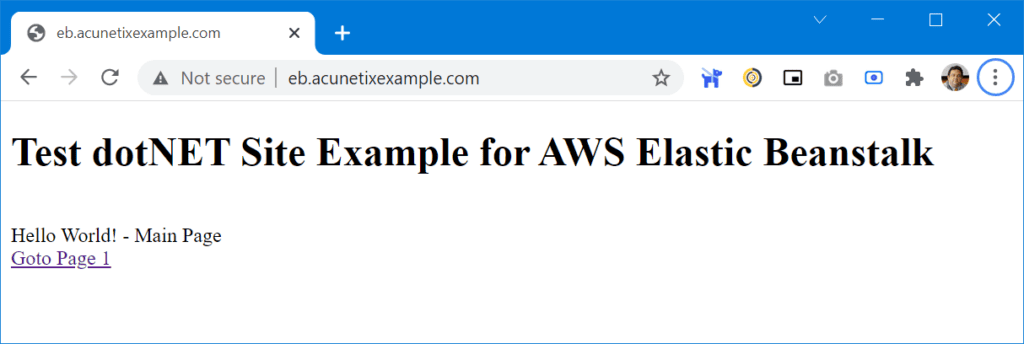
- Once the CNAME record has been added (giving time for DNS records to propagate), you can see the web application you have created by browsing to your URL (in this example http://eb.acunetixexample.com):
Step 5. Testing and scanning your web application
Point your browser to your web application – in this example http://eb.acunetixexample.com – to confirm it is running as intended; you will get the following:

You can run a scan on your target.