Invicti Standard – Form authentication – Configuration
Invicti Standard has a form authentication mechanism that makes it easy to configure scans for websites that require user authentication.
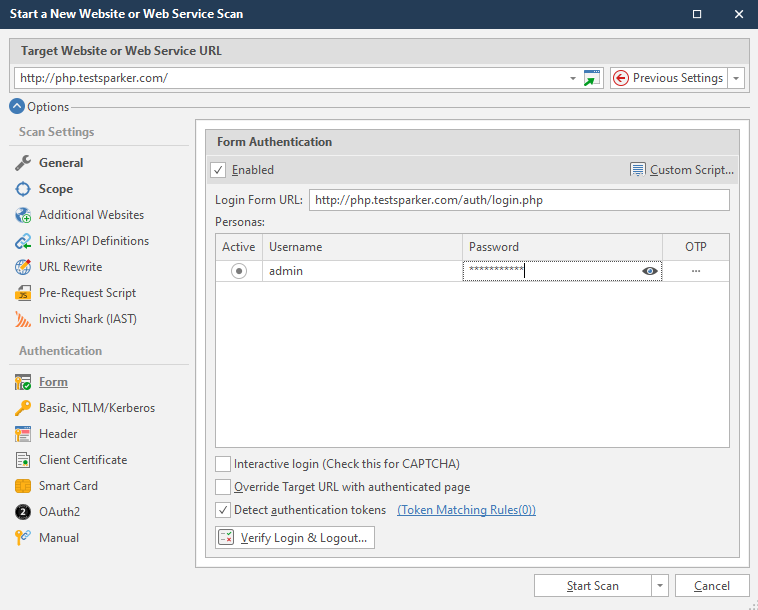
The form authentication mechanism in Invicti Standard fills and submits login forms on your websites by means of the DOM of the login form page. This means that it does so without the need to record any login macros. It automatically detects the login form components, the username, and the password inputs. It then populates them and submits the login form. To do this, you only need to configure:
- Login form URL
- Credentials (username & password)
For further information, see Custom Scripts for Form Authentication.
Form Authentication Fields
This table lists and describes the fields in the Form Authentication tab.
| Field | Description |
| Enabled | Select to enable Form Authentication. |
| Login Form URL | Enter the absolute URL of the login form, including the protocol (http or https). |
| Custom Script | Once you complete the Login Form URL field, the Custom Script button is enabled. Click Custom Script to open the dialog box. A browser window is displayed along with a script editor and Google Chrome browser developer tools. |
| Active | Select to make one of the Personas active (once you enter Username and Password credentials). |
| Username | Enter the username for the form. |
| OTP | Click the ellipsis to open the OTP Settings dialog. |
| Interactive login (Check this for CAPTCHA etc.) | Select to enable interactive logins, such as CAPTCHA. This displays the webpage during login to allow user input (for two-factor and other authentication mechanisms). |
| Override Target URL with authenticated page | Select to use the last page from the authentication process as the start URL. Invicti will not make a request to the specified Target URL. |
| Detect authentication tokens | Select to automatically intercept authentication tokens during the scan, if there is an AJAX request after the login. |
| Token Matching Rules | Select to enter a token regular expression if Invicti is required to get the token from a website other than the Target URL. Configure this option only if you want Invicti to capture the token from a website and then use the same token for different websites. |
| Verify Login & Logout | Click to verify all details, once Personas have been created. |
How to configure form authentication in Invicti Standard
- Open Invicti Standard.
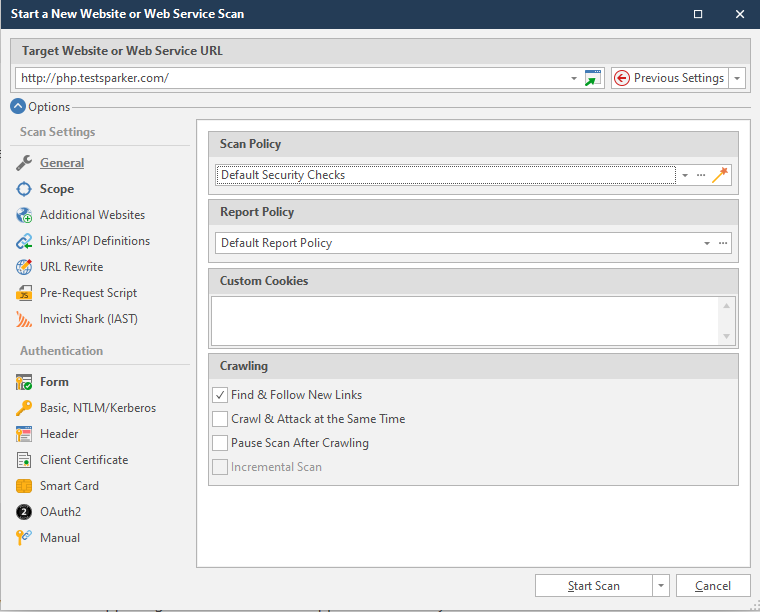
- From the Home tab, click New. The Start a New Website or Web Service Scan dialog is displayed.
- Select the Form tab. The Form Authentication section is displayed.

- Check the Enabled checkbox.
- In Login Form URL, enter the URL.
- In the Username field, enter a username.
- In the Password field, enter a password. Use the Show/Hide Password button (
 ) if required.

- If required, click the ellipsis in the OTP field (see Configuring Form Authentication using an OTP).
- Select Verify Login & Logout to verify the credentials. (For further information, see Verifying the Form Authentication Configuration in Invicti Standard.)
- Click Start Scan.
Configuring a Login Form URL
The login form URL that should be configured in Invicti is the URL of the page where your login form resides. Most websites have URLs like http://www.example.com/Login/ for their users to authenticate. It is also common for websites to have their login form on their homepages, usually somewhere located in the header or sidebar. If this is the case, specify your website’s home page URL in Invicti as the login form URL.
Invicti has a better chance of detecting and filling the login form on pages dedicated to the login operation, so always specify the dedicated login form URL if you have a login form both on your homepage and on a dedicated login page.
How to Configure a Login Form URL in Invicti Standard
- Open Invicti Standard.
- From the Home tab, click New. The Start a New Website or Web Service Scan dialog is displayed.
- Select the Form tab. The Form Authentication panel is displayed.
- Select the Enabled checkbox.
- In Login Form URL, enter the URL that contains your dedicated login form page.
- Continue from step 6 of How to Configure Automatic Form Authentication in Invicti Standard.
Configuring Multiple Sets of Credentials and URLs
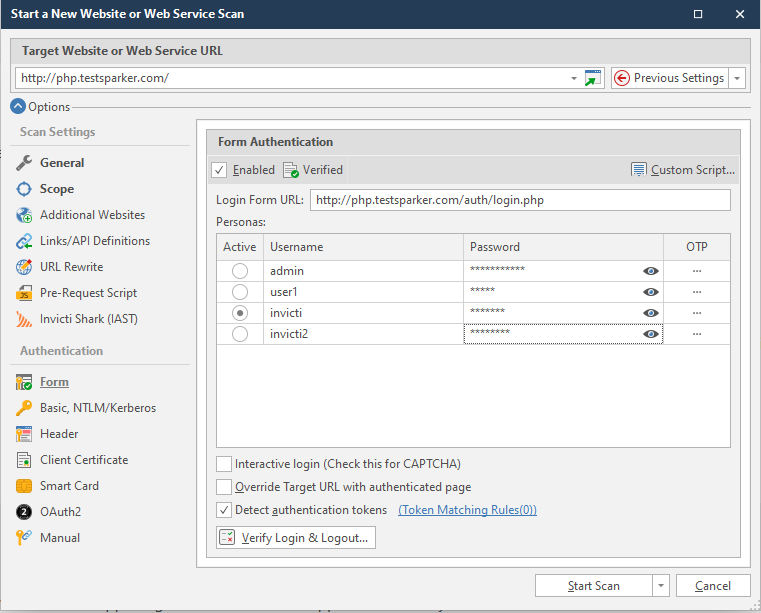
The other piece of information Invicti requires for authenticating during a web application security scan are the credentials. You can enter more than a single set of credentials to simulate the different kinds of personas your website supports, such as one for regular users and one for admin users. This way, you will be able to easily switch between accounts and perform authenticated scans with different user accounts which have different privileges.
How to Configure Multiple Sets of Credentials and URLs in Invicti Standard
- Open the Invicti Standard.
- From the Home tab, click New. The Start a New Website or Web Service Scan dialog is displayed.
- Select the Form tab. The Form Authentication section is displayed.
- Enable the Enabled checkbox.
- In Login Form URL, enter the URL.
- Click in the blank space below the first persona. A new space for another persona is displayed.
- In the Username field, enter the username.
- In the Password field, enter the password. Use the Show/Hide Password button (
 ) as required.

- Continue to add rows and login credentials for as many other personas as you need. (Remember that only one persona can be used in single scans. Different scans should be run for each persona.)

- Click Start Scan.
Configuring Form Authentication Using an OTP
Invicti Standard supports form authentication using a One-Time-Password (OTP). By providing this type of 2FA via a Secret Key, Invicti Standard enables the OTP to be filled in automatically so that Invicti can access and can scan all sections of the target website.
Two OTP Types are supported:
- Time-based (TOPT)
- HMAC-based (HOPT)
OTP Fields
This table lists and explains the fields in the OTP Settings dialog.
|
Button/Section/Field |
Description |
|
OTP Type |
This is the type of OTP. The two types are:
|
|
Secret Key |
This is a key that is used to generate the OTP and is provided by the target website. |
|
Digit |
This is the number of digits used to generate the OTP’s length. |
|
Period (seconds) |
This is the time (in seconds) after which an OTP is regenerated. |
|
Algorithm |
This is the encrypted algorithm. |
|
Generate OTP |
Click to generate a token. |
|
Read From QR Code |
Click to read from a QR (Quick Response) provided by the target website, to generate the OTP settings. |
How to Configure Form Authentication Using an OTP
- Open Invicti Standard.
- From the Home tab, click New. The Start a New Website or Web Service Scan dialog is displayed.
- Click the Form tab. The Form Authentication section is displayed.
- Check the Enabled checkbox.
- In the Login Form URL field, enter the URL.
- In the Username field, enter a username.

- In the Password field, enter a password. Use the Show/Hide Password button (
 ) if required.
 - In the OTP field, click the ellipsis for the relevant persona.
In Form Authentication settings, every persona has its own OTP settings. OTP settings open with default values.
In OTP Settings, If you have a link with a copied otpauth protocol, the settings will be changed automatically based on that link.
The OTP Settings dialog is displayed.

- In the OTP Type field, select the OTP type.
- In the Secret Key field, enter the secret key.
- In the Digit field, select an option.
- In the Period field, enter an option.
- In the Algorithm field, select an option.
- Click Generate OTP. If successful, an OTP is displayed along with a message, ‘OTP generated successfully.’.

- Click OK to save this OTP for the selected persona.
Configuring Form Authentication Using an OTP from a QR Code
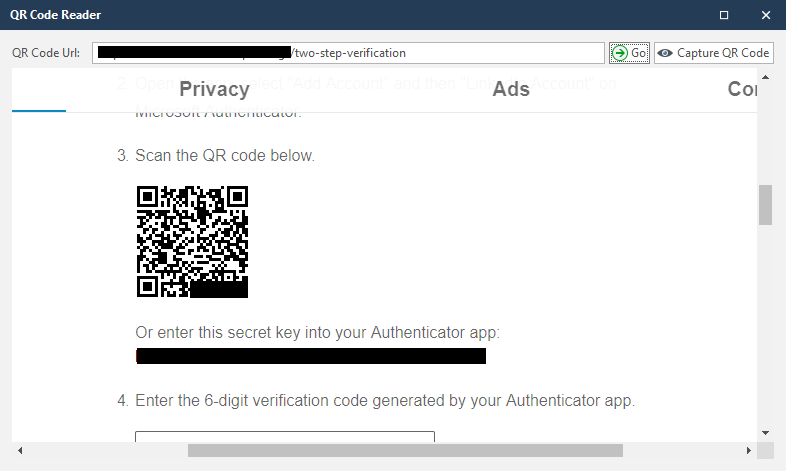
If you don’t have the information you need to complete the fields in the OTP Settings dialog, Invicti can retrieve them from a QR Code. Once the OTP settings are entered, Invicti will attempt to log in automatically. If this type of 2FA information is requested again after the initial login, Invicti will attempt to login automatically.
If Invicti does not automatically find the OTP field, the OTP field can be filled in using Custom Scripts.
For further information, see Custom Scripts for Form Authentication.
How to Configure an OTP from a QR Code
- Open Invicti Standard.
- From the Home tab, click New. The Start a New Website or Web Service Scan dialog is displayed.

- Click the Form tab.
- Check the Enabled checkbox.

- In Login Form URL, enter the URL.
- In the Username field, enter a username.
- In the Password field, enter a password.
- In the OTP field, click the ellipsis. The OTP Settings dialog is displayed.
- Click Read from QR Code. The QR Code Reader dialog is displayed.

- Click Capture QR Code. Invicti will capture the QR code and configure the settings in the OTP Settings dialog.
Problems with Form Authentication Login
The Invicti Standard form authentication configuration can be configured to use the Interactive Login feature to manually login to websites even when CAPTCHA or a one-time code is required. It also supports custom scripting, so if you have a complex login mechanism (for example, if your website performs several redirects before showing the login page) you can write a script to cater for such a setup. For further information, see Interactive Logins in Invicti Standard.
But if you notice that the scanner still cannot automatically log in and scan the password protected section on your website, open a new support ticket to tell Invicti support what the problem is, so that we can address the issue.
In the meantime, you can use any of these workarounds to scan a password protected website until we fix the issue:
Should you encounter any issues with scanning a password that requires authentication please do not hesitate to get in touch with our Support.