Deploying Shark for .NET in Invicti Enterprise On-Premises
Invicti Shark enables you to carry out interactive security testing (IAST) in your web application in order to confirm more vulnerabilities and further minimize false positives. For Invicti Shark to operate, you need to download an agent and deploy it on your server. Please note that this agent is generated uniquely for each target website for security reasons.
This topic explains how to download and copy the Shark files to your hard disk and install the Shark to your web application.
Deploying the Shark agent consists of 3 steps:
1. Downloading the Shark agent
You can find the required instructions to download the Shark agent in Deploying Invicti Shark.
You must install Prerequisites on the server hosting the website. The Shark installer application requires Microsoft .NET Framework 3.5 or higher.
2. Copying the Shark agent to web server
You need to copy the Shark installation files to the server hosting the .NET website.
3. Installing Invicti Shark
To install Invicti Shark, you need to follow the steps below.
How to install Invicti Shark for .NET websites
- Extract the Shark (IAST).zip file.
- Open the Injector.exe file.
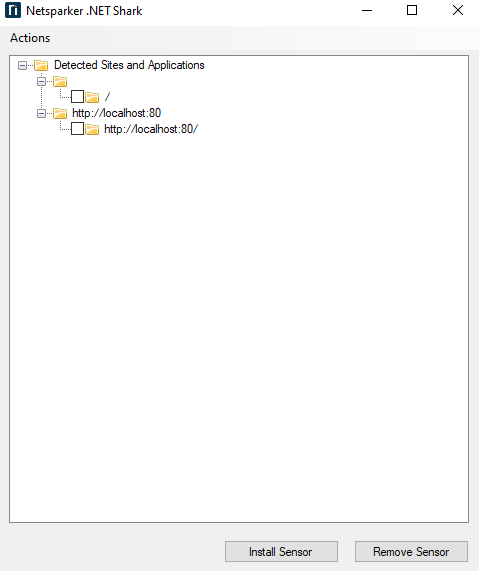
On start-up, the Injector will retrieve a list of .NET applications installed on your server.
- From the Invicti .NET Shark window, select the application(s).
- Select Install Sensor to install the Shark Technology sensor in the selected .NET applications. Wait for the installation to be over.
- Close the confirmation window and also the Shark manager.
How to remove Invicti Shark for .NET websites
- Open the Injector.exe file.
- Select the websites, then Remove Sensor
- Close the Invicti .NET Shark.
If needed, you can also uninstall the Invicti .NET Shark Manager from the Add/Remove Programs from the Settings.
Using Command Line to install or remove the Shark
You can install or remove the Shark using the command line.
Prerequisite
- Copy and extract Shark (IAST) to the server hosting the .NET website.
C:\Users\Administrator\Desktop\Shark(IAST)>injector -m inject -t http://localhost:86/yaf_forums
Target Found. Injecting sensor to: http://localhost:86/yaf_forums

C:\Users\Administrator\Desktop\Shark(IAST)>injector -m uninject -t http://localhost:86/yaf_forums
Target Found. Uninjecting sensor from: http://localhost:86/yaf_forums

C:\Users\Administrator\Desktop\Shark(IAST)>injector -m list -t http://localhost:86/yaf_forums
http://localhost:86/
http://localhost:86/yaf_forums
http://localhost:86/kartris
http://localhost:86/bugnet

C:\Users\Administrator\Desktop\Shark(IAST)>
The -m switch can be:
- inject – to inject the Shark agent into a web application
- uninject – to remove the Shark agent from a web application
- list – to list the web application on the web server
The -t switch should specify the URL for which you wish to inject or remove the Shark agent
Note: If the web application is at the root of a URL path, you must include a forward slash at the end of the URL (in this example, http://localhost:86/); if the web application is in a subfolder, you must not include a forward slash at the end of the URL (in this example, http://localhost:86/yaf_forums)
Although the Invicti Shark agent is secured with a unique strong built-in password, it is recommended that the Shark client files are uninstalled and removed from the web application if they are no longer in use.
Deploying Invicti Shark for .NET manually
You need to download the Invicti Shark for .NET. To do so, you can find the required instructions to download the Shark agent in Deploying Invicti Shark. After the download, extract the downloaded ZIP file in any directory. For this illustration, we use the following folder: C:\Shark
How to deploy Invicti Shark for .NET manually
- Open a PowerShell or CMD with administrator privileges.
- Navigate to the .NET Framework folder in the Shark folder you created.
- Run the following command:
run the command ‘Injector.exe -m extract’ - Copy the newly created DLLs and settings.ini to the target application’s bin folder.
- Open settings.ini and edit the entry ‘log.path’ to reflect ‘
log.path=C:\inetpub\temp\IIS Temporary Compressed Files\logs’ - To install the IIS HTTP Module, add the following to the web application’s web.config:
<configuration>
  <system.webServer>
    <modules>
      <add name="InvictiSensorModule" type="SensorModule.RequestsHandlerModule, SensorModule, version=5.0.0.0, culture=neutral, publicKeyToken=068f0ac6f5c4405b" />
    </modules>
  </system.webServer>
</configuration>
- To load the SensorProfiler.dll .NET profiler, you need to add the following environment variables; do this by changing the IIS application-host config file: “%windir%\System32\inetsrv\config\applicationHost.config”
COR_PROFILER={F23266E3-B53E-44EB-862C-D7DDB4C620D0}
COR_ENABLE_PROFILING=1
COR_PROFILER_PATH=<SensorRoot>/SensorProfiler.dll
SENSOR_SETTINGS_PATH=<SensorRoot>/settings.ini
- Restart the test application in IIS. (You might need to restart the W3SVC service for the changes to take effect.)