Configure Invicti for AWS
Invicti Enterprise can be configured to run scanner agents on Amazon Web Services (AWS). When you launch a new scan, Invicti Enterprise creates a new instance for the target scan and terminates it automatically once the scan is completed.
This document explains how to configure Invicti Enterprise to run scanner agents on AWS (Windows OS). For Linux instructions, refer to Configuring Invicti Enterprise for Linux on Amazon Web Services (Ubuntu). For more information about using Cloud Providers with Invicti Enterprise, refer to Cloud Provider Settings.
First, you need to install and configure the scanner agent on an EC2 instance and then create a machine image (AMI) to use as a base instance.
These are the stages to this process:
- Select a region
- Create S3 buckets
- Create IAM users and policies
- Create an AMI for the scanner agent
- Configure Invicti Enterprise
- Update the scanner agent
Select a region
Invicti Enterprise uses AWS S3 buckets for object storage and EC2 service for launching new instances.
For information on how to select a region, refer to Amazon's EMR documentation.
NOTE: S3 and EC2 resources need to be in the same AWS region. Choose an AWS region and create all resources in that same region. |

Create S3 buckets
Invicti Enterprise needs three different buckets to store scan data. Follow the steps below to create S3 buckets.
- Open the AWS console and navigate to the S3 service.
- Create 3 buckets. One for raw scan data, one for screenshots, and one for customizations. These bucket names could be used:
- exampleinc.ne.scandata (for raw scan data)
- exampleinc.ne.scanscreenshots (for form authentication screenshots)
- exampleinc.ne.customizations (for customizations)
You can apply the following precautions to harden your buckets.
- Enable Encryption: Amazon provides a default encryption service or you can use your own keys. For more information, refer to Amazon S3 default encryption for S3 buckets.
- Monitoring and Auditing: Amazon provides ways to monitor and audit S3 buckets. For more information, refer to Amazon S3 Monitoring and Auditing Best Practices.
Create IAM Users & Policies
During this step, you create the following:
- Access policy for the web application
- Access policy for the scanner agent
- Authorisation for the web application
- Option 1: Create a user for the web application
- Option 2: Create an IAM Role for the EC2 instance hosting your web application
How to create an access policy for the web application
- In the AWS console, navigate to the IAM service.
- Select Policies.
- Click Create Your Own Policy.
- Enter a policy name (e.g. NEWebAppPolicy).
- Enter your bucket names in the policy template code below and paste it into the Policy Document field.
{ "Statement": [ { "Action": [ "s3:*" ], "Effect": "Allow", "Resource": [ "arn:aws:s3:::exampleinc.ne.scandata/*", "arn:aws:s3:::exampleinc.ne.scanscreenshots/*", "arn:aws:s3:::exampleinc.ne.customizations/*" ] }, { "Action": [ "ec2:CreateTags", "ec2:DeleteTags", "ec2:DescribeInstances", "ec2:RunInstances", "ec2:TerminateInstances" ], "Effect": "Allow", "Resource": "*" } ], "Version": "2012-10-17" } |
- Click Create Policy.
How to create an access policy for the scanner agent
- Select Policies.
- Click Create Your Own Policy.
- Enter a policy name for the scanner agent (e.g. NEAgentPolicy).
- Enter your bucket names into the policy template code below, and paste it into the Policy Document field.
{ "Statement": [ { "Action": [ "s3:DeleteObject", "s3:PutObject" ], "Effect": "Allow", "Resource": [ "arn:aws:s3:::exampleinc.ne.scandata/*", "arn:aws:s3:::exampleinc.ne.scanscreenshots/*" ] }, { "Action": [ "s3:ListBucket" ], "Effect": "Allow", "Resource": [ "arn:aws:s3:::exampleinc.ne.customizations", "arn:aws:s3:::exampleinc.ne.scandata", "arn:aws:s3:::exampleinc.ne.scanscreenshots" ] }, { "Action": [ "s3:GetObject" ], "Effect": "Allow", "Resource": [ "arn:aws:s3:::exampleinc.ne.customizations/*", "arn:aws:s3:::exampleinc.ne.scandata/*", "arn:aws:s3:::exampleinc.ne.scanscreenshots/*" ] } ], "Version": "2012-10-17" } |
- Click Create Policy.
Authorisation for the web application
Option 1: Create a user for the web application
- Select Users.
- Click Add User.
- Enter a user name (e.g. NEWebApp).
- After creating the user, select Permissions.
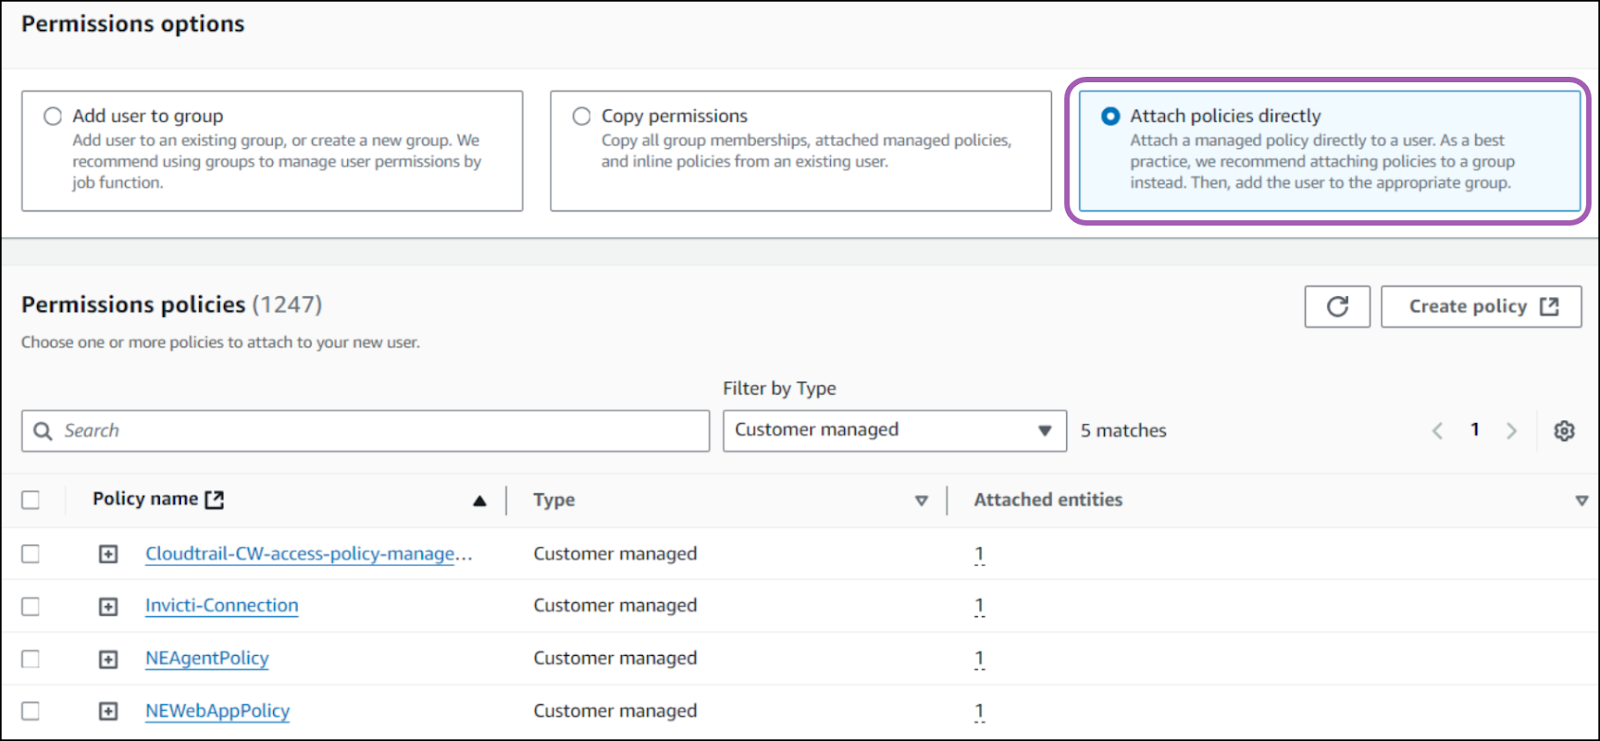
- Select Attach policies directly and use the Customer managed filter.
- Select the previously created web app policy (e.g. NEWebAppPolicy).
- Click Attach existing policies directly.
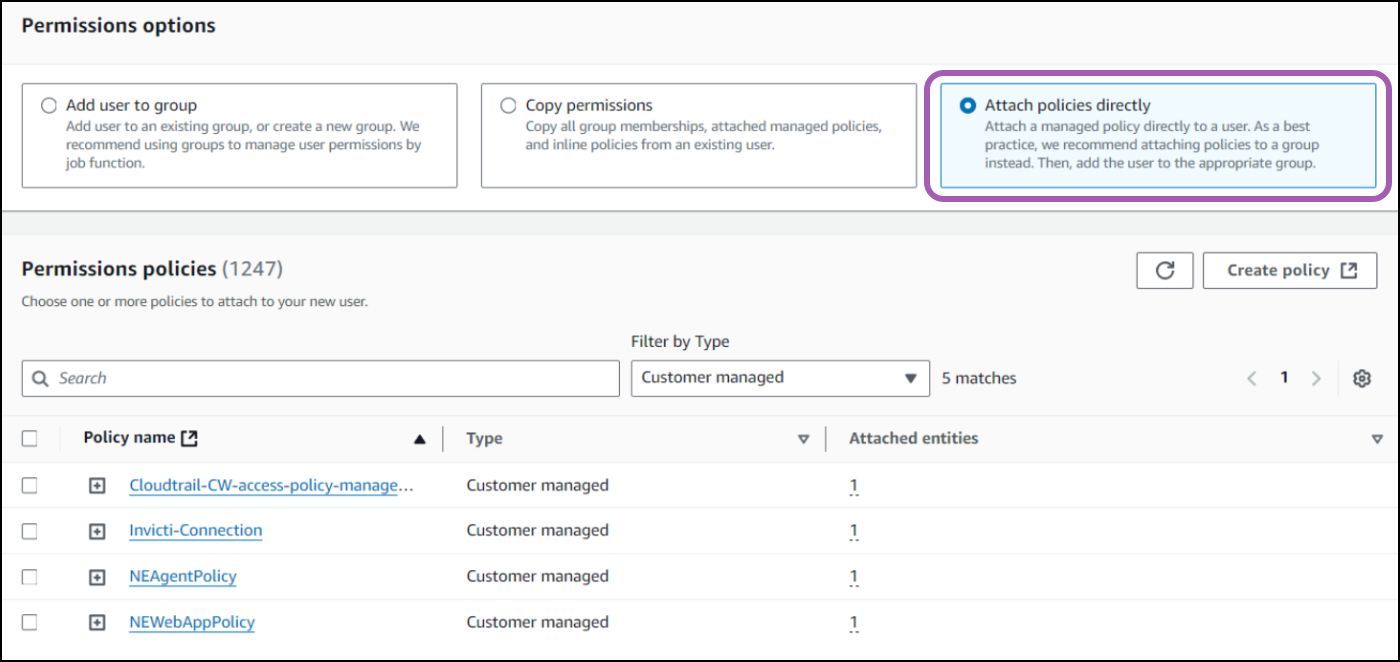
- Click Next to create the web app user.
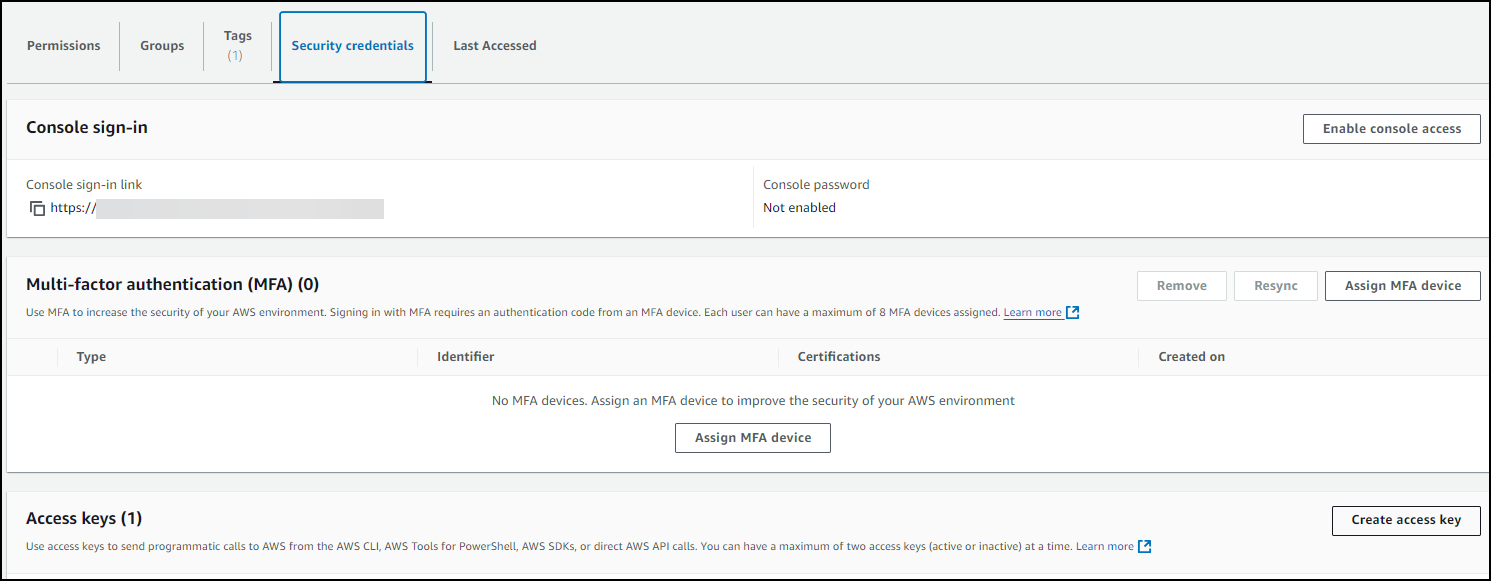
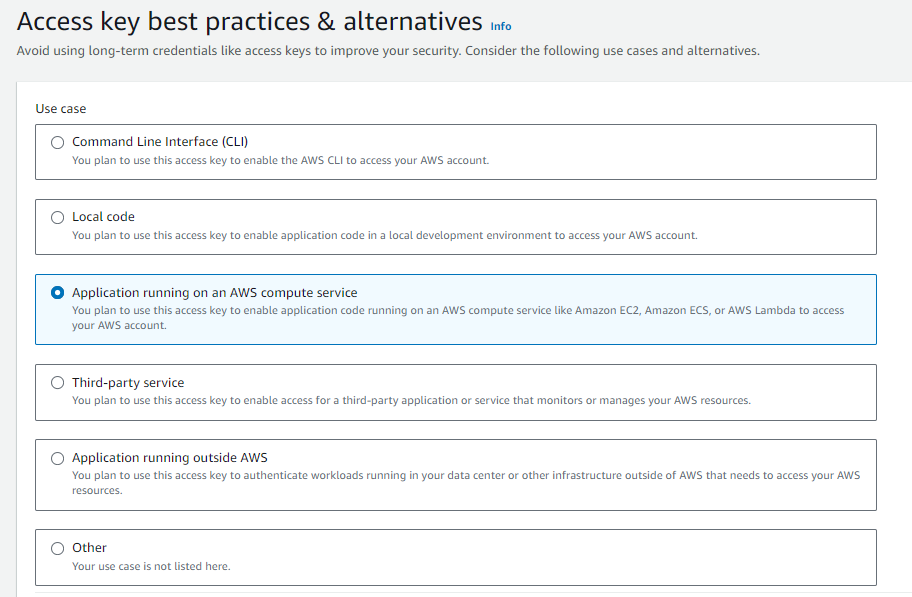
- To create your Access Keys, select the NEWebapp user from the IAM page.
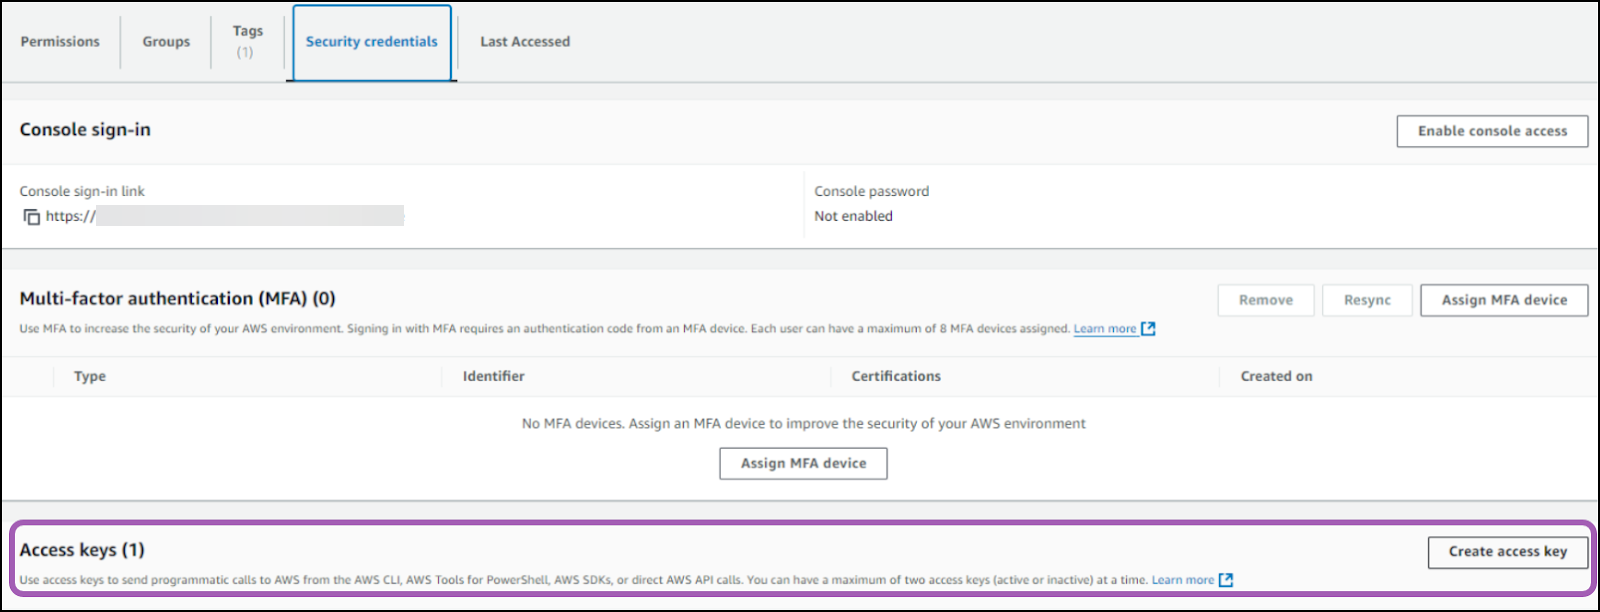
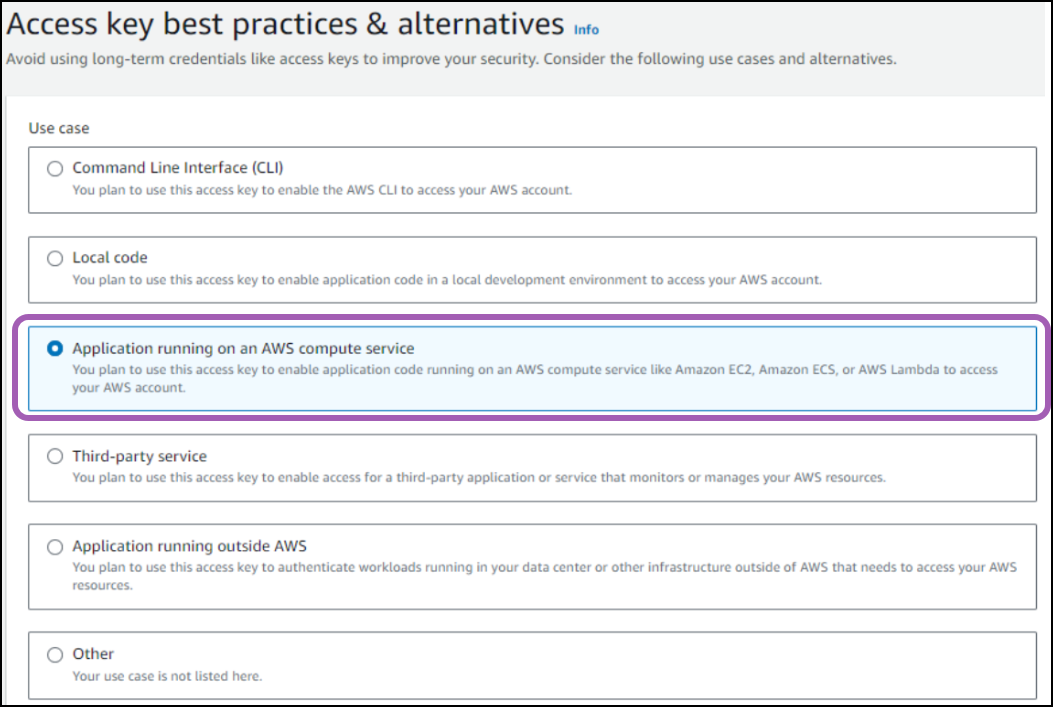
- Open the Security credentials tab, scroll down to Access Keys, and select the option Application running on an AWS compute service.
- Copy those into your notes for the Cloud Provider settings.
Option 2: Create an IAM Role for the EC2 instance hosting your web application
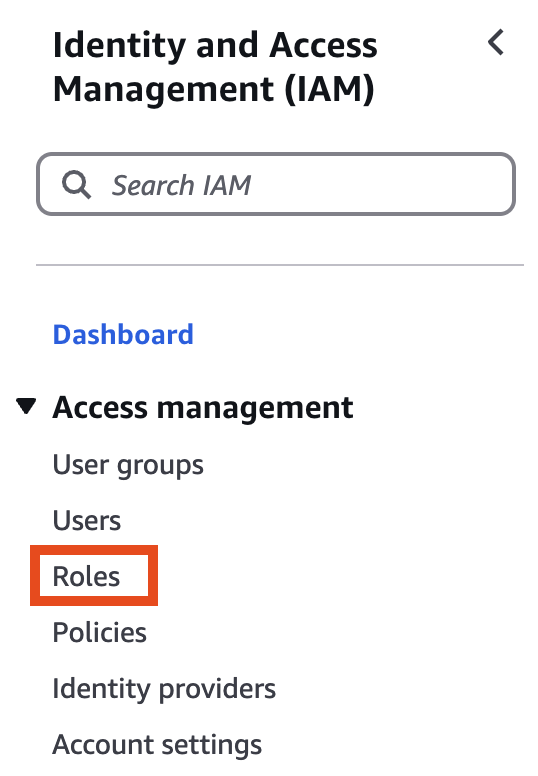
- From AWS IAM, select Roles from the sidebar
- Create a new role

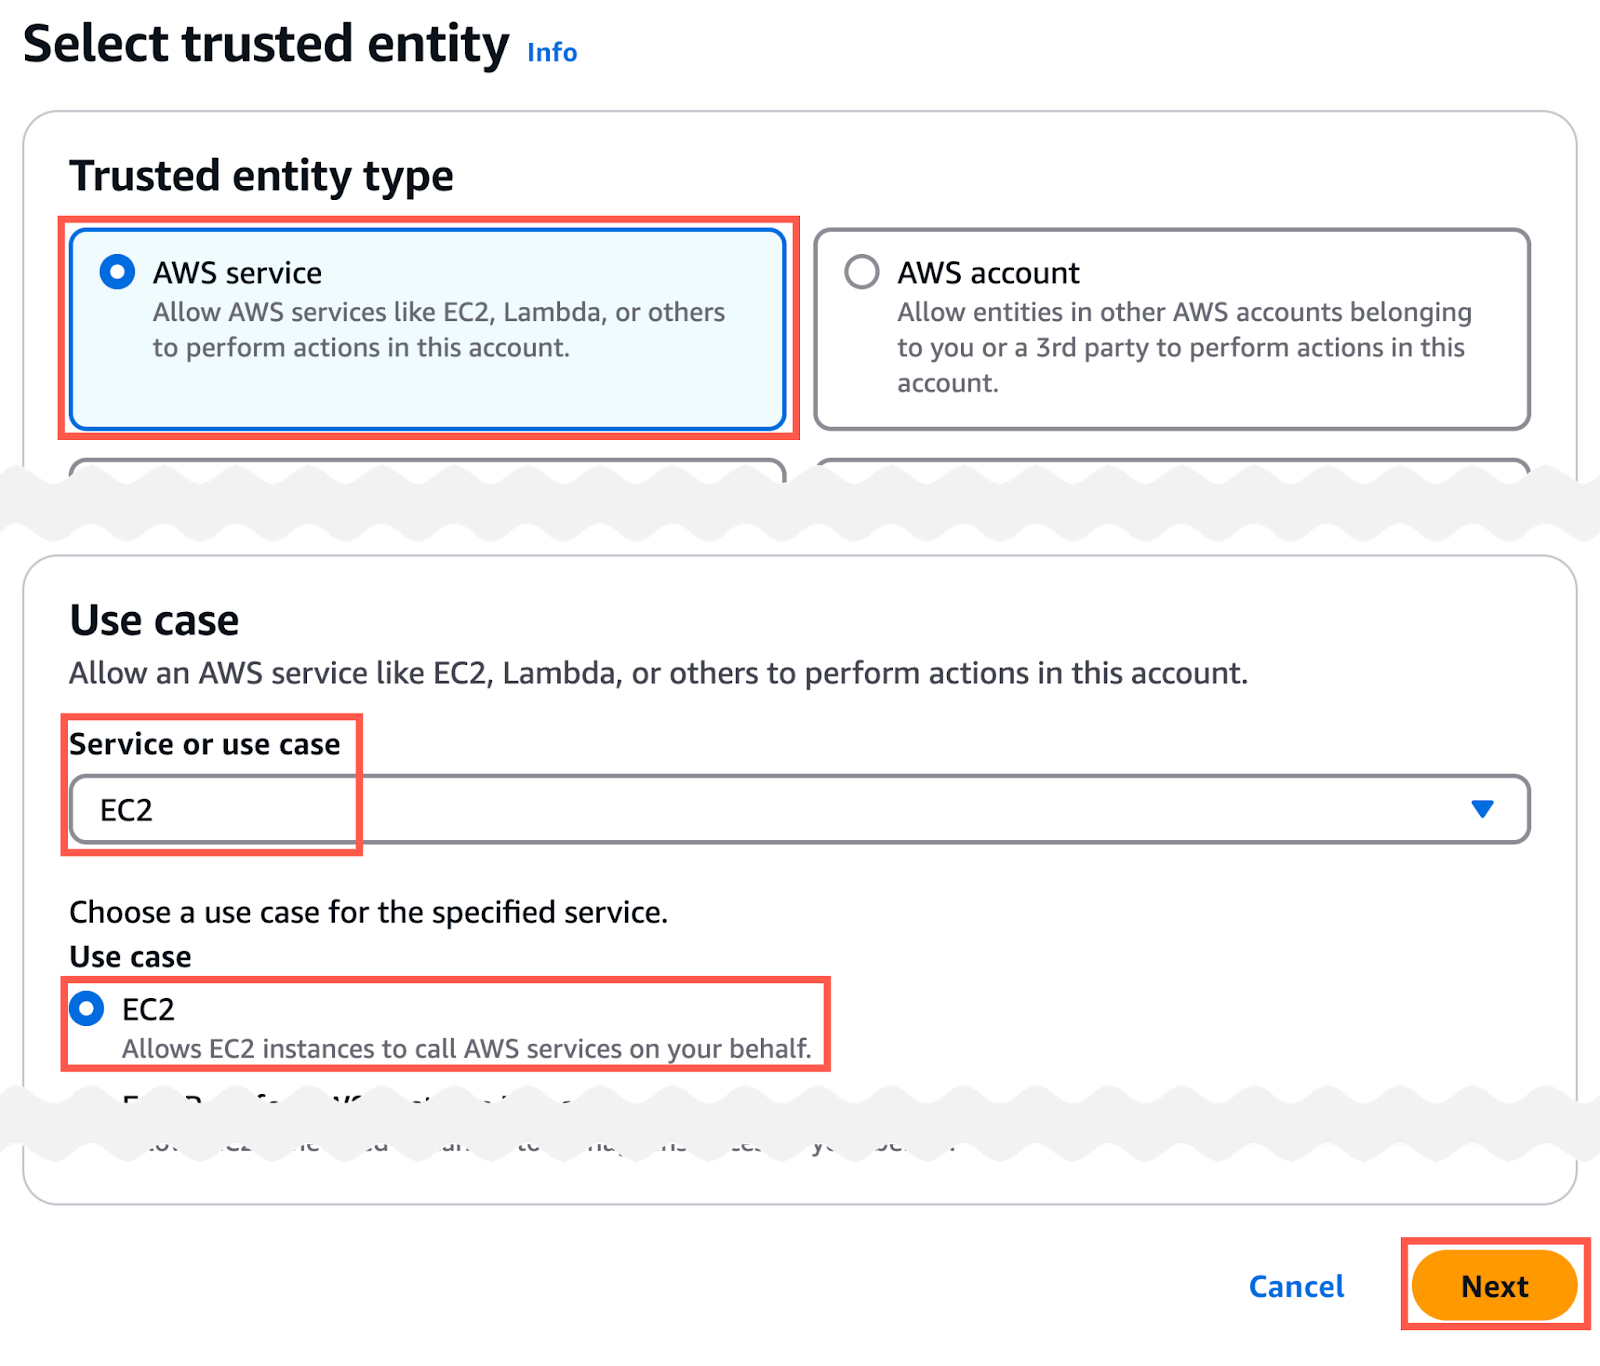
- In the Select trusted entity page:
- set the Trusted entity type to AWS Service
- set the Service or use case field to EC2
- click the Next button
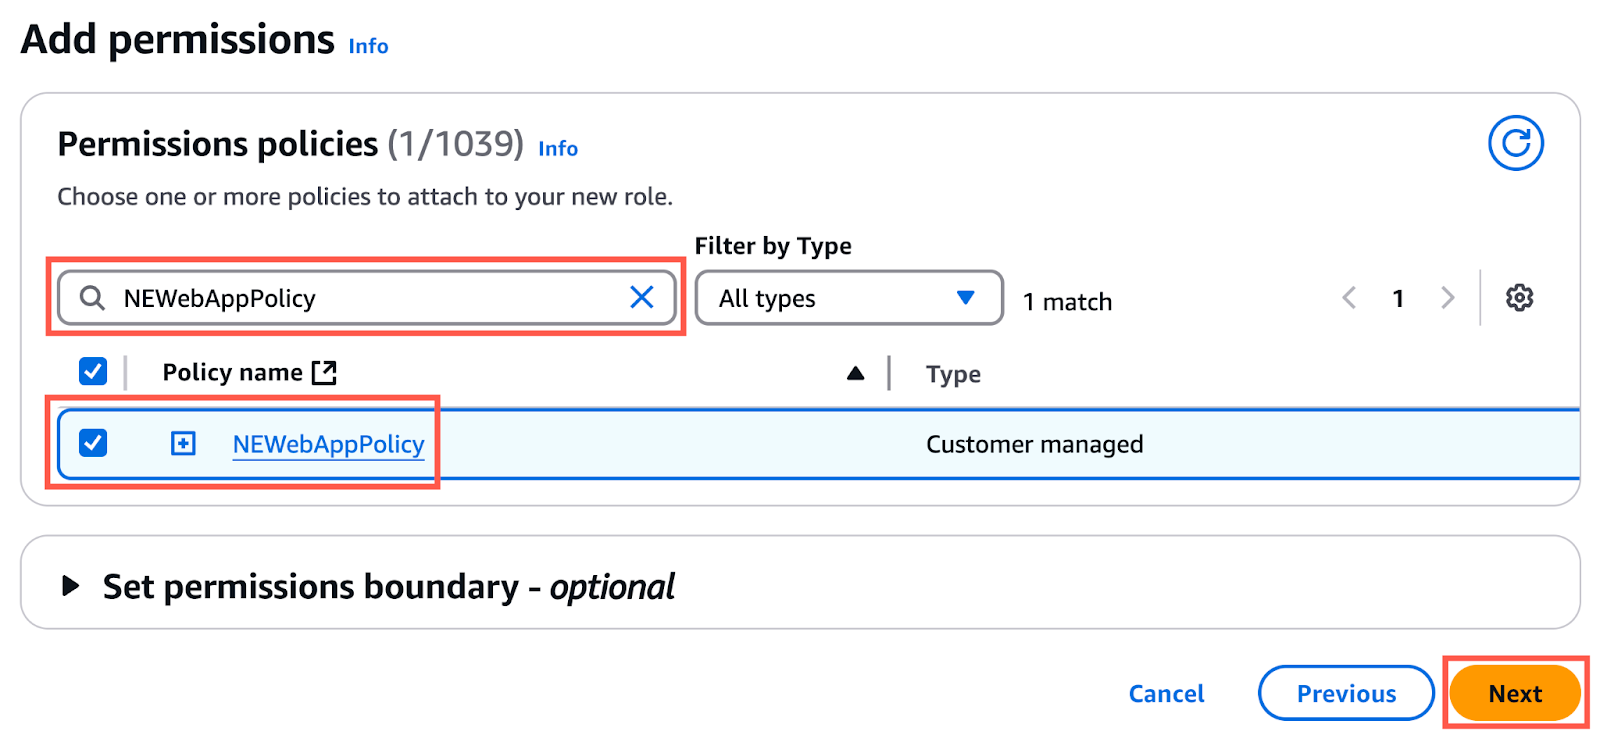
- In the Add permissions page
- search for the policy you created earlier (in this example, NEWebAppPolicy)
- select your policy
- click the Next button
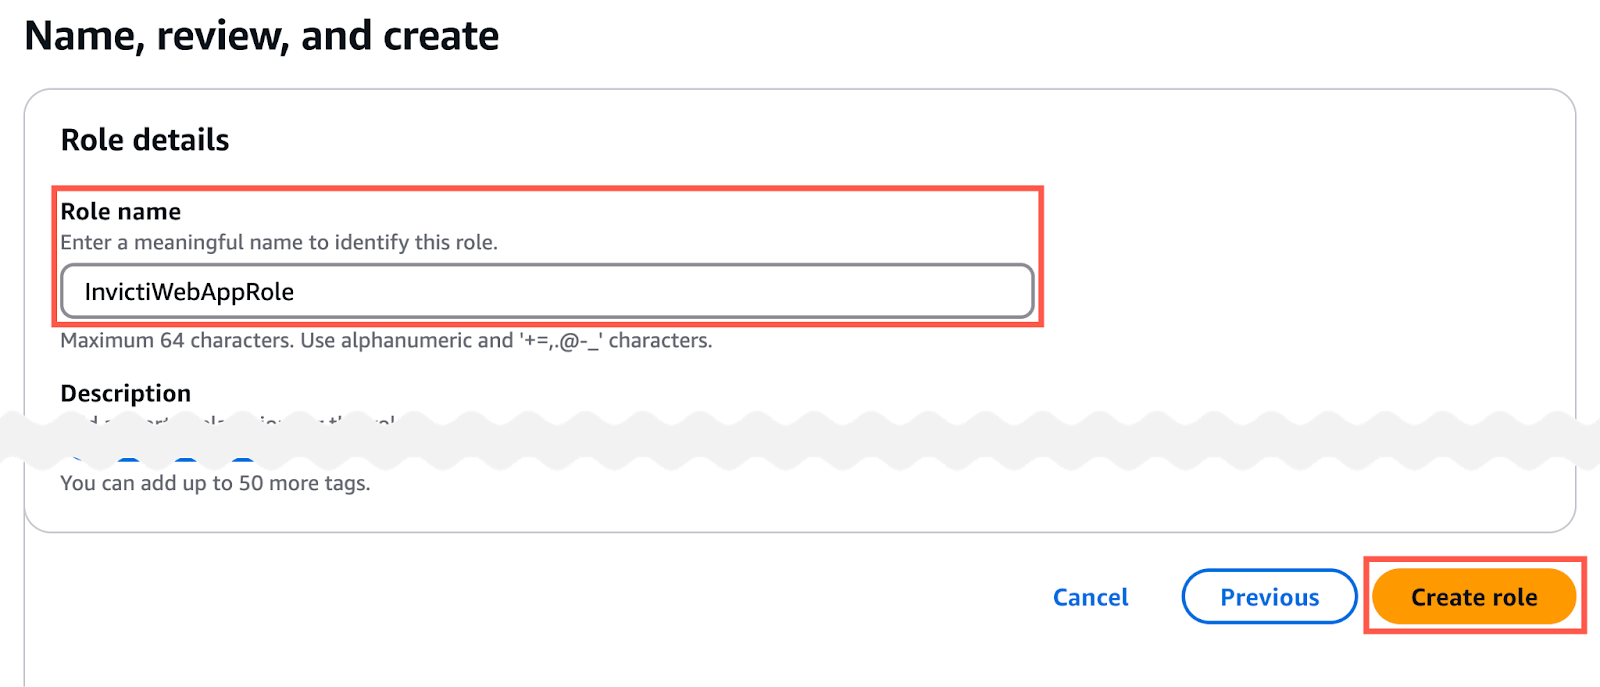
- In the Name, review, and create page:
- set the Role name field (in this example: InvictiWebAppRole)
- scroll to the bottom of the page and click the Create role button
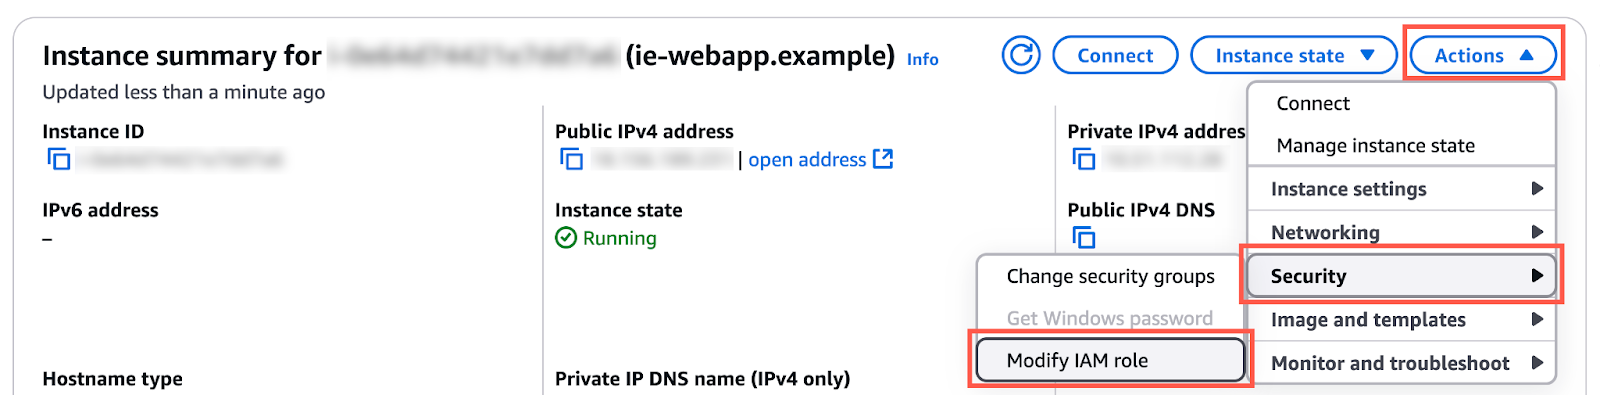
- From AWS EC2, select Instances from the sidebar
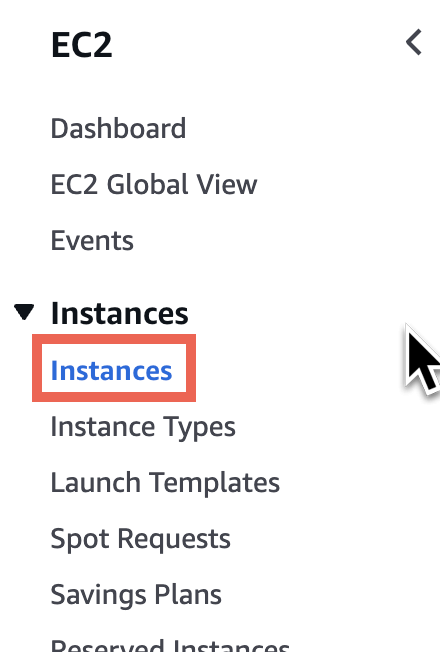
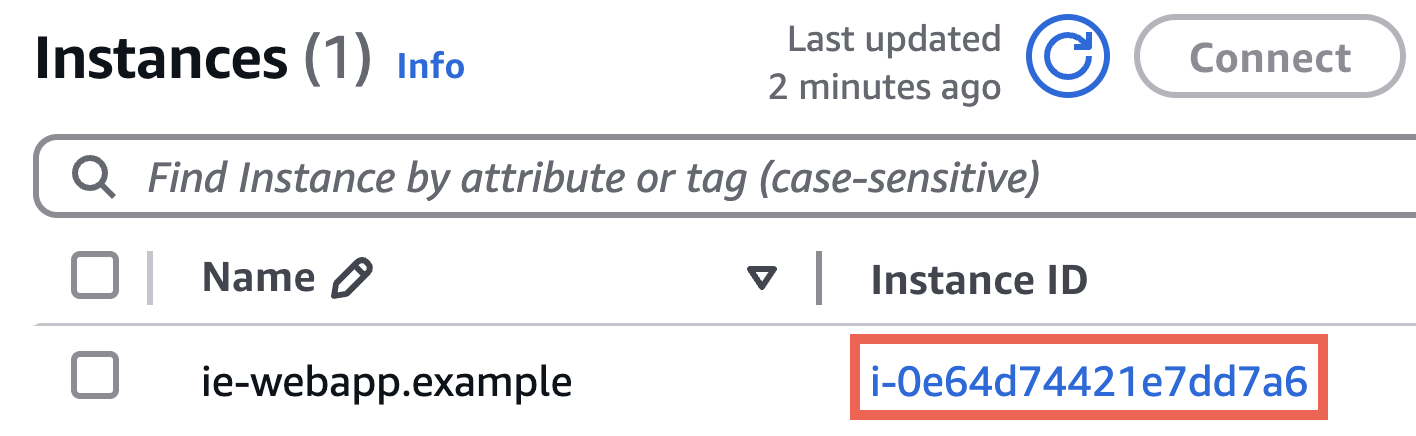
- Identify your Web Application EC2 instance, and click on the instance id
- Select the Actions -> Security -> Modify IAM role option
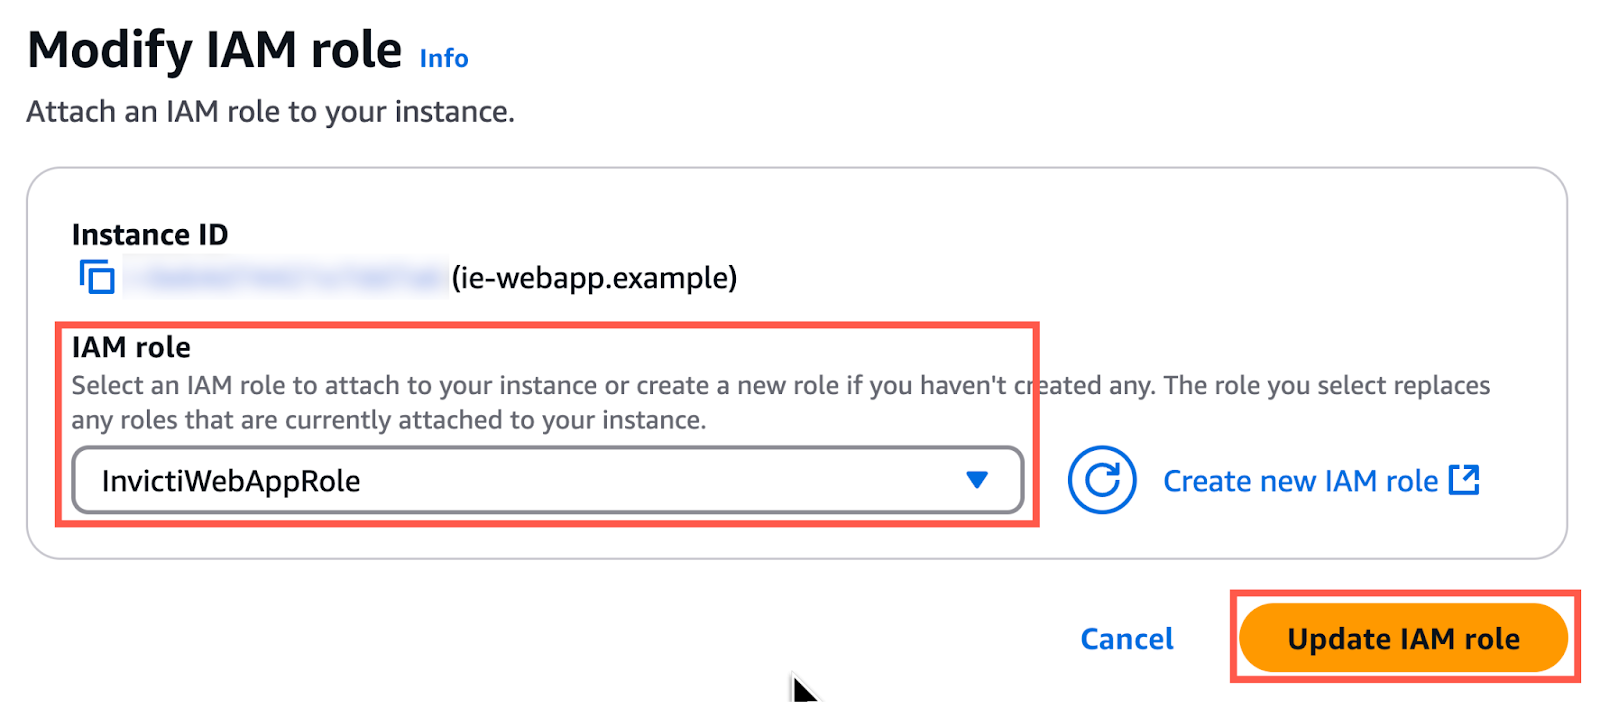
- In the Modify IAM role page:
- Set the IAM Role field to your role (in this example InvictiWebAppRole)
- Click the Update IAM role button
How to create a user for the scanner agent
- Click Users.
- Click Add User.
- Enter a user name (e.g. NEAgent).
- After creating the user, select Permissions.
- Select Attach policies directly and use the Customer managed filter.
- Select the previously created web app policy (e.g. NEAgentPolicy).
- Select Attach policies directly.
- Click Next to create the NEAgent user.
- Select the NEAgent user from the IAM page to create your Access Keys.
- Open the Security credentials tab, scroll down to the Access Keys section, and select the option Application running on an AWS compute service.
- Copy those into your notes for the Cloud Provider settings.
Create an AMI for the Scanner Agent
You will need to:
- Launch an instance for the scanner agent
- Configure the scanner agent instance
- EC2 launch and shutdown with Sysprep
- Creating a scanner agent image
How to launch an instance for a scanner agent
- Navigate to the EC2 service.
- Select Instances, from the main menu.
- Click Launch Instance.
- Select Microsoft Windows Server 2022 Base as the AMI.

- Click Choose Instance Type and select an Instance Type (c4.large is recommended).

- Click Configure Instance.
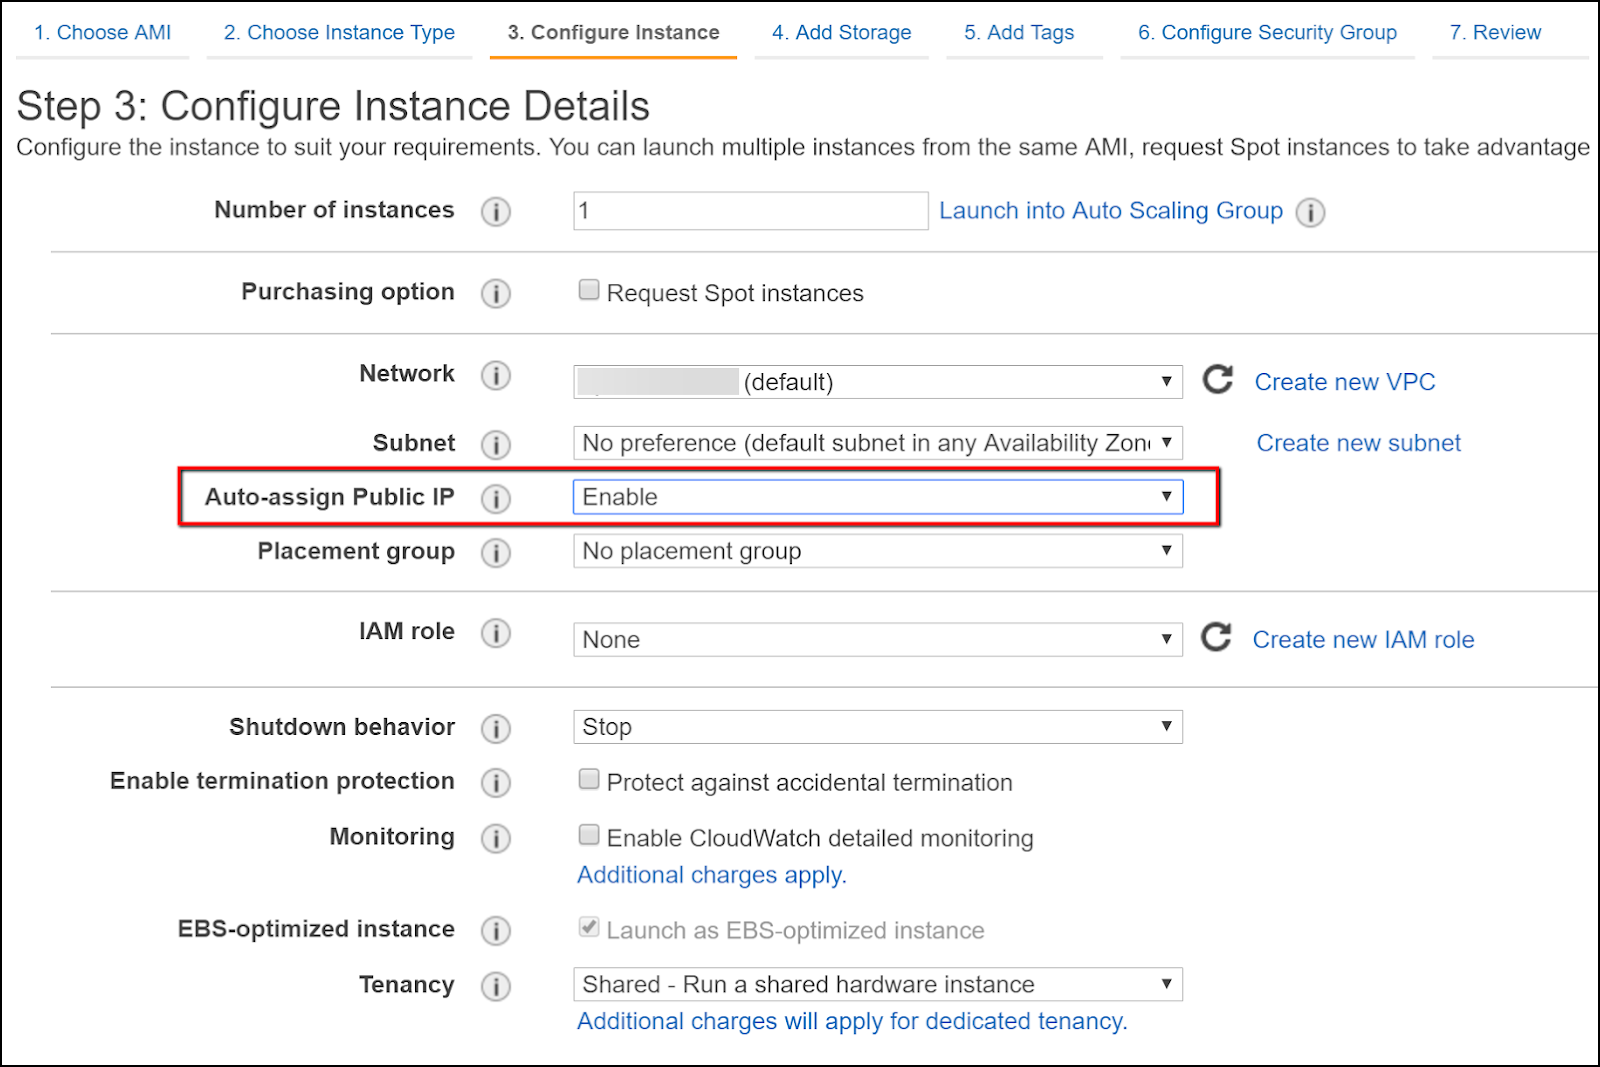
- Set the Auto-assign Public IP dropdown to Enable. (This is needed for RDP connections.)
- Click Next: Add Storage and set the Disk Size (a minimum of 30 GB is recommended).
- Click Next: Add Tags.
- Click Next: Configure Security Group.
- Click Review and Launch.
Next, you need to install the Invicti Scanner Agent to the target EC2 instance.
How to configure a scanner agent instance
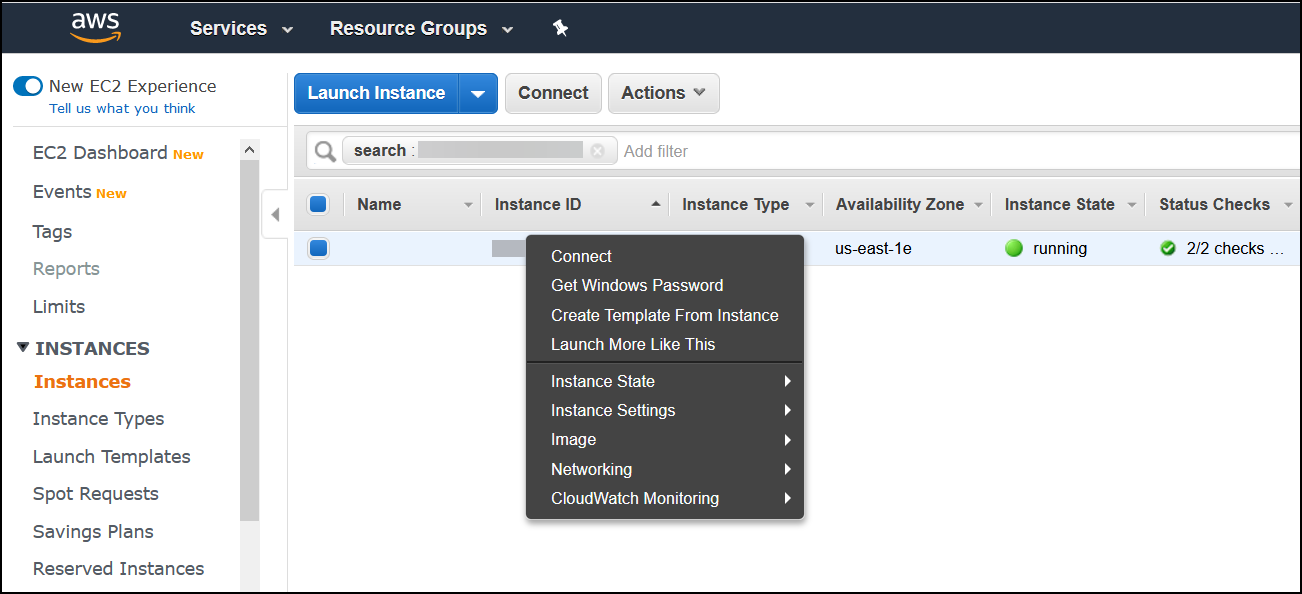
- Navigate to the EC2 service.
- From the main menu, click Instances.
- Right-click the previously launched scanner agent instance, and click Connect.
- Connect to your instance with the supplied RDP information.
- Ensure that you can connect to your on-premises Invicti Enterprise web application from this instance via the built-in browser.
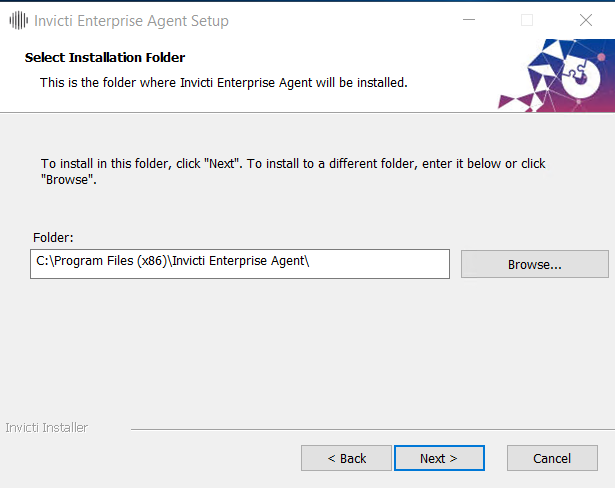
- Download and extract InvictiEnterprise.zip AgentSetup.exe into your instance.
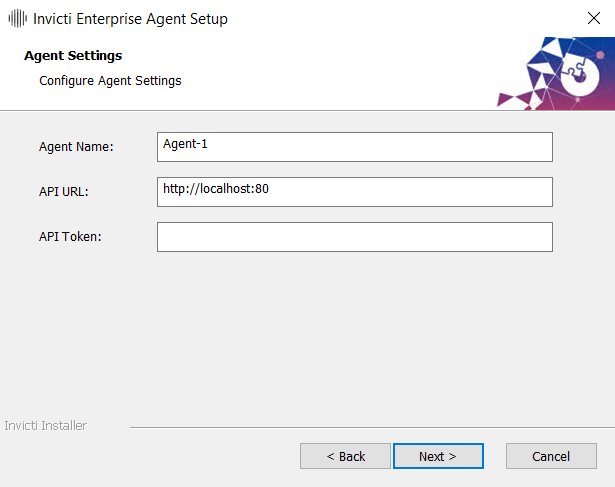
- Run AgentSetup.exe and install the scanner agent. Enter the required information asked by the agent installation wizard. For API Token, navigate to the Configure New Agent page by clicking Agents > Manage Agents > Configure New Agent.
- Start a command prompt and type: cd C:\Program Files (x86)\Invicti Enterprise Agent.
- By default, the scanner agent is not configured to run in AWS. Enter this command to uninstall the scanner agent's Windows service:
Netsparker.Cloud.Agent.exe /u. - Open the agent’s configuration file with a text editor: C:\Program Files (x86)\Invicti Enterprise Agent\appsetting.json
- Navigate to the Agent Info section and set Agent Type to Cloud.
- Save the appsetting.json file.
- Type this command to re-install the scanner agent windows service: Netsparker.Cloud.Agent.exe /i.
- Open Microsoft Services
- The installed agent's Windows Service’s Startup Type needs to be changed to 'Automatic'.
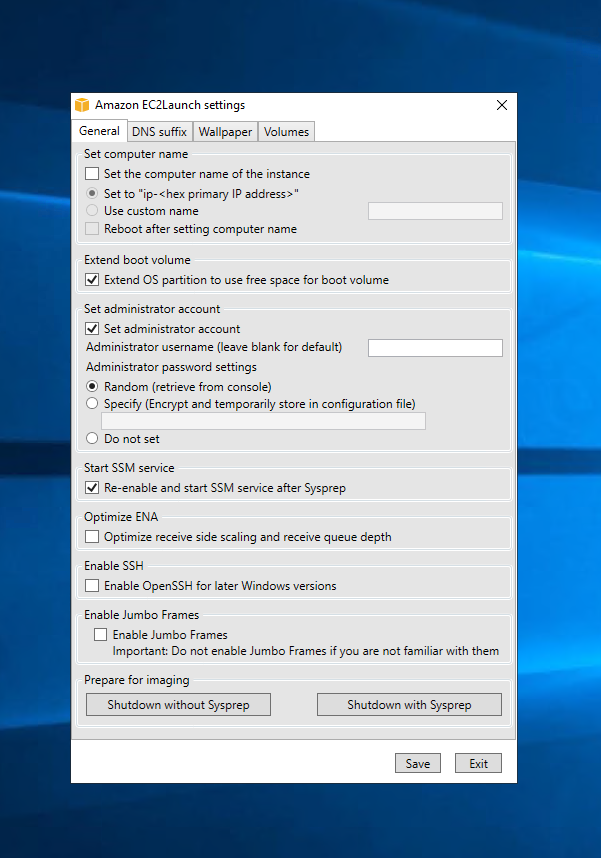
EC2 Launch and Shutdown with Sysprep
- If you do not have EC2 Launch, you can download it directly from Amazon.
- Once the file is extracted, navigate to the EC2Launch Scripts folder in Powershell by copying and pasting the path from the File Browser or via Powershell. It should look something like this:
<C:\ProgramData\Amazon\EC2-Windows\Launch\Scripts>
- Run the script with the -Schedule flag: .\InitializeInstance.ps1 -Schedule
- Open Amazon EC2Launch via Windows search and Shutdown w/Sysprep
Next, you need to create an AMI that will be used as a base image for new scans.
How to create a scanner agent image
- Open the EC2 instances page on the AWS console.
- Select the EC2 instance and from the Actions menu click Instance State > Stop/ Wait for the agent instance to be stopped.
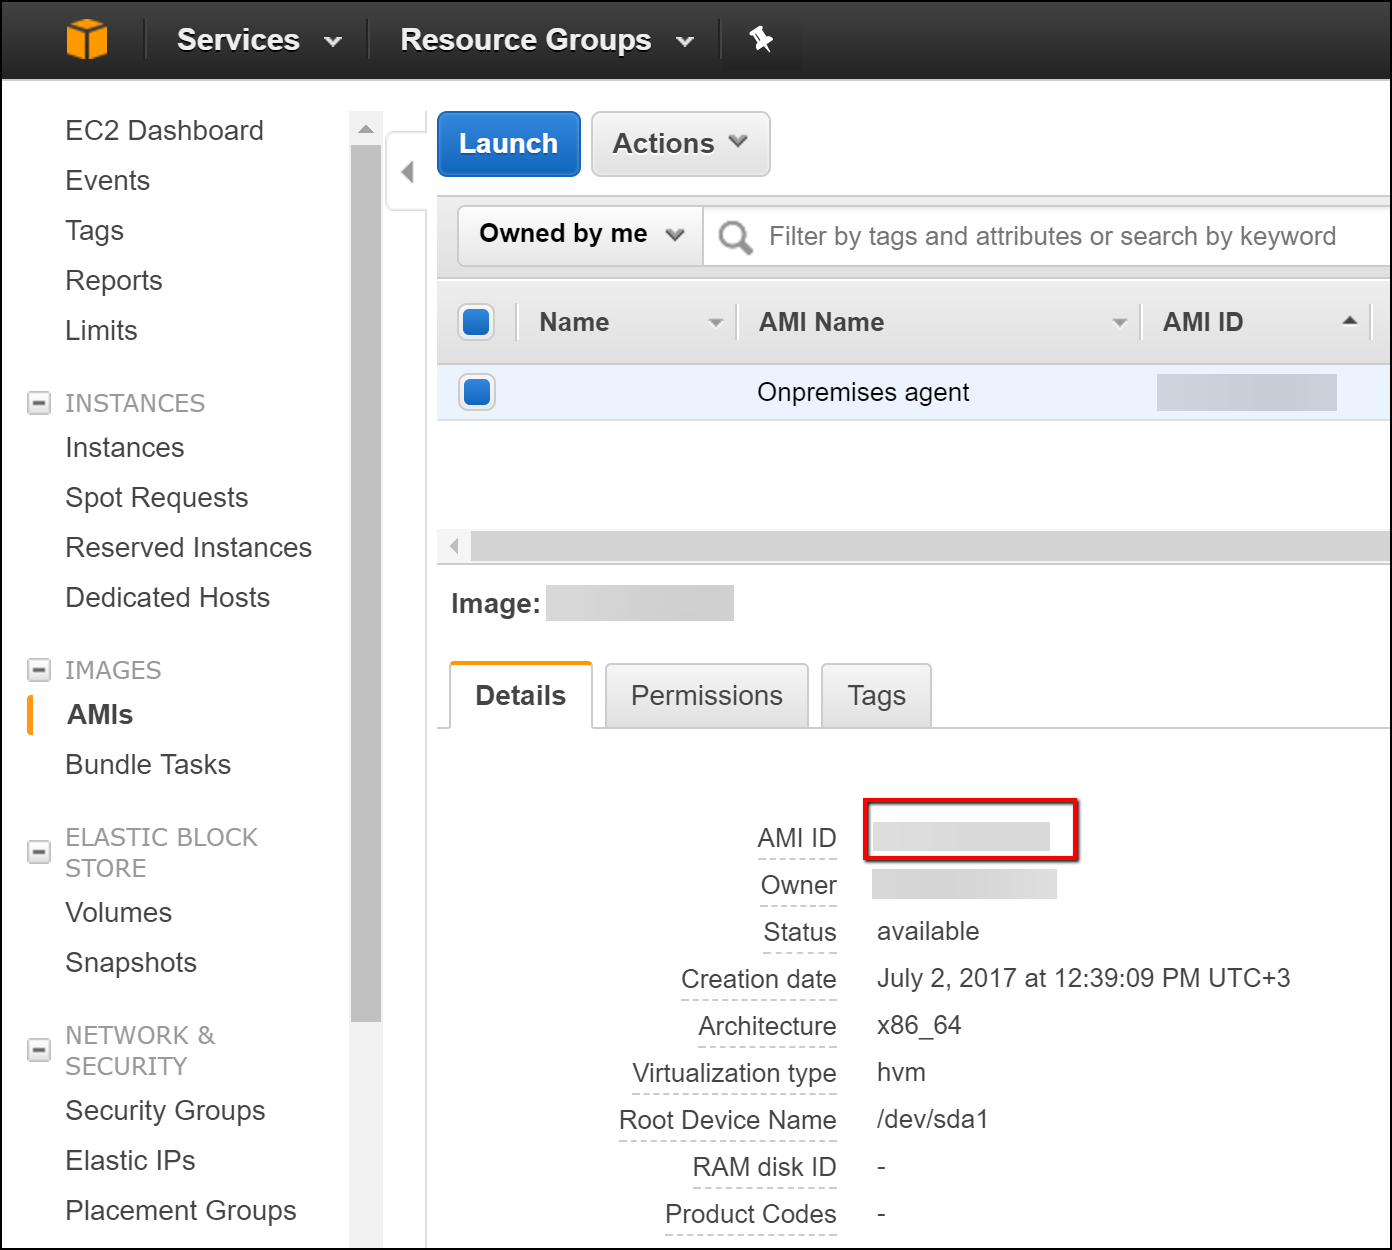
- Once the agent instance has stopped, right-click on it, and click Create Image. Enter a name for your image and click Create Image.
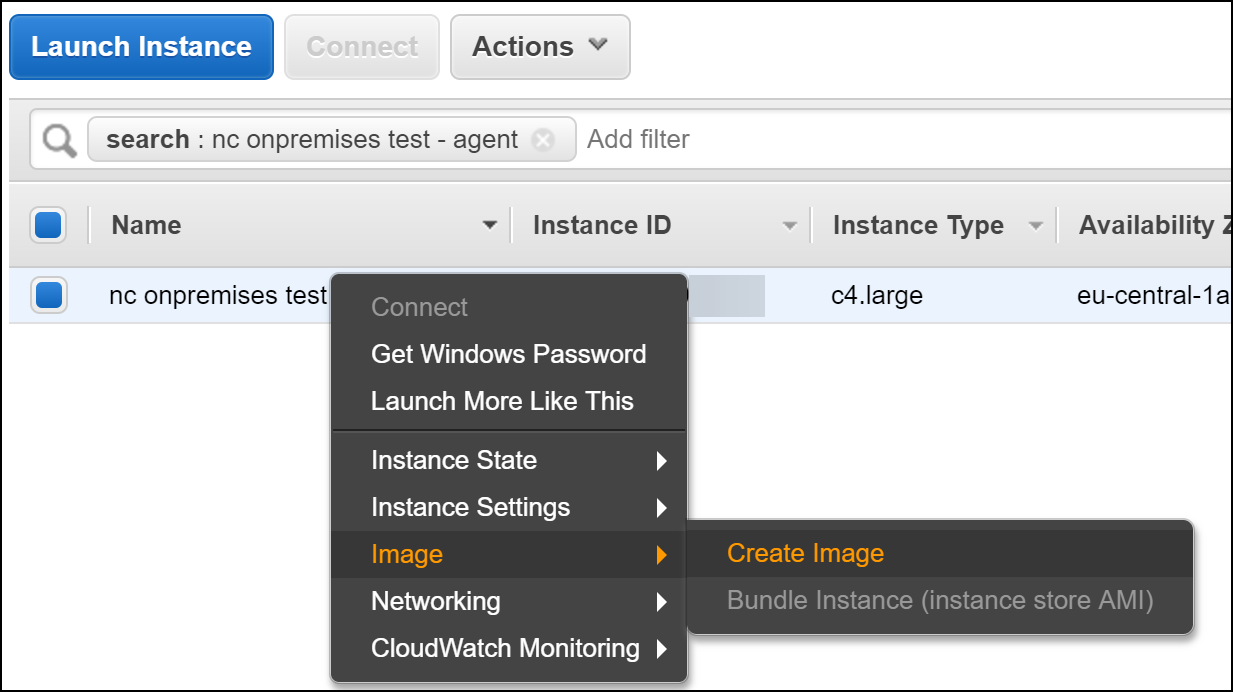
- Navigate to the AMIs page and save your AMI ID (you will need it later).
Configuring Invicti Enterprise web application
Follow these steps to configure Invicti Enterprise AWS settings.
- Create an RDP connection to your Invicti Enterprise web application server.
- Log in to Invicti Enterprise.
- Select Settings > Cloud Provider from the left-side menu.
- Enter your AWS settings.
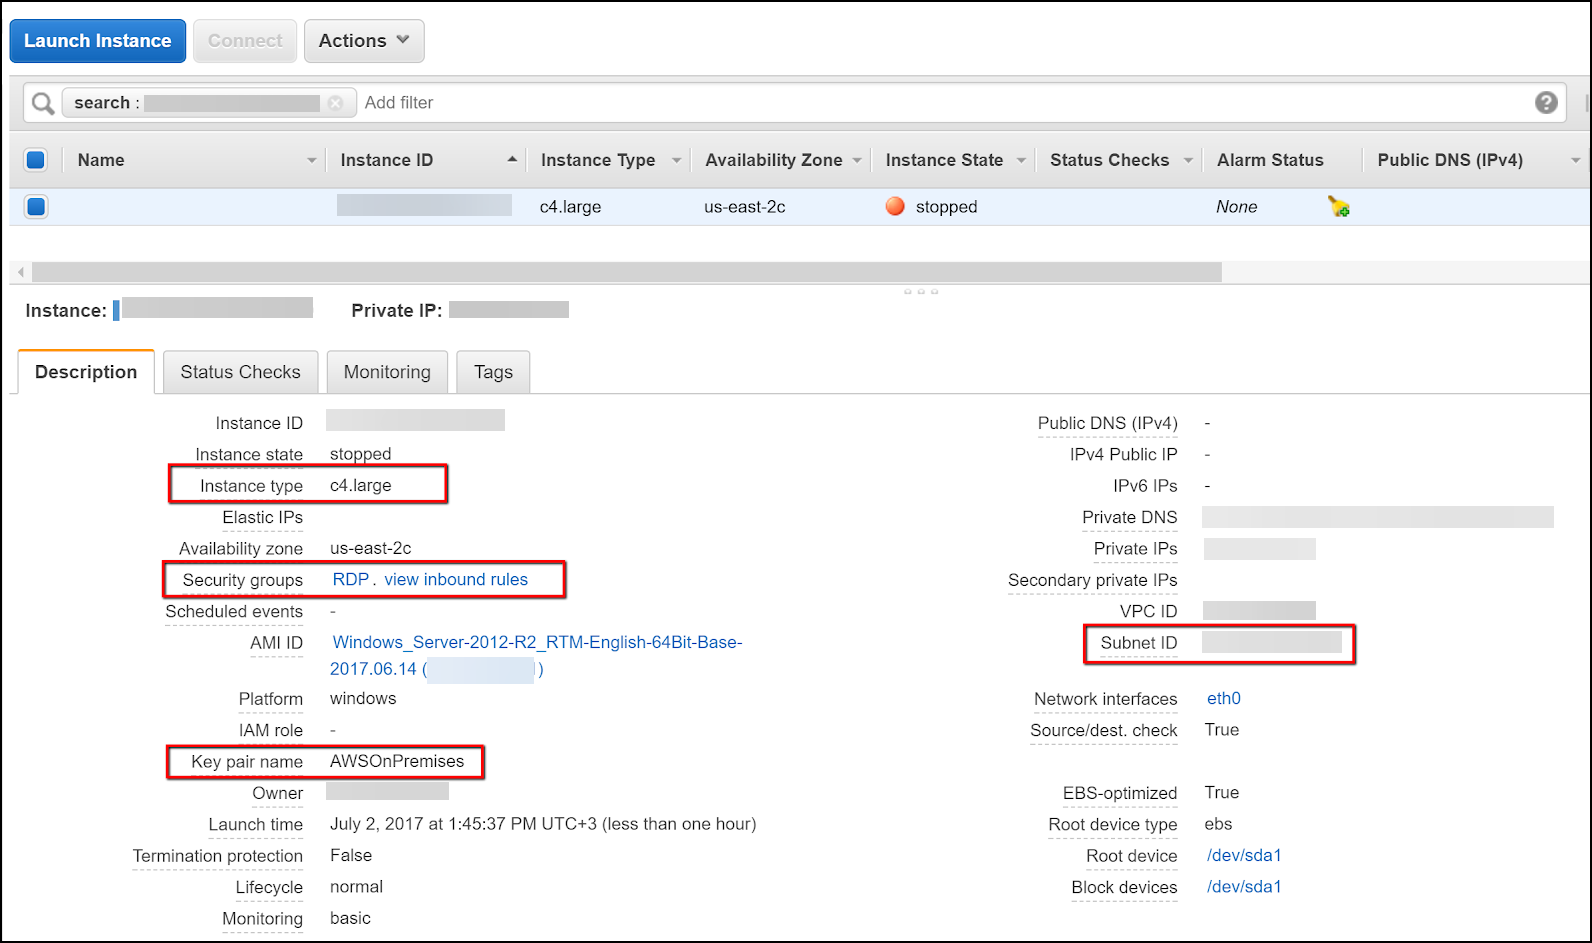
- The settings for the Instance Type, Subnet ID, and Key Pair Name are in your stopped instance’s details in AWS.
- Click Security Group to get the Security Group id (e.g. sg-abc3fec2).
- Click Save. You can now run new scans on your AWS environment.
NOTE: Now, that you have enabled the Cloud Provider Settings, you need to ensure the Agent Mode for your targets is set to Cloud. |

Update the scanner Agent
Next, you need to update the scanner agent using these instructions
- In the AWS EC2 console, open the AMI page. Right-click on your current scanner agent’s AMI, and launch an instance.
- Once your scanner agent instance is ready, make an RDP connection to it.
- Download the Invicti Enterprise installation bundle. After extracting the zip file, click the file AgentSetup.exe to start the agent installation wizard.
- Once the new scanner agent is installed, create a new AMI of your instance as described in How to Create a Scanner Agent Image.
- Next, log in to Invicti Enterprise. From the main menu, select Settings > Cloud Provider.
- Enter your new AMI and click Save.