Integrating Invicti Enterprise with Jenkins
Jenkins is an automation server that lets software developers build automation into their projects by supplying plugins. You can extend Jenkins's functionality by using the Invicti Enterprise Scan Jenkins plugin.
This guide shows you how to install and configure the Invicti Enterprise Jenkins Plugin with Jenkins Freestyle Projects so you can launch automated scans and view vulnerability reports in Jenkins. You can also use our plugin with Jenkins Pipeline Projects by adding the plugin script to your pipeline, which is generated by the Integration Script Generator in the Jenkins Integration window.
How to integrate Invicti Enterprise with Jenkins
There are two options for integrating Invicti Enterprise with Jenkins:
- Using the Invicti Enterprise Plugin for Jenkins. (This allows for a simplified configuration that can handle many use cases).
- Generating and using Invicti Enterprise’s integration script generator. (For complex cases).
Prerequisites
- Get the Invicti Enterprise URL. Depending on the region, your login URL can be one of the following:
- If US-based: https://www.netsparkercloud.com
- If EU-based: https://eu.netsparker.cloud
- If CA-based: https://ca.netsparker.cloud
- If on-premises: https://yourinvictiserver.com
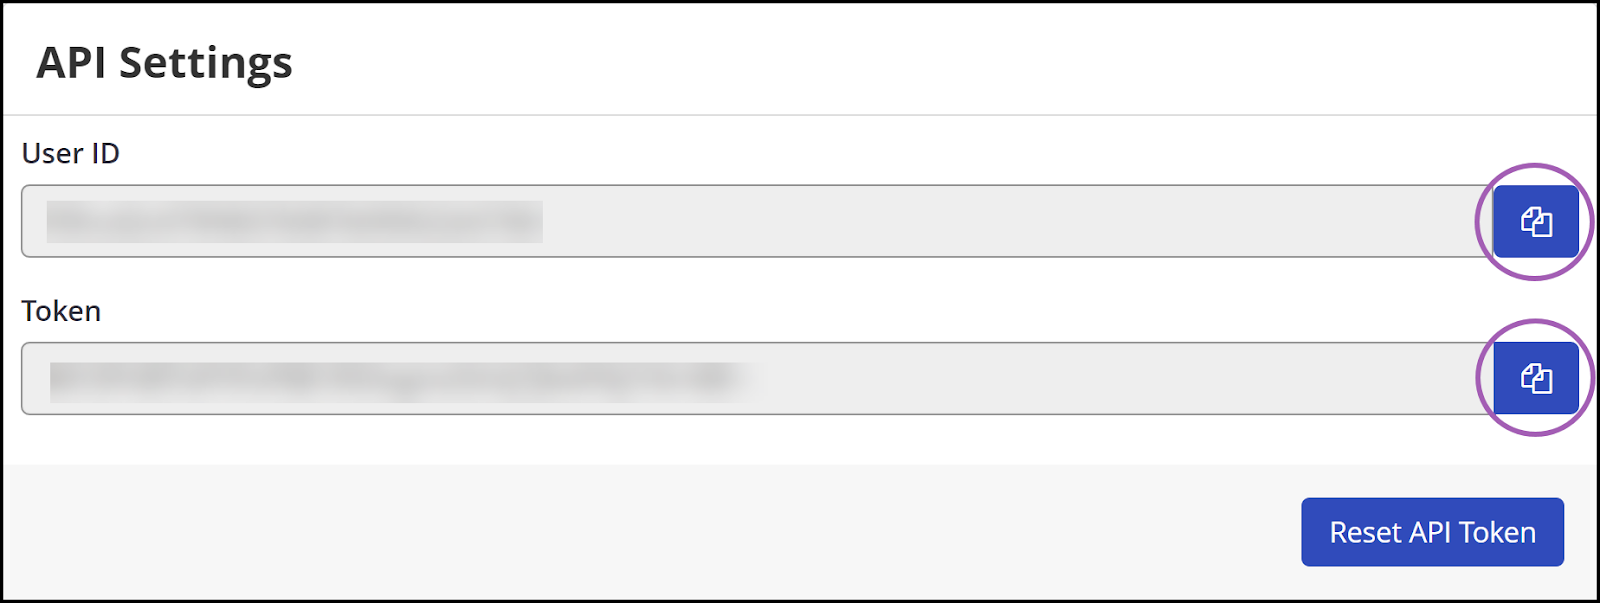
- Get the User ID and Token from Invicti Enterprise by following the steps below:
- Log in to Invicti Enterprise.
- Click your name in the upper right-hand corner, then select API Settings.
- On the API Settings page, enter your password.
- Copy the User ID and Token information.
Option 1: Using the Invicti Enterprise Plugin for Jenkins
There are three steps involved in using the Invicti Enterprise Plugin for Jenkins:
- Downloading and installing the plugin
- Configuring your Jenkins system
- Configuring your Jenkins project
Step 1: Download and install the Invicti Enterprise Scan Jenkins Plugin
The plugin is packaged into a .hpi file called jenkins-plugin.hpi. This package has been tested and approved for Jenkins version 2.474+.
While the latest plugin version requires Jenkins 2.474 or higher, Jenkins generally supports backward compatibility, meaning newer Jenkins versions (e.g., 2.500) can run plugins designed for earlier versions (e.g., 2.474). If your Jenkins instance is running a version lower than 2.474, please download older releases of the plugin from the Jenkins Plugins website.
There are two ways to install the Jenkins Plugin:
How to install the Jenkins Plugin from the Plugin Manager
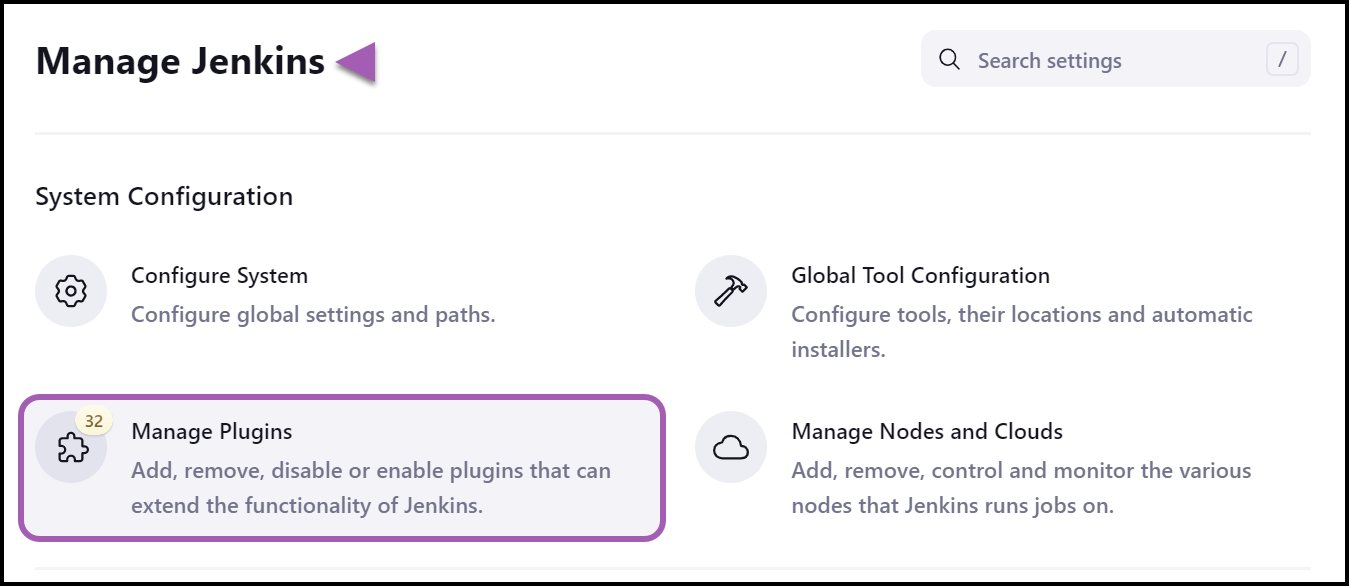
- Open Jenkins using an administrator account.
- From the main menu, select Manage Jenkins > Manage Plugins.
- From the Plugin Manager page, select the Available plugins option.
- Enter netsparker into the search field. From the search results, select the checkbox next to the Netsparker Enterprise Scan plugin, then click Install without restart.
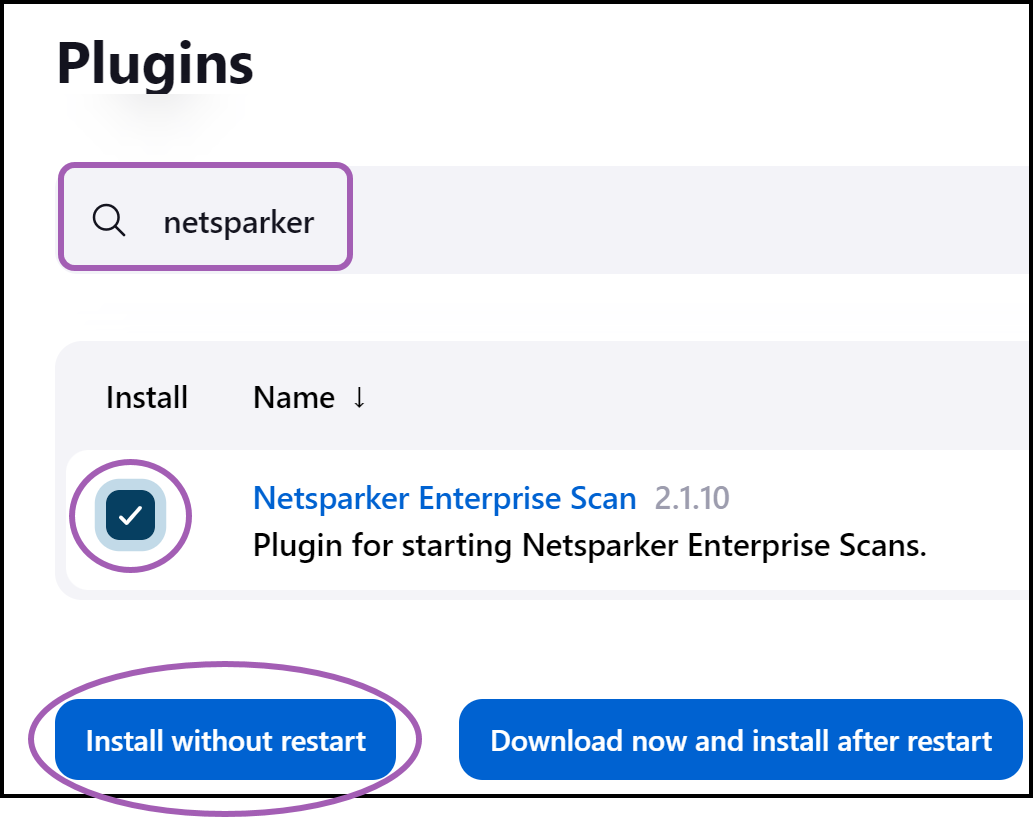
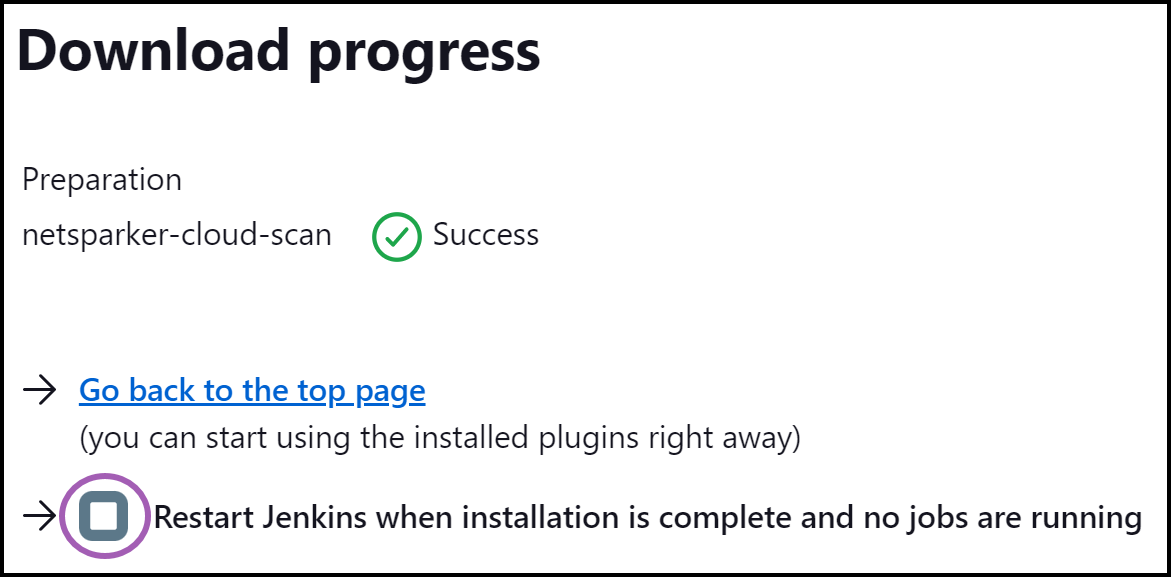
- When the plugin has completed installation, select the Go back to the top page link.
- To use the plugin, restart Jenkins. To restart from a browser, navigate to:
- [jenkins_url]/safeRestart (restarts Jenkins after the current builds have completed)
- [jenkins_url]/restart (forces a restart and builds will not wait to complete)
How to install the Jenkins Plugin from Invicti Enterprise
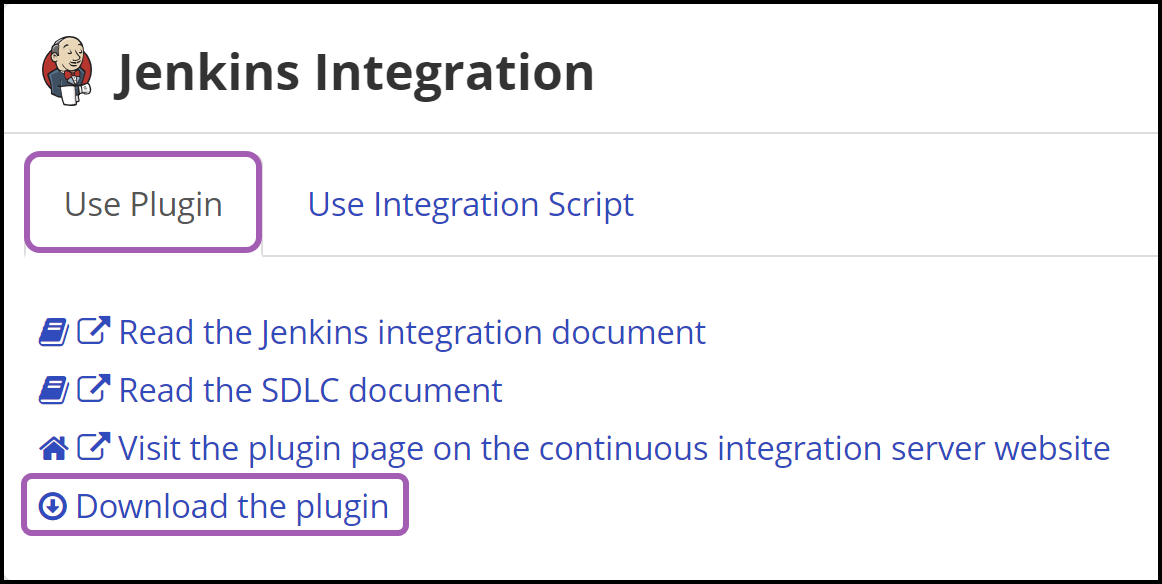
- Log in to Invicti Enterprise.
- From the main menu, go to Integrations > New Integration.
- Select the Jenkins tile in the Continuous Integration Systems section.
- On the Use Plugin tab, select Download the plugin and save the file to a location of your choice.
- Open Jenkins using an administrator account.
- From the main menu, select Manage Jenkins > Manage Plugins.
- From the Plugin Manager window, select the Advanced Settings option.
- From the Deploy Plugin section, select Choose File.
- Select the jenkins-plugin.hpi file you downloaded previously (step 4 above), then click Open.

- Click Deploy.
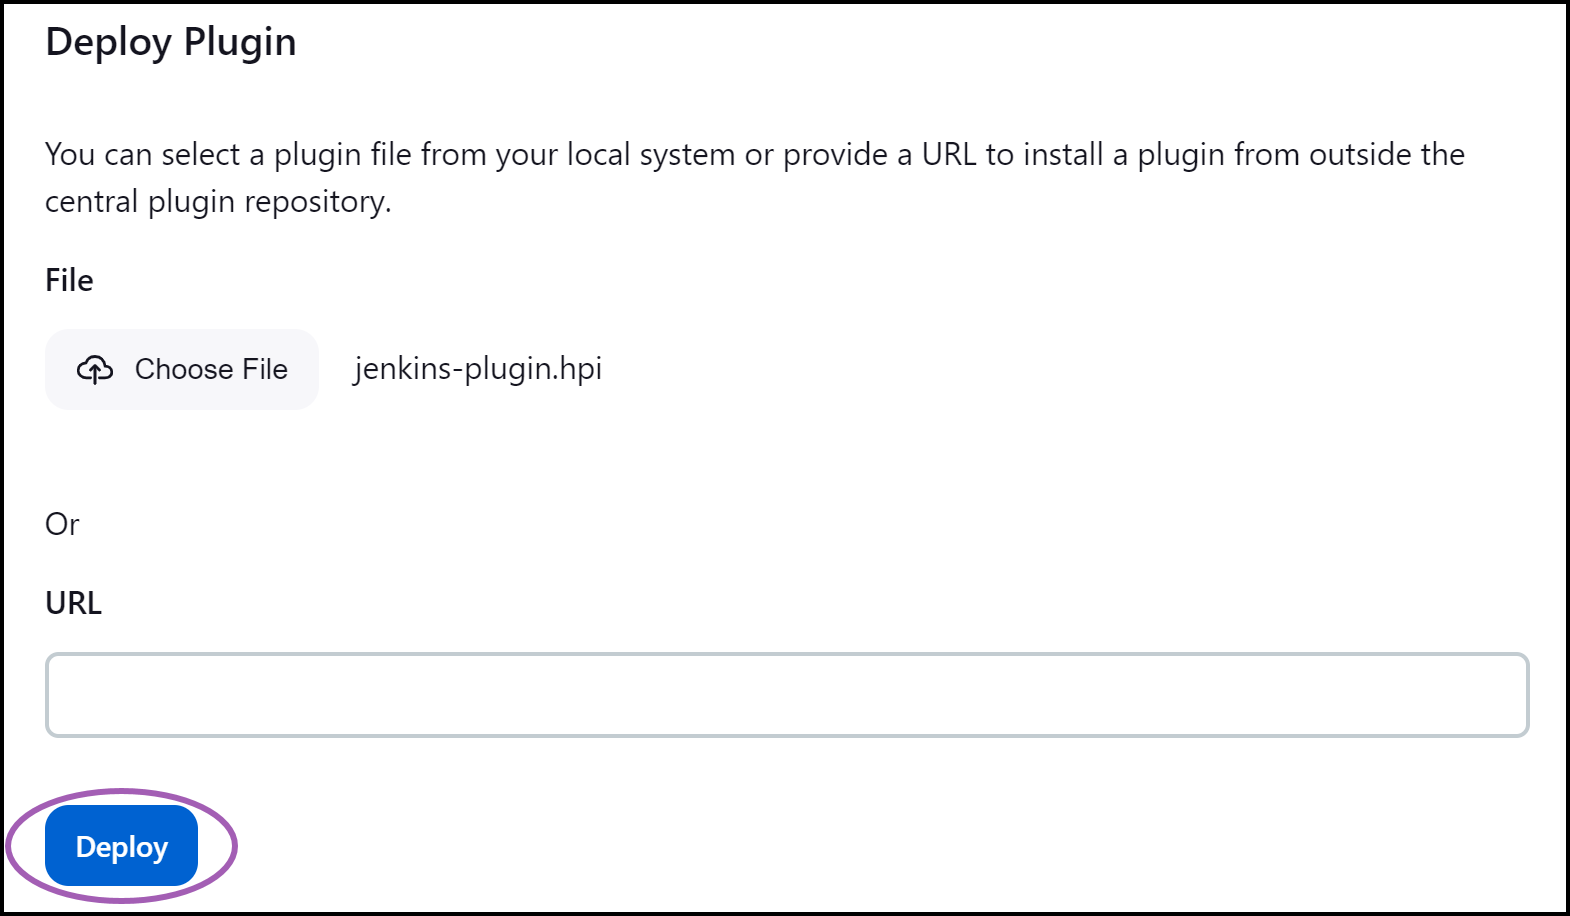
- To use the plugin, restart Jenkins. Select the checkbox next to Restart Jenkins when installation is complete and no jobs are running.
Step 2: Configure your Jenkins System for Invicti Enterprise integration
- Open Jenkins using an administrator account.
- From the main menu, select Manage Jenkins > Configure System.
- Scroll down to the Netsparker Enterprise section.
- Configure the following settings:
- Enter your Invicti Enterprise Server URL and API Token that you retrieved in the Prerequisites section.
- If your Jenkins server operates behind a proxy, configure the proxy settings as follows:
- Enter the Proxy Host and Port provided by your network administrator
- If authentication is required, provide the Proxy Username and Password
- Click Test Connection to verify access to Invicti Enterprise.
- Select Save.

Step 3: Configure your Jenkins Project to integrate with Invicti Enterprise
- Open Jenkins using an administrator account.
- Navigate to your project by selecting the project name.
- From the menu, select Configure.
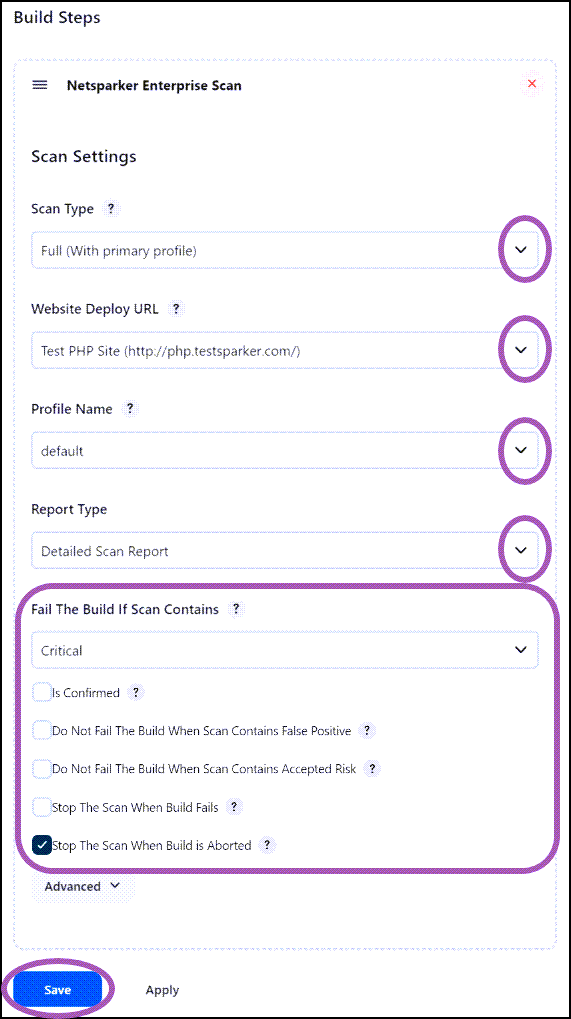
- Scroll down to the Build Steps section.
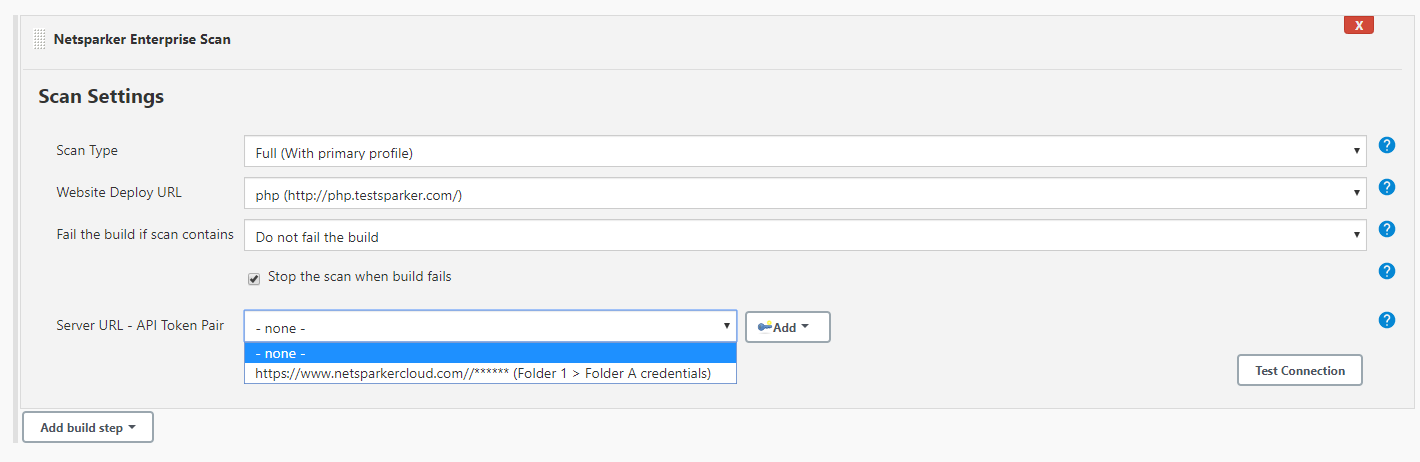
- Select Add build step, then choose the Netsparker Enterprise Scan option from the drop-down list.
- Configure the Scan Settings in the following way:
- From the Scan Type drop-down list, choose Incremental, Full (With primary profile), or Full (With selected profile).
- From the Website Deploy URL drop-down list, choose the website you wish to scan.
- From the Profile Name drop-down list, choose the desired Scan Profile.
- From the Report Type drop-down list, choose the desired Report Type.
- Set your preferred setting for the section entitled Fail The Build If Scan Contains.
- Select Save.
With these settings configured, each time a build is triggered, a scan of the website will also be triggered.
Option 2: Generating and using Invicti Enterprise integration scripts
Assumptions for using Invicti Enterprise integration scripts
|

Step 1: Use Pipeline Scripts in the Pipeline Project
- Log in to Invicti Enterprise.
- From the main menu, go to Integrations > New Integration.
- Select the Jenkins tile in the Continuous Integration Systems section.
- Select the Use Integration Script tab.
- From the Integration Script Generator section, select the relevant Scan Settings:
- Scan Type: Select your preferred option.
- Website: Use the drop-down to select a website.
- Scan Profile: Use the drop-down to select a scan profile (this is not displayed if you selected Full (With Primary Profile) as the Scan Type).
- To override the Jenkins plugin general settings with specific settings for a particular project, select the relevant checkboxes from these options:
- Override API Token for Jenkins Pipeline Script; you will need to configure a project parameter for ncApiToken
- Override Server URL for Jenkins Pipeline Script
- Override Stop the Scan When Build is Aborted Parameter for Jenkins Pipeline Script
- Override Stop The Scan When Build Fails Parameter for Jenkins Pipeline Script
- Override Fail The Build If Scan Contains Parameter for Jenkins Pipeline Script
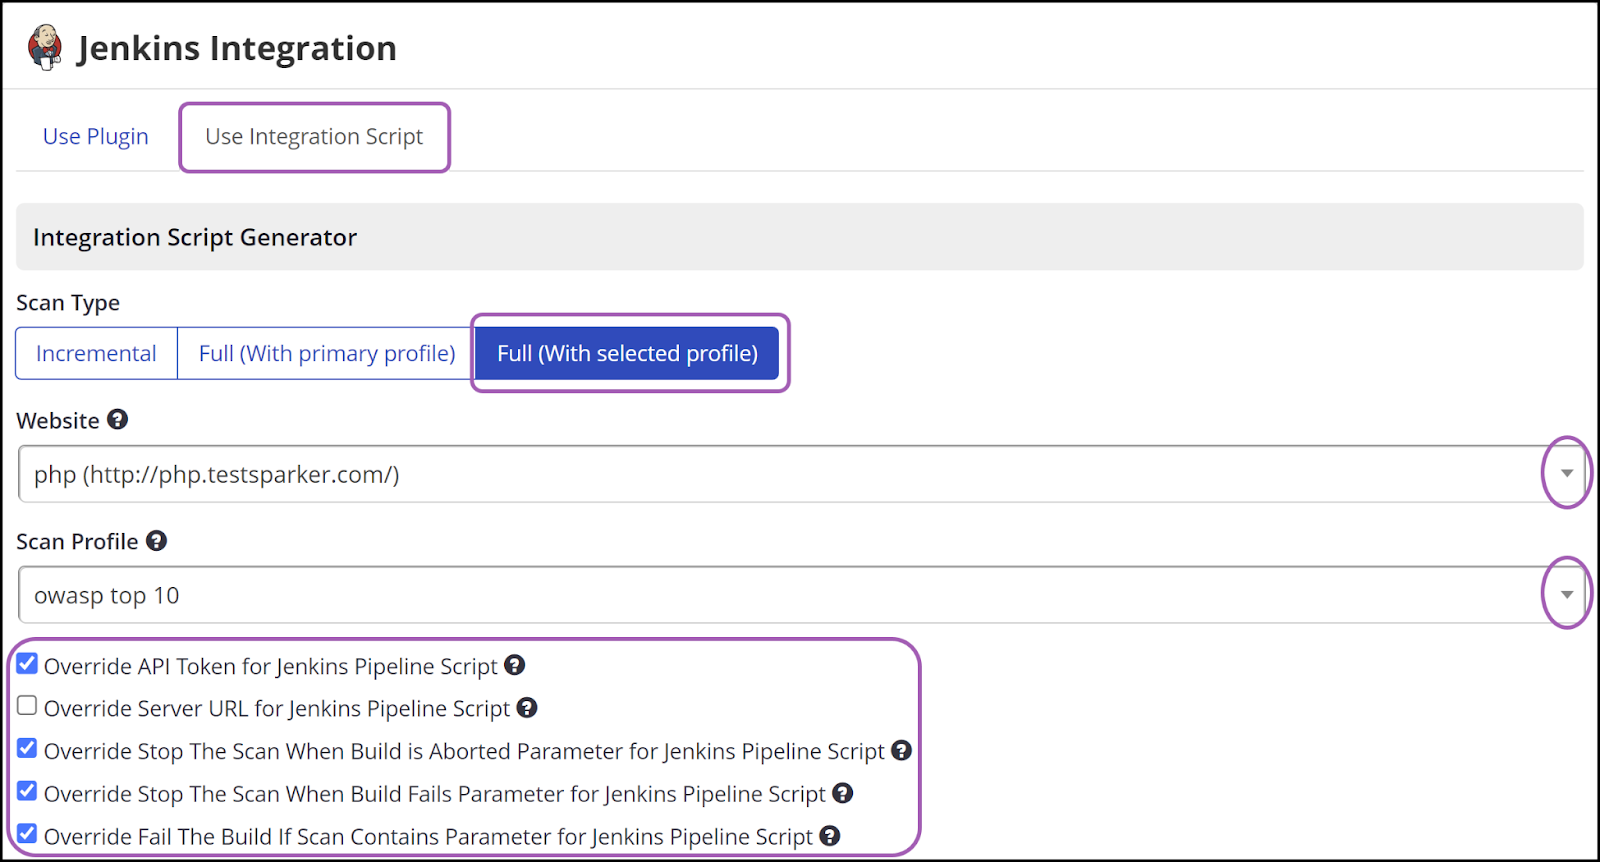
- Select Copy to clipboard () in the Pipeline Script field.


Step 2: Adjust the script snippet to match your pipeline syntax
You need to adjust the script snippet based on your pipeline syntax. For more information, refer to the Jenkins documentation: Declarative vs Scripted Pipeline Syntax.
- The following is an example script snippet:
step([$class: 'NCScanBuilder', ncApiToken: '$APITOKEN', ncScanType: 'FullWithSelectedProfile', ncWebsiteId: '2a8d4f53-de39-46e4-4634-ace503ac99ab', ncProfileId: 'ba4e999a-731a-4786-bdd7 -ae660483f1d9', ncStopScan: true, ncSeverity: 'Critical', ncDoNotFail: false, ncConfirmed: false, ncIgnoreFalsePositive: false, ncIgnoreRiskAccepted: false, ncAbortScan: true]) |

- If you intend to use scripted pipeline syntax, you would wrap your script snippet within a node{...} section like this:
node{ step([$class: 'NCScanBuilder', ncApiToken: '$APITOKEN', ncScanType: 'FullWithSelectedProfile', ncWebsiteId: '2a8d4f53-de39-46e4-4634-ace503ac99ab', ncProfileId: 'ba4e999a-731a-4786-bdd7- ae660483f1d9', ncStopScan: true, ncSeverity: 'Critical', ncDoNotFail: false, ncConfirmed: false, ncIgnoreFalsePositive: false, ncIgnoreRiskAccepted: false, ncAbortScan: true]) } |
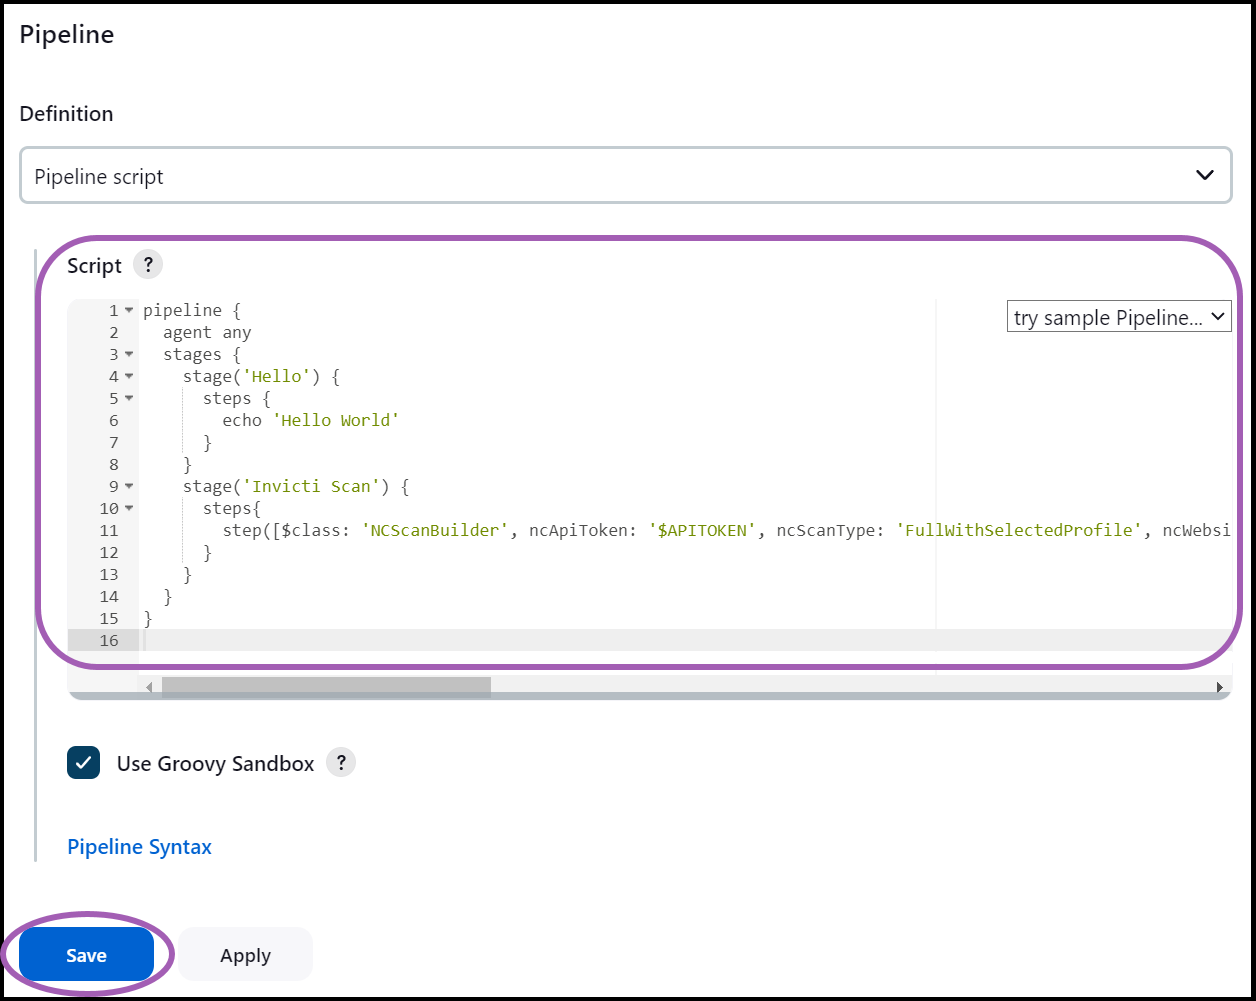
- If you intend to use declarative pipeline syntax, you would insert your script snippet into a stage in your pipeline script, like in this example:
pipeline { agent any stages { stage('Hello') { steps { echo 'Hello World' } } stage('Invicti Scan') { steps{ step([$class: 'NCScanBuilder', ncApiToken: '$APITOKEN', ncScanType: 'FullWithSelectedProfile', ncWebsiteId: '2a8d4f53-de39-46e4-4634-ace503ac99ab', ncProfileId: 'ba4e999a-731a-4786-bdd7- ae660483f1d9', ncStopScan: true, ncSeverity: 'Critical', ncDoNotFail: false, ncConfirmed: false, ncIgnoreFalsePositive: false, ncIgnoreRiskAccepted: false, ncAbortScan: true]) } } } } |
Step 3: Add parameters to your Jenkins Project
This example overrides the API Token, and the script snippet assumes that your Jenkins project will supply the APITOKEN environment variable (note the $APITOKEN in the script snippet). To add the parameter:
- Open Jenkins.
- Navigate to your pipeline project by selecting the project name.
- From the menu, select Configure.
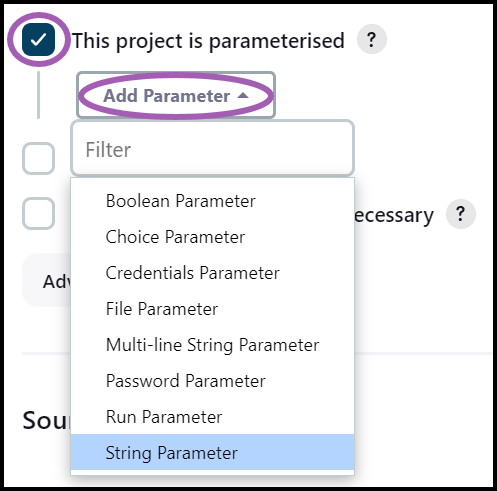
- From the General section, select the checkbox next to This project is parameterised.
- Select Add Parameter, then choose your preferred option. (For this example, we chose String Parameter. Depending on your project, you can choose a different option.)
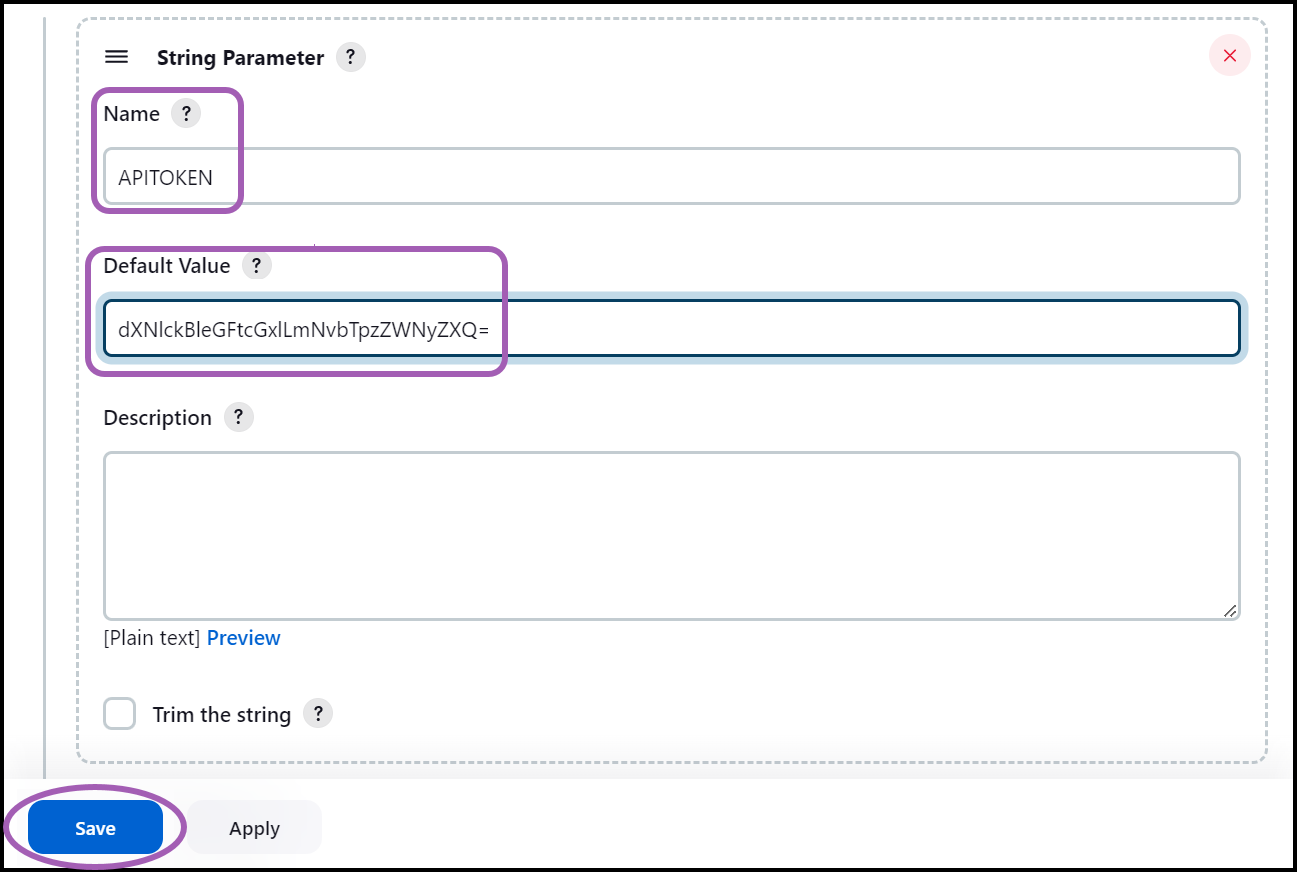
- To set the parameter's value and name, do the following:
- Set the parameter's Name to match the environment variable in your script snippet.
- Set the parameter's default value to match. (For this example, it is the API Token value for your Invicti Enterprise user account.)
- Select Save.
- From your project's sidebar, go to Configure > Pipeline.
- Insert your finalized script snippet into the Pipeline script field.
- Select Save.
With these settings configured, a scan of the Website will also be triggered each time a build is triggered.
Checking Pipeline Results
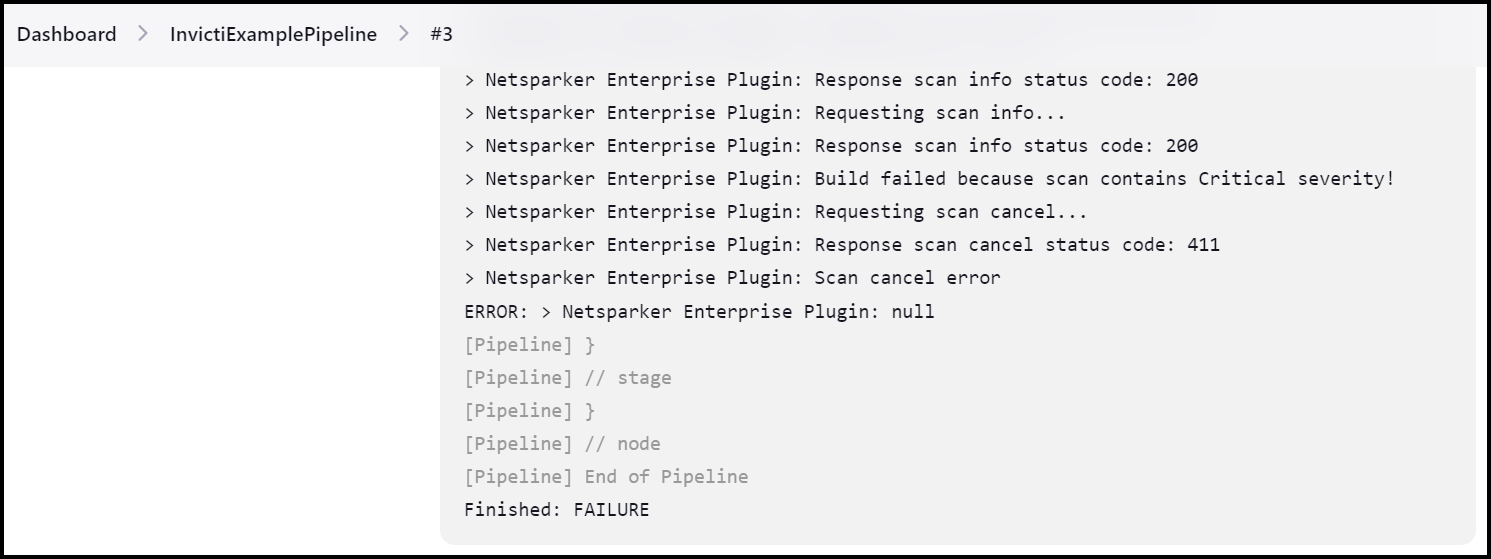
- Build Fail Errors: Your pipeline console output will show you when a build fails following an issue being detected by Invicti Enterprise via the Console Output panel.
- Scan Reports for Executed Pipelines: If you have enabled the generation of reports for completed scans, the scan report will be reachable from the Netsparker Enterprise Report option in the pipeline sidebar.
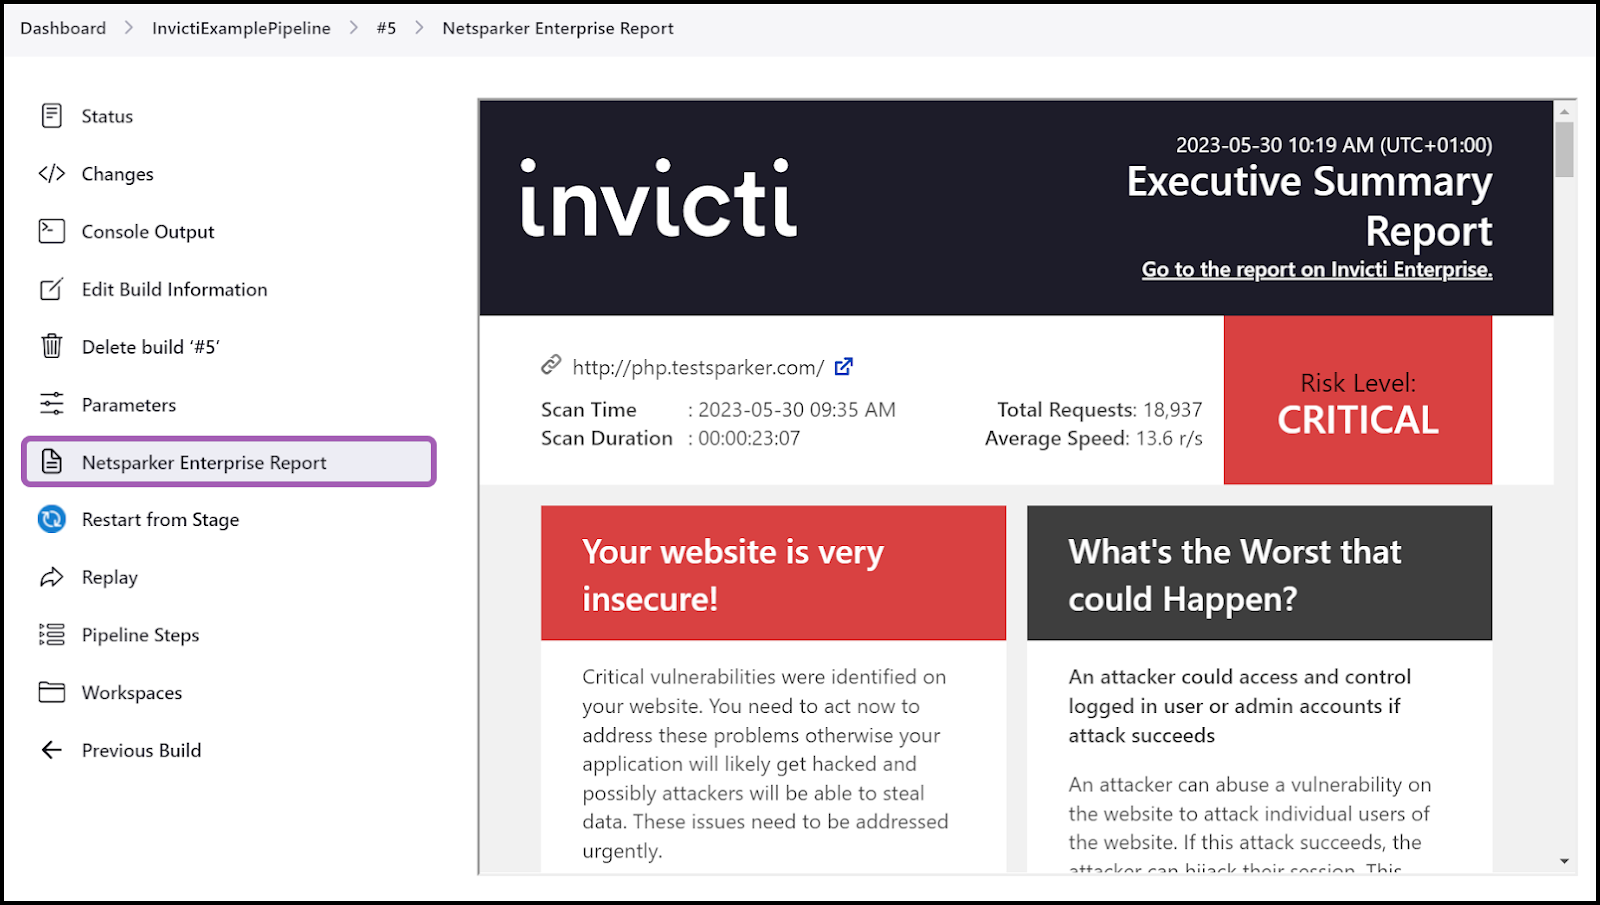
Checking Scan Results
The Recent Scans page lists all scans performed. By default, the most recently triggered scan will show at the top of the list.
- Examine the Scan Report: Select Report on the scan triggered by your Jenkins Pipeline to go to the scan summary.

Using the Build Fail option in Jenkins Projects
It is possible to configure a failure in the Jenkins build to stop the scan when a vulnerability severity is detected for projects.
This can be configured using the Severity, Confirmed, False Positive, and Accepted Risk parameters.
- Scan Severity: With this option, you choose which severity will fail this build when found in a related scan. If you choose “DoNotFail”, the detected vulnerability does not affect your Jenkins build. The options for Scan Severity are:
- DoNotFail
- Critical
- High or above
- Medium or above
- Low or above
- Best Practice or above
- Confirmed: With this option, you choose to fail this build when a vulnerability found in a related scan is confirmed.
- For example, if you choose the Medium or above option from the Scan Severity drop-down and select the Is Confirmed checkbox, the build fails only if the vulnerability has medium or higher severity and that vulnerability is confirmed. Otherwise, the build continues.
- False Positive: With this option, you choose not to fail this Jenkins build when the scan identifies a vulnerability set as a False Positive.
- For example, if you choose the Medium or above option from the Scan Severity drop-down and select the False Positive checkbox, the build will not fail if the vulnerability has medium or higher severity and that vulnerability is false positive. Otherwise, the build fails.
- Accepted Risk: With this option, you choose not to fail this Jenkins build when the scan identifies a vulnerability set as an Accepted Risk.
- For example, if you choose the Medium or above option from the Scan Severity drop-down and select the Accepted Risk checkbox, the build will not fail if the vulnerability has medium or higher severity and that vulnerability is accepted risk. Otherwise, the build fails.
Configuring the Jenkins Plugin to Build Fail
In the Jenkins plugin there are two options:
- Fail the build if scan contains: You choose which severity will fail this Jenkins build with this option. If you choose Do not fail the build, the detected vulnerability will not affect your Jenkins build.
- Stop the scan when build fails: With this option, if the build fails because of your selections, the scan will be canceled.

Configuring the Jenkins Plugin to Support Multiple Invicti Enterprise Users and Creating Folder Admin Permissions
Role-Based Strategy authorization is used to allow different users to have access to different folders.
This section closely follows the steps described in Cloudbees' Role-Based Authorization Strategy: Limit folder access article, explaining how to create folder-based admin roles. The end goal is that User1 will have access to Folder1, and User2 will have access to Folder2. Each user will be able to access only their projects in their folders using Invicti Enterprise tokens.
- The Invicti Enterprise Jenkins Plugin handles the required plugin installations, so no extra steps are needed there.
- Here is an example to show how user access can be restricted to specific jobs at both the folder and subfolder level.
- We created a main folder (Folder1) that contains two different subfolders Folder1/FolderA and Folder1/FolderB.
- We also created two Freestyle projects, 'job1' and 'job2' in the folders Folder1/FolderA/job1 and Folder1/FolderB/job2 respectively.
- The main folder name is 'Folder1'.
- The sub-folder names are 'Folder1/FolderA' and 'Folder1/FolderB'.
After completing the configuration steps, it is good practice to ensure that users have access to the correct folders described above.
This table lists and explains the role settings used in this example.
User | Role | Pattern |
admin | admin | |
Folder1 | Folder1View | Folder1 |
Folder1_FolderA_user | Folder1FolderA | Folder1/FolderA.* |
Folder1_FolderB_user | Folder1FolderB | Folder1/FolderB.* |
There are three steps involved in completing the configuration:
Step 1: How to configure authorization and manage roles
- Open Jenkins.
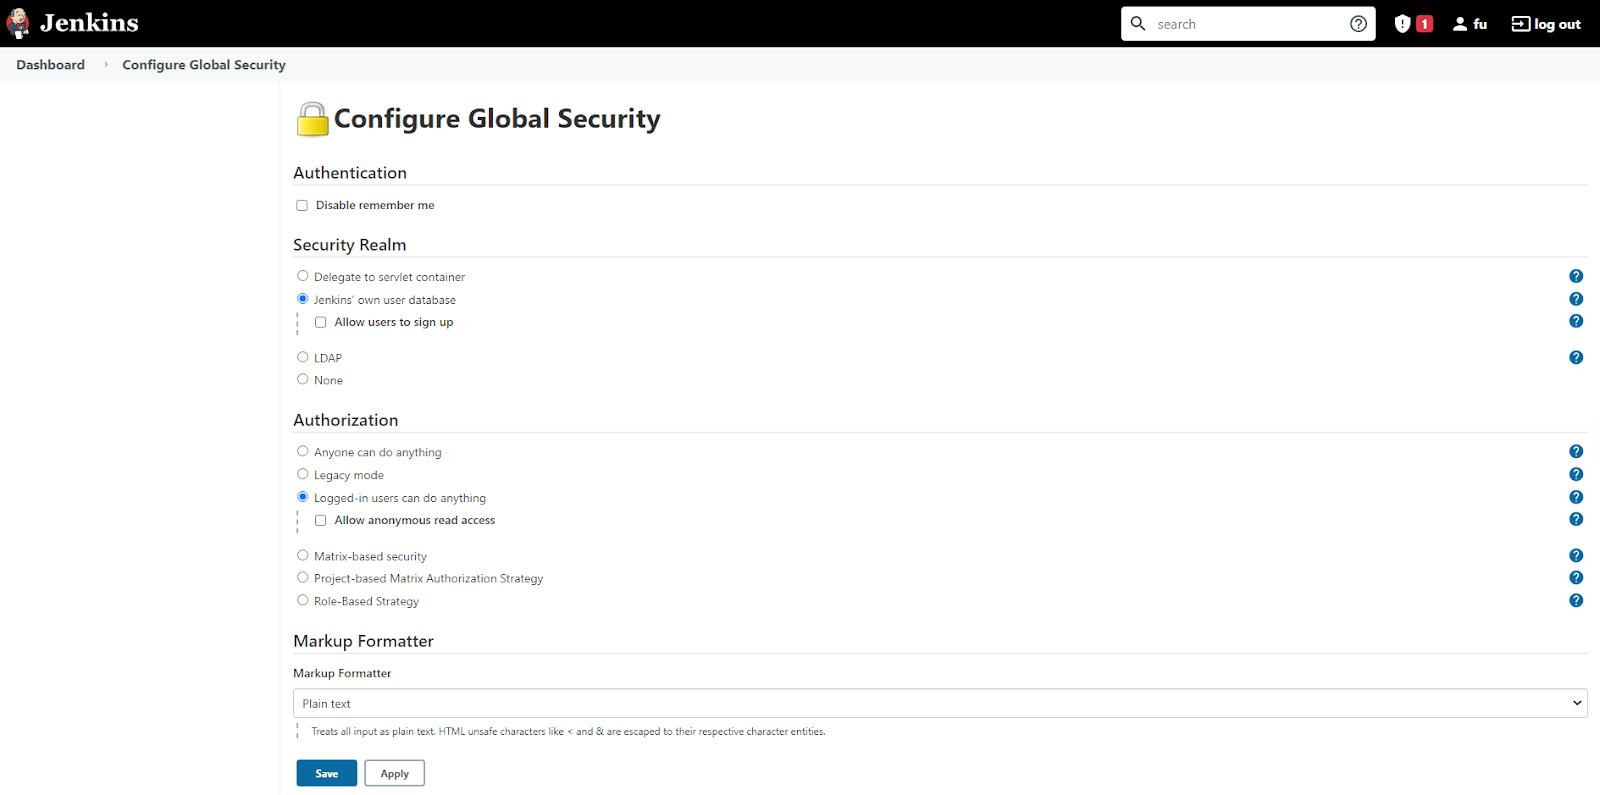
- Navigate to Manage Jenkins > Configure Global Security.
- From Authorization, select Role-Based Strategy. Select Save.
- Go to Manage Jenkins > Manage and Assign Roles > Manage Roles.
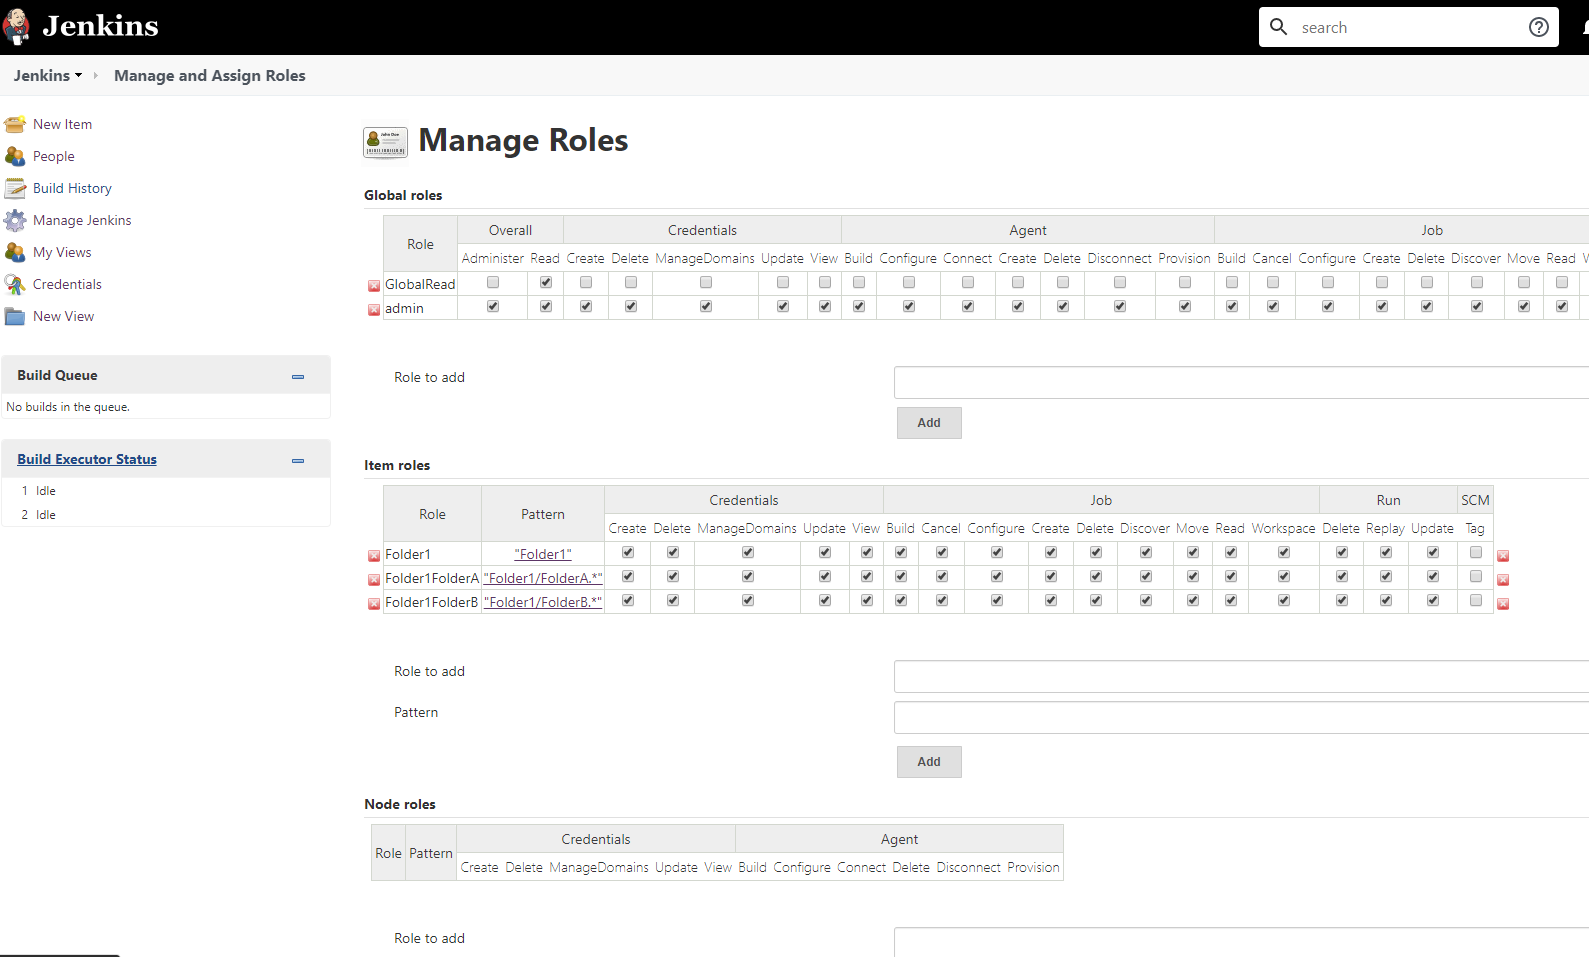
- Create the roles you need and save them.
Step 2: How to assign roles in Jenkins
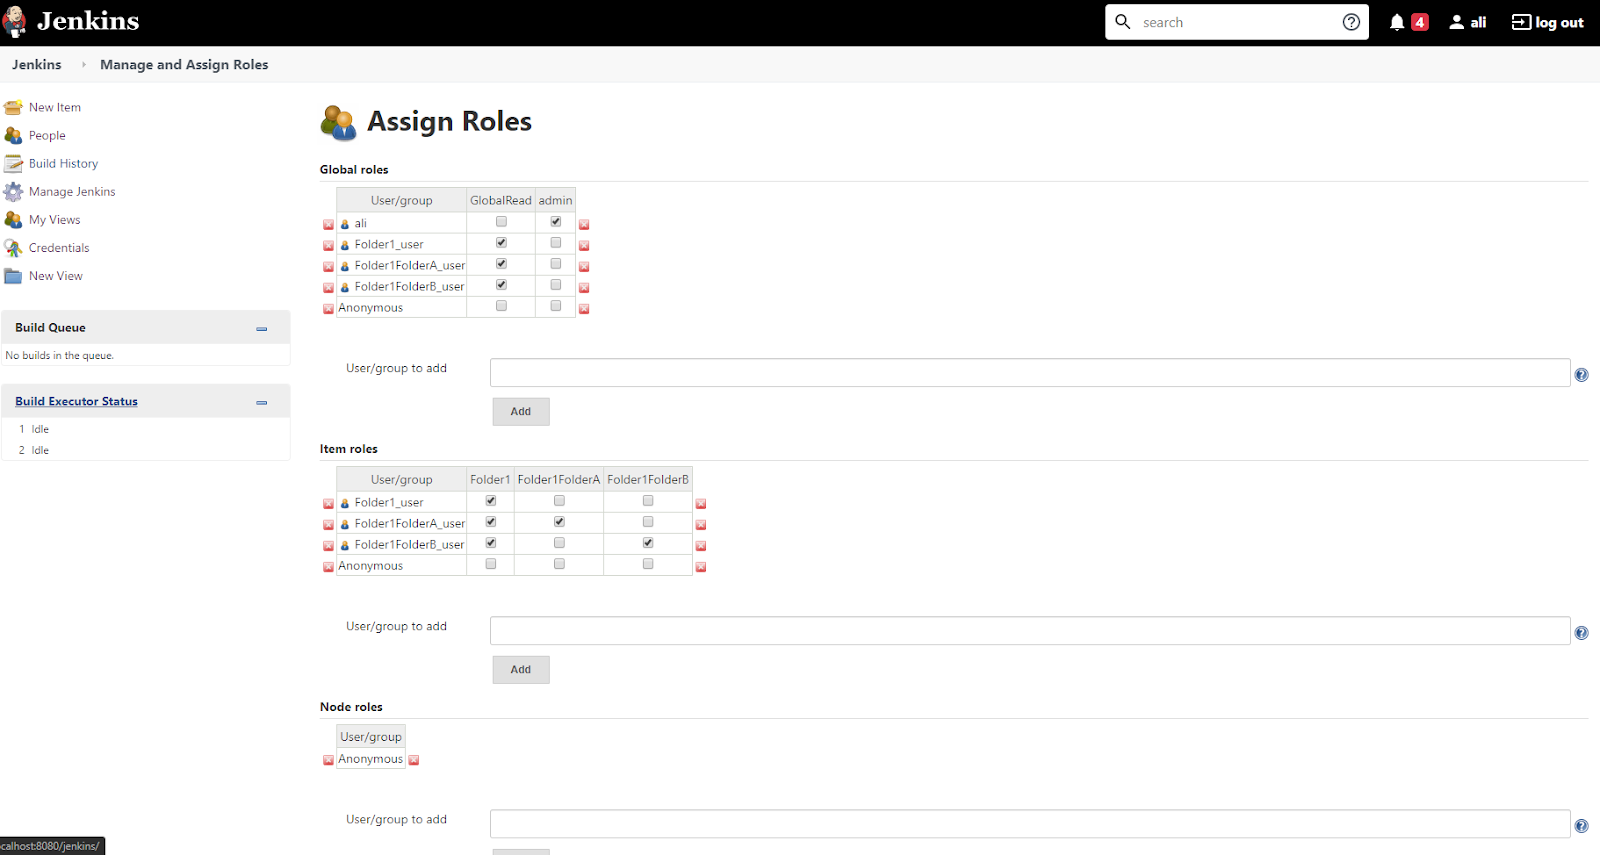
- Go to Manage Jenkins > Manage and Assign Roles > Assign Roles.
- Set the roles as follows:
- Global roles:
- Folder1_user should have GlobalRead
- Folder1FolderA_user should have GlobalRead
- Folder1FolderB_user should have GlobalRead
- Item roles:
- Folder1_user should have Folder1
- Folder1FolderA_user should have Folder1FolderA
- Folder1FolderB_user should have Folder1FolderB
Step 3: How to create credentials for users
- Open Jenkins.
- Go to Jenkins > Folder1 > FolderA.

- From the main menu, select Credentials.
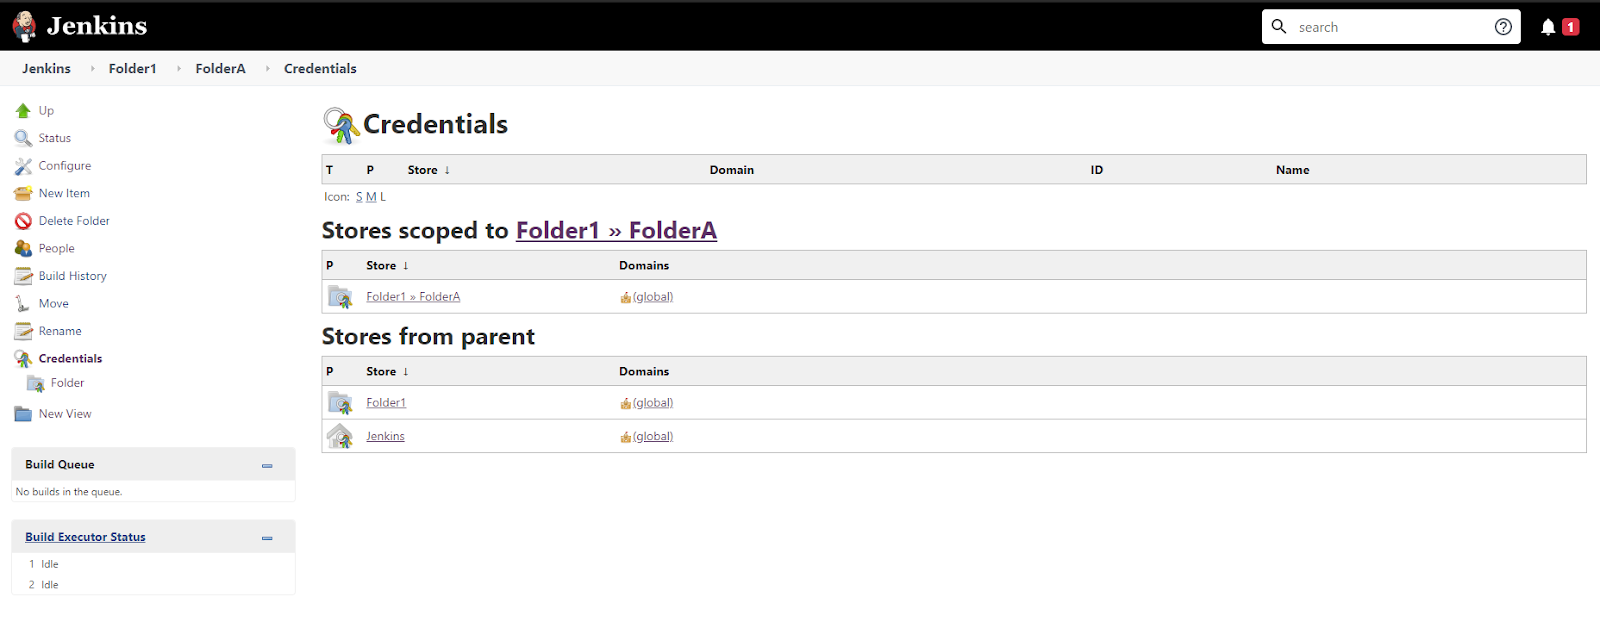
- In the Credentials section, select Folder1 > FolderA.
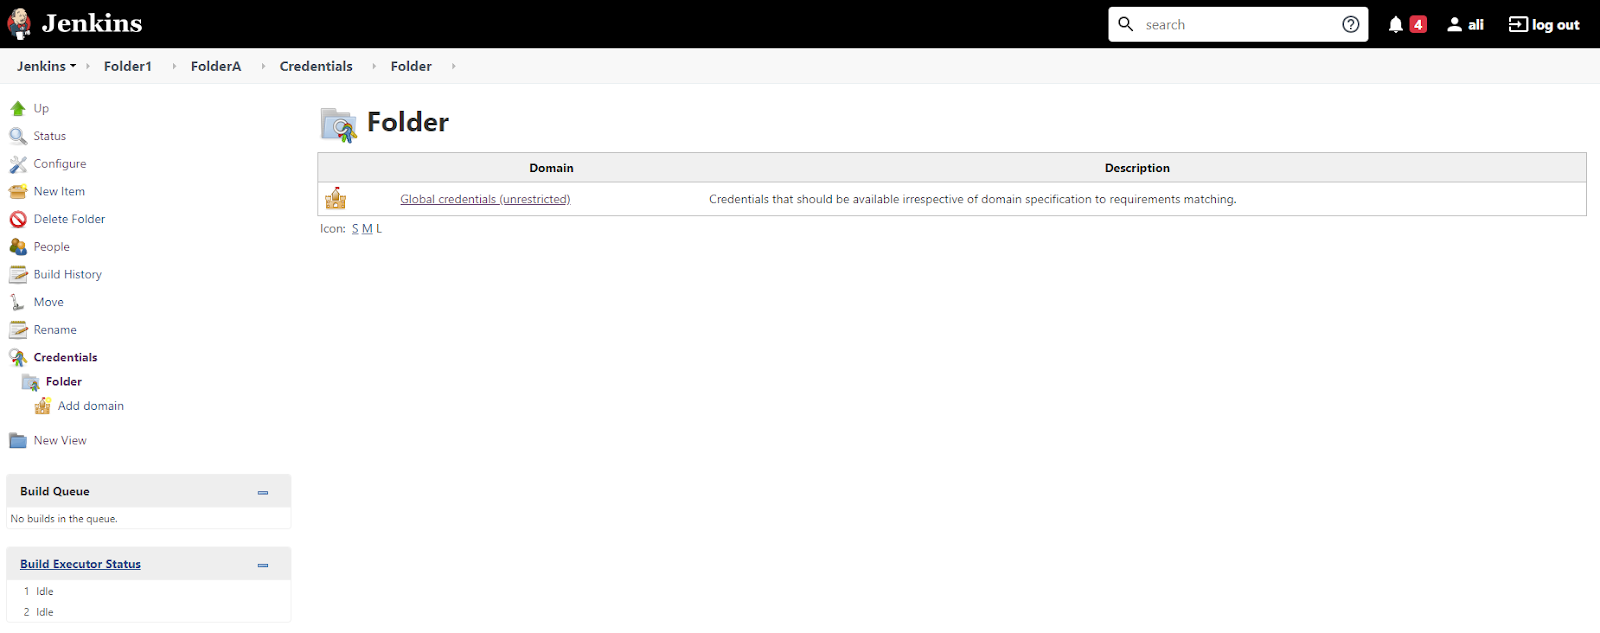
- Select Global credentials (unrestricted) > Add Credentials.
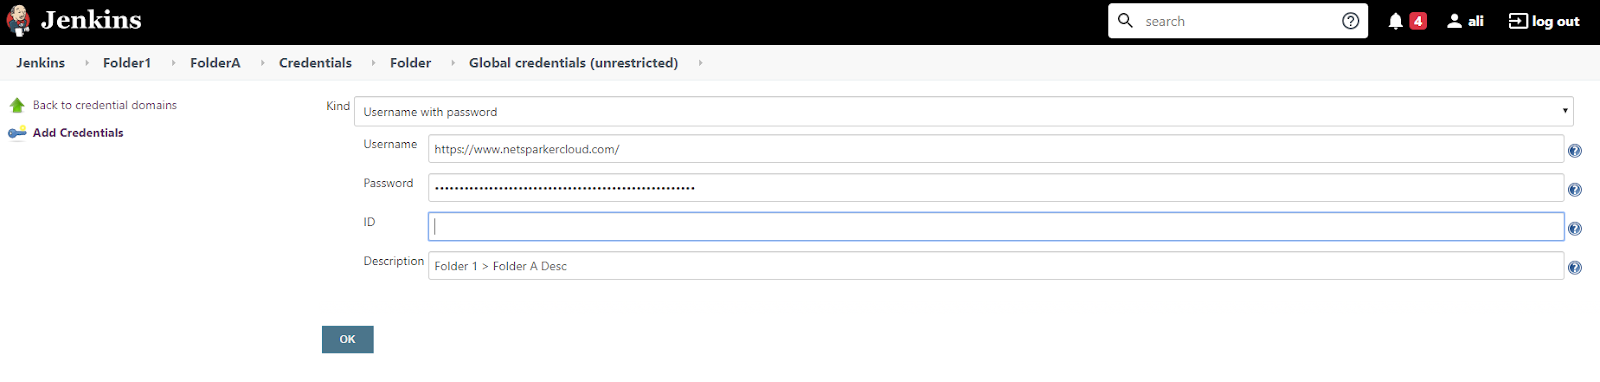
- Complete the following fields:
- Kind: Username with password
- Username: https://www.netsparkercloud.com (Server Url)
- Password: User1’s Invicti Enterprise Api Token
- Description: This description will be shown when the Credentials dropdown is selected when configuring the job. Entering something meaningful here will help to distinguish this one from other credentials there.
- Select OK.
- Go to Jenkins > Folder1 > FolderB and repeat the steps for User2.