Install Invicti On-Premises in Silent Mode
You can install the Invicti Enterprise web application server and agent using silent mode, which allows for a user interaction-free installation with no interface displayed. By defining the installation configuration once, you can simplify and streamline the process.
This document explains how to install the web application server and the agent in silent mode.
For instructions on how to perform manual installation and configuration, refer to Configuring the Invicti Enterprise Web Application Server using the Installation Wizard.
NOTE: During the silent installation of the web app, the Auth Verifier Hub will be installed automatically without displaying an installation wizard. |

Prerequisites
The prerequisites for the silent installation are the same as for the standard installation.
Refer to Step 1: Components and architecture, prerequisites, and download to learn more about:
- Components and architecture
- Whitelisting requirements
- Minimum requirements for the Invicti Enterprise Application Server
- Minimum requirements for the Invicti Enterprise Agent
- Minimum requirements for the Authentication Verifier Service and Authentication Verifier
- Minimum requirements for IAST Bridge
- Minimum requirements for the Database Server
IMPORTANT: Some antivirus or anti-malware software may prevent Invicti Enterprise On-Premises from working or cause it to run very slowly. To ensure you can use Invicti On-Premises effectively, we recommend adding Invicti files and folders to your antivirus (or other protection scanning software) exception list (also known as a 'whitelist'). For more information about the Invicti files and folders we recommend excluding from your antivirus software, refer to Excluding Invicti files from antivirus scans. |

Installing the Invicti Enterprise Web Application Server
You can install the web application server in silent mode either by using a JSON file or with a Windows PowerShell Script.
How to install the Invicti Enterprise Web Application Server with JSON
Required fields
The following fields are mandatory:
- DatabaseSettings fields
- AccountSettings fields
- GeneralSettings fields:
- ServerRootUrl
- UpdateServerUrl
- RadarRootUrl
- ScanDataPath
- ScreenshotsPath
- MaxUploadedFileSize
- SalesContactMail
The following fields are required only when specific conditions are met:
- CloudSettings - required if Enabled is true
- ScannerAgentSettings - required if SkipInstallation is false
- AuthenticationVerifierSettings - required if InstallAuthentifier is true
- EmailSettings - required if Enabled is true
- SmsSettings - required if SmsEnabled is true
Installation
- Copy the following script into a text editor and save it as silent_mode_settings.json.
{ |
IMPORTANT: Ensure that you have entered the correct information into the JSON file so that the installation proceeds as expected. Your password must be between 15 and 256 characters and contain lowercase/uppercase letters, digits, and special characters. If an installation is performed using an incorrect password model, any subsequent installations will be incomplete unless a fresh database is used and the Settings folder is deleted. This folder is typically located at C:\Users\NetsparkerAppPool\AppData\Roaming\NetsparkerCloud\Settings, but in some cases, it may appear under the Administrator user path instead. Ensure the Settings folder is deleted before proceeding. |
- Open a command prompt window.
- Use cd to navigate to the directory containing WebAppSetup.exe.
- Run WebAppSetup.exe /exenoui /qn /L*V "silent-install.log". Wait for some time for the installation to complete.
TIP: To install the Invicti Enterprise Web Application Server to a different location, for example D:, use the following: WebAppSetup.exe /Q APPDIR="D:\Invicti Enterprise Web Application" /L*V "install-log.log" |

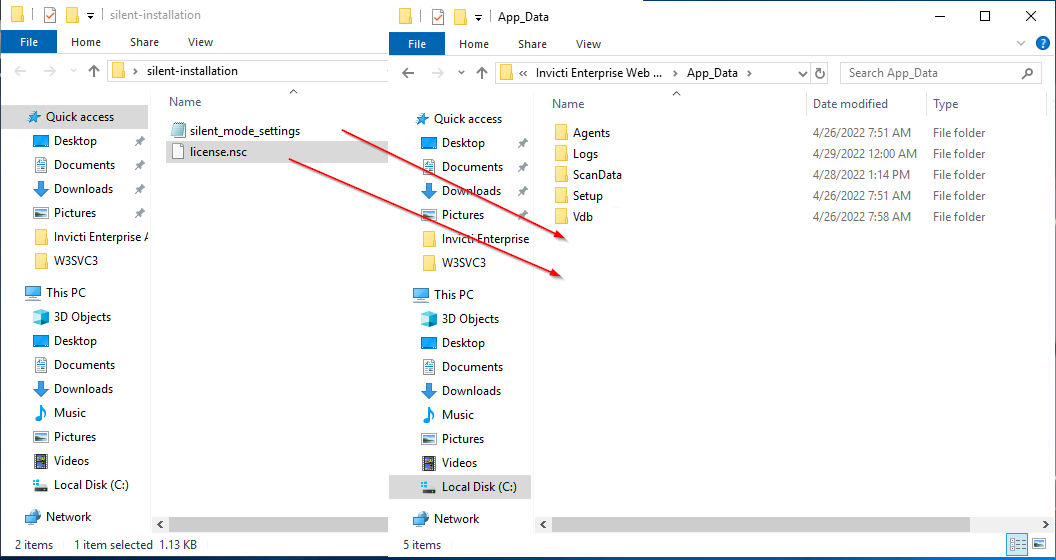
- Copy, paste, and rename files as follows:
- Copy and paste the license file, which you were supplied, to the AppData folder in the Web Application installation folder.
- Rename the license file as "license.nsc".
- Copy and paste the silent mode settings file to the AppData folder in the Web Application installation folder.
- Rename the file as "silent_mode_settings.json".
- Open a command prompt window and run the following commands to restart the Invicti Enterprise Web Application.
- cd %systemroot%\system32\inetsrv\
- appcmd stop site /site.name:NetsparkerCloud
- appcmd start site /site.name:NetsparkerCloud
IMPORTANT: This installation creates a secret_key.json file in the App_Data folder. After the installation, copy and store your secret key, then delete the secret_key.json file for your security. |
How to install the Invicti Enterprise Web Application Server with PowerShell Script
- Create the silent_mode_settings.json file as instructed in the section above: How to install the Invicti Enterprise Web Application Server with JSON.
- Copy the following script into a text editor and save it as silent-mode-installation.ps1.
NOTE: These instructions assume that you installed the Invicti Enterprise Web Application to the default folder. If you did not install it to the default folder, please change the relevant step in the PowerShell script accordingly. |
# Go to the installation file path and run WebAppsetup.exe |
- Open a Windows PowerShell window.
- Use cd to navigate to the directory containing the silent-mode-installation.ps1 file.
- Run .\silent-mode-installation.ps1
The PowerShell script installs the web application server and restarts the Invicti Enterprise Web Application.
IMPORTANT: This installation creates a secret_key.json file in the App_Data folder. After the installation, copy and store your secret key, then delete the secret_key.json file for your security. |
Installing the Invicti Enterprise Agent in Silent Mode
Silent mode installation in Invicti Enterprise On-Premises helps you to install the Agent. For the manual installation instructions, refer to Installing the Invicti Enterprise Agent.
This table explains the parameters used in the silent mode installation for the Invicti Enterprise Agent.
Parameter | Description |
/exenoui /qn | This parameter performs the silent installation without the user interface. |
APPDIR | This parameter shows the location of the Agent. |
APP_URL_PROP | This parameter shows the URL of the Web Application Server. |
API_TOKEN_PROP | This parameter displays the API Token. |
AGENT_NAME_PROP | This parameter displays the name of the Agent. |
How to install the Invicti Enterprise Agent in Silent Mode
- Open a command prompt window.
- Run the following command:
AgentSetup.exe /exenoui /qn APPDIR="C:\Invicti Enterprise Agent" APP_URL_PROP="https://localhost/" APP_TOKEN_PROP="YOUR_TOKEN” AGENT_NAME_PROP="YOUR_AGENT_NAME"
Updating the Invicti Enterprise Web Application Server and Agent
To update the web application server or agent using silent installation mode, follow the installation instructions contained in this article.
NOTE: To update, there is no need to create a new database or user. Before proceeding, ensure you enter the Secret Key, if applicable, into the JSON file. |
Troubleshooting
If you encounter any problems during silent mode installation, check the log files in the AppData folder. If the problem persists, submit a ticket through our Help Center.