Integrating Invicti Enterprise with GitLab CI/CD
GitLab is a web-based Git repository manager that provides CI/CD pipeline features, enabling you to add CI configuration to your source control repository using just one file.
You can integrate Invicti Enterprise with GitLab using cURL or PowerShell scripts, generated by our Integration Script Generator.
This topic explains how to generate and use cURL scripts to integrate Invicti Enterprise with GitLab in order to enable our advanced integration functionality.
Prerequisites
- Getting the User ID and Token from Invicti Enterprise
How to get the User ID and Token
- Log in to Invicti Enterprise.
- Select your name in the upper right-hand corner, then API Settings.

- On the API Settings page, enter your password.
- Copy the User ID and Token information, as you need them for integration.

Generating and Using Invicti Enterprise’s GitLab Integration Scripts
Invicti Enterprise uses cURL and PowerShell command-line tools to integrate with GitLab. These scripts have been tested and approved for GitLab version 9+. In order to integrate with Invicti Enterprise, GitLab Runner’s execution environment must support cURL or PowerShell.
Step 1. Generate GitLab CI/CD Integration Scripts from Invicti Enterprise
How to generate Invicti Enterprise’s GitLab Integration Scripts
- Log in to Invicti Enterprise.
- From the main menu, go to Integrations > New Integration > GitLab CI/CD.

- From the Integration Script Generator section, select the relevant Scan Settings:
- From the Scan Type field, select an option. (This example uses the Full (With selected profile) type.)
- From the Website drop-down, select a website
- From the Scan Profile drop-down, select a scan profile (This is not displayed if you select Full with Primary Profile as the Scan Type)
- Enable the Stop the scan if the Build fails, if required
- Enable the Fail the Build if one of the selected scan severity is detected, if required (For further information, see Using Build Fail in GitLab Project.)
Please note that the default settings do not enable the Stop the scan if the build fails or the Fail the build if one of the selected scan severity is detected options. This would limit the communication between GitLab and Invicti Enterprise to a one-way request, which simply triggers a scan to start, without monitoring any feedback from the scanning engine.
You must enable one or both of the following 2 options to generate a script that will monitor the feedback from the scanner, so the pipeline can know if the build has failed and if issues with high enough severity are identified.
- In the PowerShell field, select Copy to copy the PowerShell script.
- If you are using a Linux agent in your GitLab CI/CD Project, copy the script in the cURL field, and retain it for the next step.
- If you are using a Windows agent in your GitLab CI/CD Project, copy the script in the cURL field, and retain it for the next step.
Step 2. Deploy the Integration Script into your GitLab CI/CD Pipeline
How to deploy the integration script into your GitLab CI/CD pipeline
- Log in to your GitLab CI/CD account.
- Navigate to your project, and select Settings > CI/CD.

- Navigate to the Variables section, and select Expand.

- Select the Add variable to set the USERID variable:
- Add a new variable with the name USERID.
- Set the value to the retained value that you obtained in the How to get the User ID and API Token step.
- Select Add variable.

- Select the Add variable to set the APITOKEN variable:
- Add a new variable with the name APITOKEN.
- Set the value to the retained value that you obtained in the How to get the User ID and API Token step.
- Select Add variable.
- Your variables will now be listed in the Variables section.

- Navigate to your project, and select CI/CD > Editor.


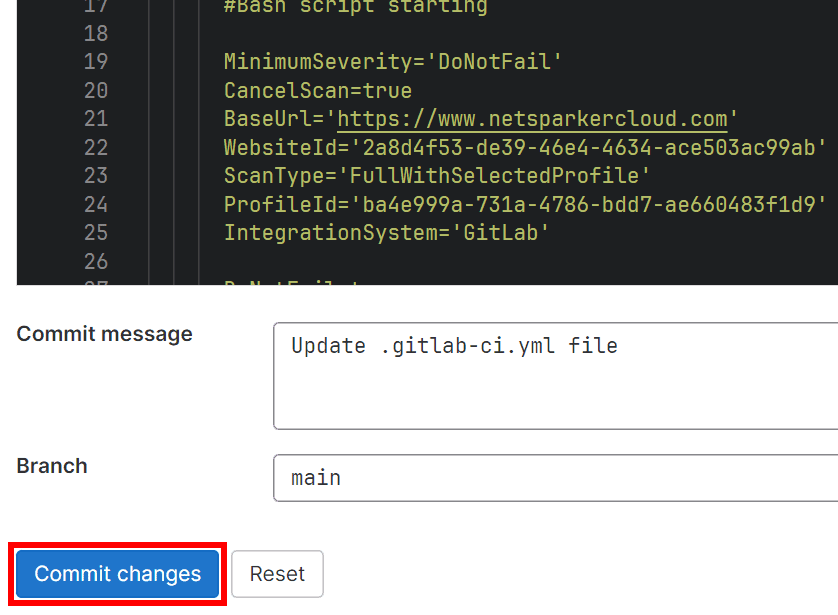
- Add a scan stage in your pipeline and add the integration before_script and script sections, similar to the following example:

- Select Commit changes at the bottom of the page.
This will trigger a run of the pipeline, and therefore add an immediate scan request to Invicti Enterprise:

All future pipeline runs will now also trigger a scan request to Invicti Enterprise.
Customizing your Integration Script
You may add extra steps or logic to your Integration Scripts by invoking custom or additional calls to the Invicti Enterprise API. For more detailed information about the Invicti Enterprise Cloud API, visit Invicti API Documentation.
Checking Pipeline Results
Build Fail Errors
Your pipeline summary page shows you when a build fails following an issue being detected by Invicti Enterprise via the Errors panel.

Using Build Fail in GitLab Project
It is possible to configure a failure in the GitLab build to stop the scan when a vulnerability severity is detected.
Build Fail Logic
The build fail parameters operates in the AND logic. To fail a build, all selected parameters have to be met. For instance, if you select Critical from the severity drop-down and select the Confirmed checkbox, the build fails only if these two conditions are met.
This can be configured using the Severity, Confirmed, False Positive, and Accepted Risk parameters.
- Scan Severity: With this option, you choose which severity will fail this build when found in a related scan. If you choose “DoNotFail”, the detected vulnerability does not affect your GitLab build. The options for Scan Severity are: DoNotFail, Critical, High or above, Medium or above, Low or above, Best Practice or above.
- Confirmed: With this option, you choose to fail this build when a vulnerability found in a related scan is confirmed.
For example, if you choose the Medium or above option from the Scan Severity drop-down and select the Is Confirmed checkbox, the build fails only if the vulnerability has medium or higher severity and that vulnerability is confirmed. Otherwise, the build continues. - False Positive: With this option, you choose not to fail this GitLab build when the scan identifies a vulnerability set as a False Positive.
For example, if you choose the Medium or above option from the Scan Severity drop-down and select the False Positive checkbox, the build will not fail if the vulnerability has medium or higher severity and that vulnerability is false positive. Otherwise, the build fails. - Accepted Risk: With this option, you choose not to fail this GitLab build when the scan identifies a vulnerability set as an Accepted Risk.
For example, if you choose the Medium or above option from the Scan Severity drop-down and select the Accepted Risk checkbox, the build will not fail if the vulnerability has medium or higher severity and that vulnerability is accepted risk. Otherwise, the build fails.