Configuring Microsoft Active Directory Federation Services Integration with SAML
Active Directory Federation Services (ADFS) is a software solution developed by Microsoft that can run as a component on Windows Server operating systems. It provides SSO to applications that cross organization boundaries by the secure sharing of entitlement rights and digital identity. ADFS can be configured to authenticate users stored in an LDAP directory (see Configure ADFS to authenticate users stored in LDAP directories).
- Using Security Assertion Markup Language (SAML), a user can use their managed account credentials to sign in to enterprise cloud applications via Single Sign-On (SSO). An Identity Provider (IdP) service provides administrators with a single place to manage all users and cloud applications.
- You don't have to manage individual user IDs and passwords tied to individual cloud applications for each of your users. An IdP service provides your users with a unified sign-on across all their enterprise cloud applications.
- You can also create a new user in Invicti Enterprise with the Enable Auto Provisioning option.
If you encounter any problem while setting up SSO integration, see Troubleshooting SSO Issues.
You have to use IdP-initiated SSO if you want to utilize Auto Provisioning.
If you will use SP-initiated SSO, please set the Name ID Format value to email address on the IdP side.
These instructions were prepared using Windows Server 2016, though other, recent versions should also work.
There are two parts to this procedure:
- Part 1: Adding a Relying Party Trust
- Part 2: Edit Claim Issuance Policy
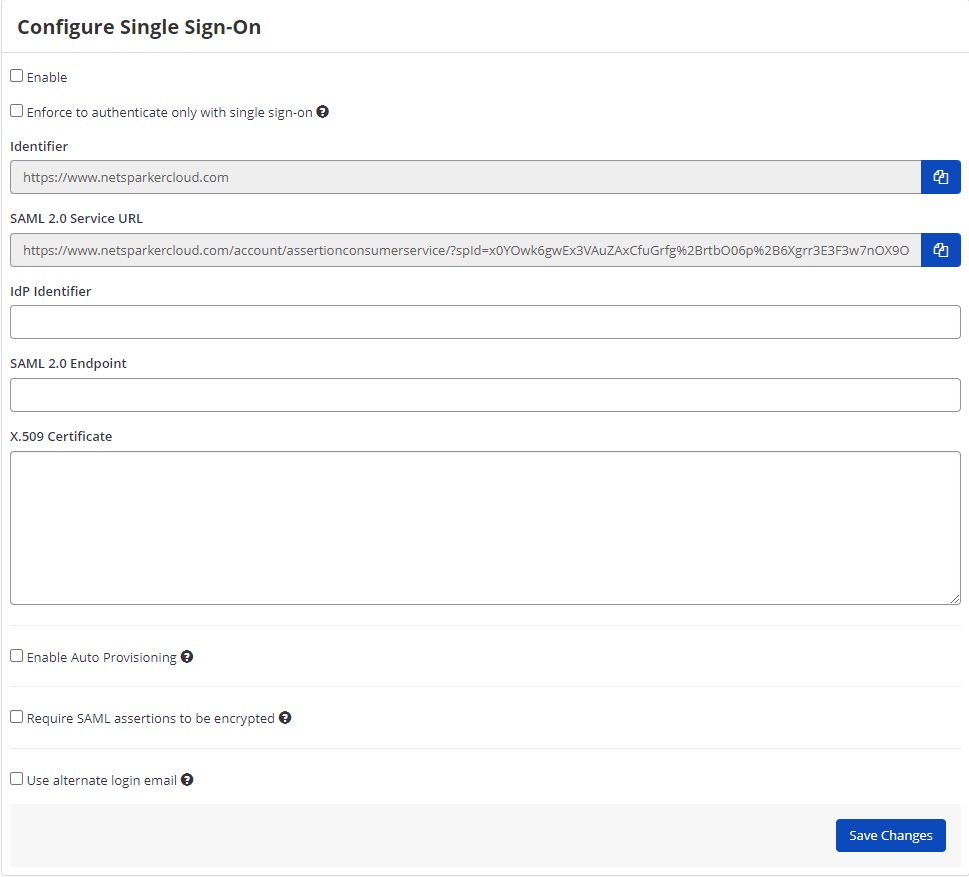
Single Sign-On Fields
This table lists and explains the Single Sign-On fields in the Configure Single Sign-On page.
| Field | Description |
| Enable | Select this option to enable the single sign-on feature. |
| Enforce to authenticate only with single sign-on | Enable this option so only administrator users can authenticate without Single Sign-on. Users can only sign in to Invicti Enterprise by using the email address that belongs to their employer. |
| IdP Identifier | This is the SAML identity provider’s Identifier value. |
| SAML 2.0 Service URL | This is the Consumer URL value (also called the SSO Endpoint or Recipient URL). |
| SAML 2.0 Endpoint | This is the URL from your IdP's SSO Endpoint field. |
| X.509 Certificate | This is the X.509 certificate value. |
How to Configure Microsoft Active Directory Federation Services Integration with SAML (Part 1: Adding a Relying Party Trust)
- Open Microsoft Active Directory Federation Services Management. The ADFS window is displayed.

- From the AD FS node, select Relying Party Trusts.
- In the Actions pane, select Add Relying Party Trust. The Add Relying Party Trust Wizard is displayed.

- In the Welcome step, select Start.

- Select Enter data about the relying party manually, and select Next.

- In the Display Name field, enter a display name and select Next. The Configure Certificate step is displayed.

- Accept the defaults by selecting Next. The Configure URL step is displayed.

- Select Enable support for the SAML 2.0 WebSSO protocol.
- Then log in to Invicti Enterprise, and from the main menu, select Settings, then Single Sign-On. The Single Sign-On page is displayed. Select the Active Directory Federation Services tab:
- Next, copy the URL from the SAML 2.0 Service URL field
- In the Microsoft ADFS Wizard, paste the URL into the Relying party SAML 2.0 SSO service URL field
- In the Microsoft ADFS Wizard, select Next. The Configure Identifiers step is displayed.

- In the ADDS tab in Invicti Enterprise's SSO window, copy the URL from the Identifier field.
- In the Microsoft ADFS Wizard, paste the URL into the Relying party trust identifier field. Select Add, then Next. The Choose Access Control Policy step is displayed.

- Select Permit everyone , then Next. The Ready to Add Trust step is displayed.

- Review your settings, and select Next. The Finish step is displayed.

- Select Close.
How to Configure Microsoft Active Directory Federation Services Integration with SAML (Part 2: Edit Claim Issuance Policy)
- Open Microsoft Active Directory Federation Services Management. The ADFS window is displayed.

- From the ADFS node, click Relying Party Trusts. The Relying Party Trust that you have just created is listed in the Central Panel.

- Right-click the relying party trust and select Edit Claim Issuance Policy. The Edit Claim Issuance Policy for Invicti Enterprise dialog box is displayed.

- Select Add Rule. The Add Transform Claim Rule wizard is displayed.

- From the Claim rule template drop-down, select Send LDAP Attributes as Claims.
- Select Next.
- In the Claim rule name field, enter a name.
- From the Attribute store drop-down, select Active Directory.
- In the Mapping of LDAP attributes to outgoing claim types section, select the following attributes from the drop-down lists.
|
LDAP Attributes |
Outgoing Claim Type |
|
E-Mail-Addresses |
E-Mail Address |
|
Given-Name |
Given Name |
|
Surname |
Surname |

- Select Finish.
- Select Add Rules.
- Select Transform an Incoming Claim as the claim rule template to use. Configure the Transforming an Incoming Claim fields as shown in the following image:

- Download AD FS SAML Metadata from https://<server-address>/FederationMetadata/2007-06/FederationMetadata.xml
- Open the downloaded AD FS SAML metadata file, and copy the URL located in the EntityDescriptor node>entityID attribute:
- Then, log in to Invicti Enterprise, and from the main menu click Settings, then Single Sign-On. The Single Sign-On window is displayed. Select Active Directory Federation Services from the drop-down list and paste the URL into IdP Identifier field.
- Next, copy the URL from the SingleSignOnService node>Location attribute field.
- Then in Invicti Enterprise's Single Sign-On window, paste the URL into SAML 2.0 Endpoint field.
- Finally, copy the content of the X509Certificate node (signing).
- Then in Invicti Enterprise's Single Sign-On window, paste it into the X.509 Certificate field.
- Select one or all of the following options, if necessary:
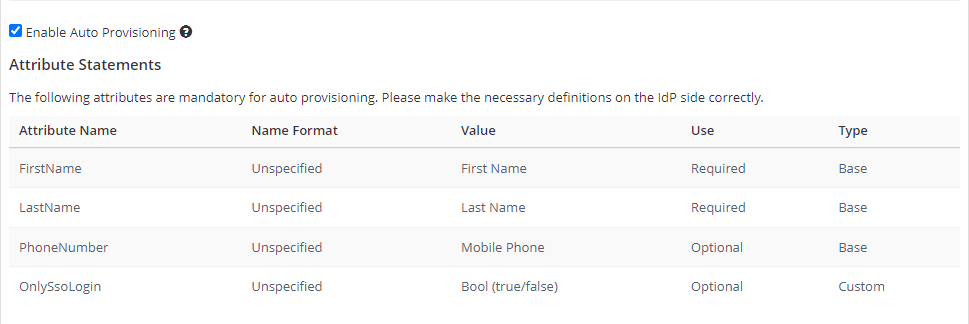
- Enable Auto Provisioning: If enabled, an account will be automatically created for IdP-registered users when they first access Invicti Enterprise. To do so, you must complete the FirstName, LastName, and Phone Number (optional) fields in the Attribute Statements on the IdP side. For further information about OnlySsoLogin, see Provisioning a member.
- Require SAML assertions to be encrypted: If enabled, it prevents third parties from reading private data in transit from assertions. There are two options:
- Generate a new certificate for me: Invicti generates a key pair. Invicti will keep a private key to decrypt received SAML messages and provide you with a certificate so that you can upload it on the IdP side.
- I have an existing certificate: You need to upload your certificate to Invicti by importing a decryption certificate from your files.
- Use Alternate Login Email: If enabled, this lets users use alternative email for SSO. So, you can enter an alternative email on the New Member Invitation page and while editing the user's details on the Team page.
- On Invicti Enterprise's Single Sign-On page, click Save Changes.