Install Invicti Hawk internally
Hawk is the infrastructure the Invicti web application security scanner uses to detect Server Side Request Forgery (SSRF) and all other kinds of blind, asynchronous, and second-order vulnerabilities that require data to be sent over out-of-band channels. This guide explains how to host Invicti Hawk infrastructure in your environment.
For more information about Invicti Hawk, refer to How Invicti Hawk Finds Vulnerabilities.
Minimum requirements
These are the minimum requirements for the machines where you install Invicti Hawk:
- Docker must be installed
- SSL/TLS certificate ready in .pem format for <DOMAIN_NAME>
- Recommended RAM: 4 GB
- Recommended disk: 100 GB (mostly for logging purposes)
How to install Invicti Hawk internally
- Ensure you have a Static IP address to allocate to the DNS Server. In these instructions, we will refer to this as <STATIC_IP>.
- Register a short DNS Address. In these instructions, we will refer to this as <DOMAIN_NAME> or example.com.
- Register ns.<DOMAIN_NAME> and ns2.<DOMAIN_NAME> as Name Servers for <DOMAIN_NAME>.
- Point ns.<DOMAIN_NAME> and ns2.<DOMAIN_NAME> to <STATIC_IP>. The Name Server will be hosted inside the Docker Container.
- Ensure that the following Hawk ports are reachable and not used by any other process:
- TCP 80, 53, 443; from everywhere
- UDP 53; from everywhere
- Download the latest compressed Invicti Hawk Docker image file and copy it to a machine with a Docker installation. You can download it from this link: https://s3.amazonaws.com/ns.hawk/netsparkerhawk.tar.gz
- Load this image to Docker using the following command:
docker load < netsparkerhawk.tar.gz |

- Create a container using the following command. Adjust the command by inserting your own domain name (<DOMAIN NAME>) and static IP (<STATIC IP>).
docker create -it -e HAWK_URL=http://127.0.0.1:5080 -e DOMAIN_NAME='r87.rocks' -e STATIC_IP='52.58.178.141' -e RESPONDER_HTTP_ONLY='NO' --security-opt=no-new-privileges --restart=always --oom-kill-disable --memory=3g -p 80:5080 -p 443:50443 -p 53:5053/udp --name netsparkerhawk netsparkerhawk |
- To restrict IP addresses based on your requirements, run this command:
docker cp config.yml netsparkerhawk:/opt/gopath/src/hawk/conf/config.yml |
You can find the config.yml in the dockerfile. Here is the sample:
allowedListMode : true
allowedList:
- 54.85.169.114
- 54.88.149.100
- 3.122.90.89
- We recommend you have SSL/TLS support between Invicti and Hawk. If your certificates are in .crt and .key file formats, they should be converted to .pem files (refer to https://stackoverflow.com/search?q=crt+key+pem).
- Copy your certificate and private key into the cert folder in the Hawk container
docker cp --chown=invicti:invicti fullchain.pem netsparkerhawk:/opt/cert/fullchain.pem docker cp --chown=invicti:invicti privkey.pem netsparkerhawk:/opt/cert/privkey.pem |
If you do not wish to use HTTPS, (e.g. for testing purposes), pass the RESPONDER_HTTP_ONLY='YES' argument to the docker create command.
IMPORTANT: If RESPONDER_HTTP_ONLY='NO' is defined and you don't have a certificate and private key defined, Invicti Hawk will exit and not function properly. |

- Start the container: docker start netsparkerhawk
- Configure DNS for <DOMAIN_NAME>, as in example.com:
- Define two name servers ns.example.com and ns2.example.com to point to the static IP address of the docker host.
- Check that the docker host machine is accessible using these DNS names.
- Invicti Hawk should be able to resolve the following addresses:
- example.com
- ns.example.com
- ns2.example.com
- a.example.com
- a.b.c.example.com
- aaaaaaaaaaaaaaaaaaaaaaa.example.com
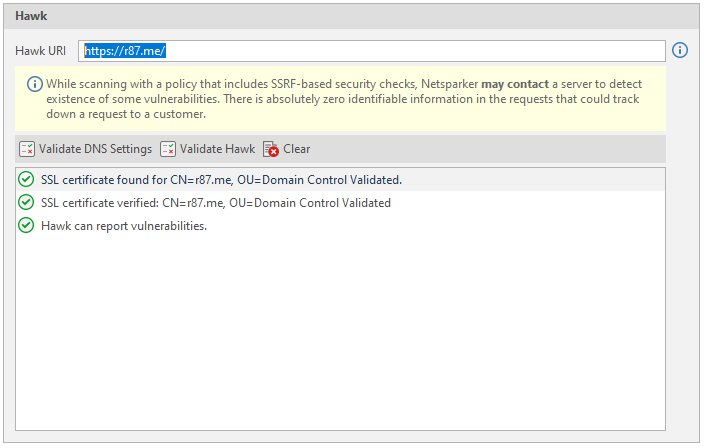
- Change the Invicti Hawk URI in the policy to https://example.com or http://example.com if you do not want to use HTTPS.

- Validate DNS Settings and Validate Invicti Hawk.
- You can now run Invicti scans using a custom server that uses this policy for the Hawk verification.
Troubleshooting
If you experience difficulties installing Invicti Hawk in your environment, try these troubleshooting tips:
- Check security groups on an ec2 instance to confirm that access to ports 80, 443, and udp 53 is open.
- Check the Invicti Hawk error log located at /var/log/hawk.log