Installing Authentication Verifier Agents
To run authenticated scans in your local environment, install an Authentication Verifier Agent. For scanning internal websites inaccessible from the internet, set up a Scan Agent on your network. The Scan Agent performs the scan and sends results to Invicti Enterprise. Use an Internal Verifier Agent to ensure the scan is authenticated. For further information about the internal authentication verifier, refer to our Streamline authenticated scanning with Invicti’s verifier agents document.
This document explains how to install, update, and uninstall authentication verifier agents on Windows. Using Linux? See Installing Authentication Verifier Agent on Linux (Debian Distribution). For the RedHat distributions, see Installing Authentication Verifier Agent on Linux (RedHat Distribution).
TIP: The Authentication Verifier Agent is an optional component. Install it if you need to scan websites with form, basic authentication, or OAuth2. It also supports Authentication Profiles, Custom Scripts for Form Authentication, CyberArk Vault, HashiCorp Vault, and AzureKey Vault. |

There are 3 steps in this process:
- Downloading an authentication verifier agent
- Configuring an authentication verifier agent
- Setting an authentication verifier agent as a Windows Service
Prerequisites
Software Requirements
- Windows Server 2016 or above (Windows Server 2019 recommended)
Hardware Requirements
- 1.4 GHz Processor (2.0 GHz or faster recommended)
- 4 GB RAM or higher recommended
- 10 GB Free Disk space for each internal agent
NOTE: If you select TLS 1.3 as a security protocol from the Scan Policy, make sure you have Windows 11 or Windows Server 2022 or higher versions. |

Network Requirements
- Agent should be configured so that it can reach your internal website through HTTP/HTTPS
- Agent needs to be able to access the Invicti Enterprise Application Server’s HTTPS 443 port
Whitelisting Requirements
Refer to these documents to whitelist the correct IP addresses based on your region:
- Whitelisting requirements for Invicti Enterprise On_Demand - US region
- Whitelisting requirements for Invicti Enterprise On_Demand - US-2 region
- Whitelisting requirements for Invicti Enterprise On_Demand - EU region
- Whitelisting requirements for Invicti Enterprise On_Demand - CA region
- Whitelisting requirements for Invicti Enterprise On-Premises
Required Access
- A user must have administrator privileges to run the required commands and agent service.
Step 1: Downloading the authentication verifier agent
You need to download the authentication verifier agent and install it on a machine in your internal network.
How to download the authentication verifier agent
- In Invicti Enterprise select Agents > Manage Agents > Configure New Agent from from the left-side menu.
- From the Authentication Verifier section, select Windows to download the file.
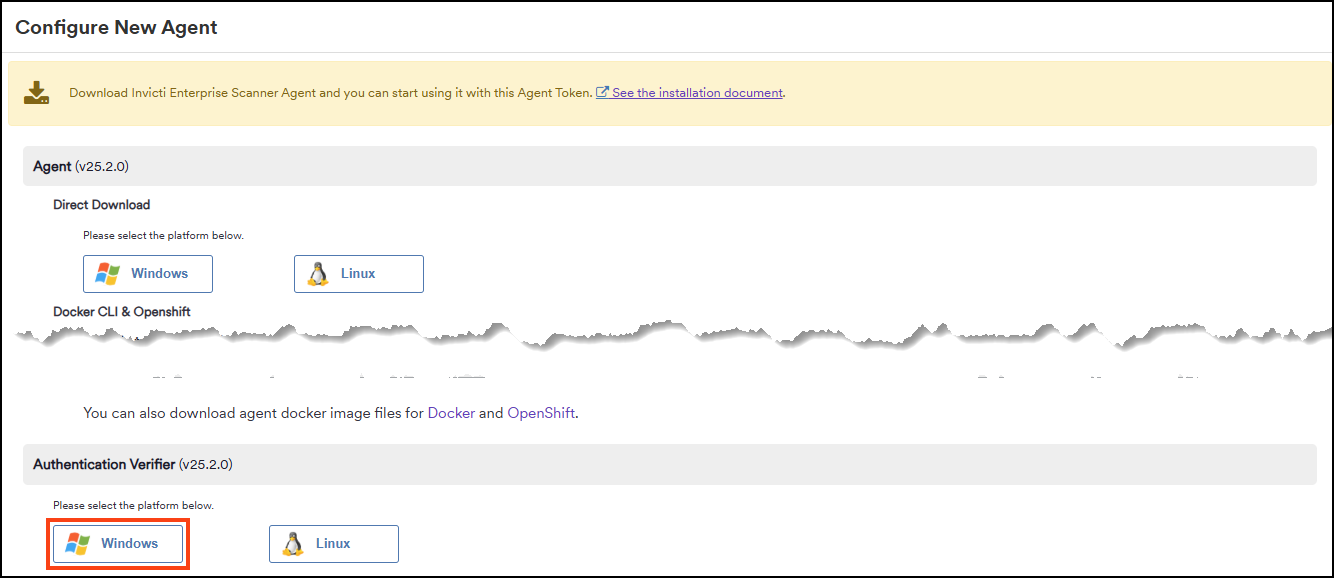
When you download the ZIP file, you can configure the authentication verifier agent.
Step 2: Configuring authentication verifier agent
How to configure the authentication verifier agent
- Navigate to the folder you downloaded the ZIP file.
- Extract the contents of the zip file to C:\NC_VerifierAgent or other, desired location.
- Open the C:\NC_VerifierAgent\appsettings.json file with your preferred text editor.
- Edit the following attributes before running the agent, listed under AgentInfo:
- AgentName: This can be anything you want. (If you are going to install more than one instance of the agent, you must set a unique agentName value for each instance, something you will use later.)
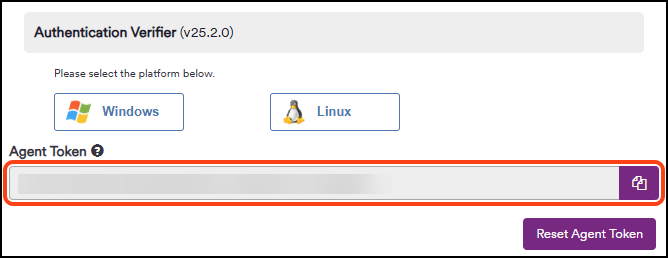
- ApiToken: In Invicti Enterprise, the Agent Token is displayed in the Configure New Agent window. Copy the value into the ApiToken.
IMPORTANT:
|

- Save and close the C:\NC_VerifierAgent\appsettings.json file.
NOTE: You can change the default location in which the scanner agent saves its data. For further information, refer to Changing default data folder for the authentication verifier agent. |
Setting proxy in authentication verifier agent
You can set a proxy for the authentication verifier agent in Invicti Enterprise. Invicti Enterprise supports Basic Authentication but not Digest and NTLM.
You are required to manually enter proxy settings into the appsettings.json file with your preferred text editor.
This table lists and explains the entries in the Proxy settings.
Field | Description |
Proxy Mode | Enter your proxy settings if you want the Agent to use or not to use the proxy. There are three modes:
|
Use Default Credentials | Enter true if you authenticate to the proxy via the user that the Agent service is defined. |
Username | Enter a username for authentication |
Password | Enter a password for authentication |
Domain | Enter a domain name |
Address | Enter a proxy address. Only IP address or hostname without schema and port is allowed. |
Port | Enter a port for the proxy |
Bypass on Local | Enter a value that indicates whether to bypass the proxy server for local addresses. |
Bypass List | Enter the address(es) that do not use the proxy server. Enter the address(es) as RegEx. The following shows some possible bypass list expressions: "example\\.com", ";*\\.example\\.com", "192\\.168\\.1\\.1", "www\\.example\\.com", "www\\.example\\.com:8080", "100\\.;*\\.;*\\.;* |
Using Proxy Auto-Configuration file
NOTE: This is an optional step. To use a PAC file, you must set the Proxy Mode to System Proxy in the appsetting.json file. |

You can use Proxy Automatic Configuration (PAC) to configure your proxy. A PAC file lets you describe the proxy configuration in a file using JavaScript, so you can manage your proxy settings.
How to use a Proxy Auto-Configuration file on Windows
- In Windows go to Settings > Network & Internet > Proxy.
- Turn on the Use setup script toggle.
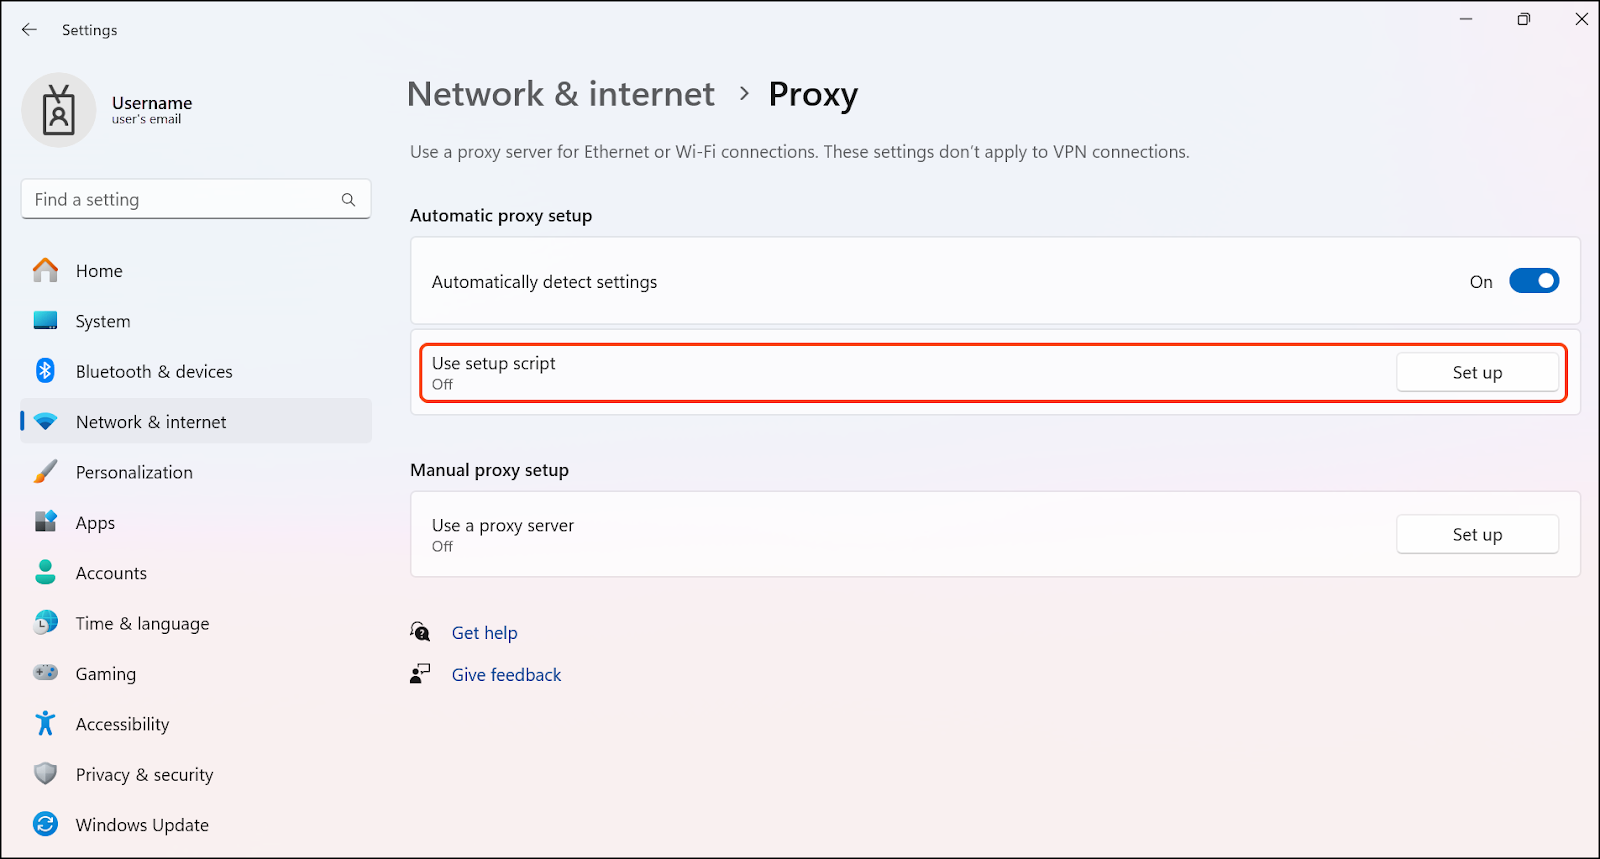
- In the Script address field, enter the PAC file's URL address.
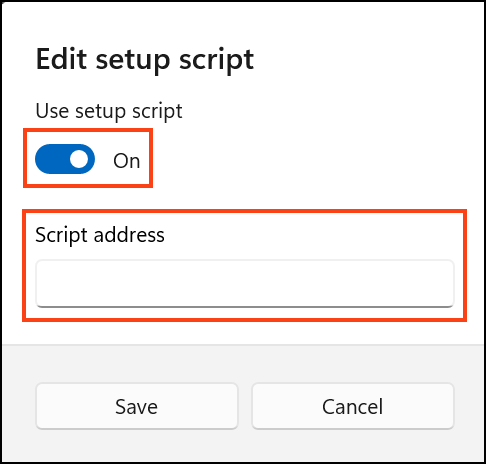
- Select Save.
Step 3: Setting authentication verifier agent as a Windows Service
An internal authentication verifier agent should be configured as a Windows service so that it can poll the Invicti Enterprise servers regularly and can take the verification initiation command from the server.
How to set the authentication verifier agent as a Windows Service
- Open a command prompt in Administrator mode and navigate to the agent's folder.
- Run the following command to install the Invicti Enterprise Authentication Verifier Agent as a Windows Service:
Netsparker.Cloud.Agent.exe -i. |
- Press Windows+R, type 'services.msc' and press Enter.
- Find 'Invicti Enterprise Scanning Service - [YOUR_AGENT_NAME]'.
- Right-click on it and select Properties.
- Make sure Startup type is set to Automatic, and select Start.
- Select Apply and OK, then exit the Properties window.
NOTE: Although this service is set to start automatically, it may not restart until the PC is restarted too. |
After these steps, the Invicti Enterprise Authentication Verifier Agent should be running on your network. To view your verifier agents, select Agents > Manage Verifiers from the left-side menu.

IMPORTANT: Any change in the appsetting.json file, such as setting proxy and changing API Token, requires restarting the service so that the changes can take effect. |
Updating authentication verifier agents
There are three methods to update your authentication verifier agent.
- When a new verifier agent version has been published, you can update your Agents manually using installation files on the machines on which agents are installed.
- You can update agents manually by selecting Update Agent (visible only when the Enable Auto Update is not configured and the new version of the Agent is available). While the update is in progress, the State field will display 'Updating'.
- You can enable the auto update feature. The target verifier agent updates itself as soon as possible when it’s idle.
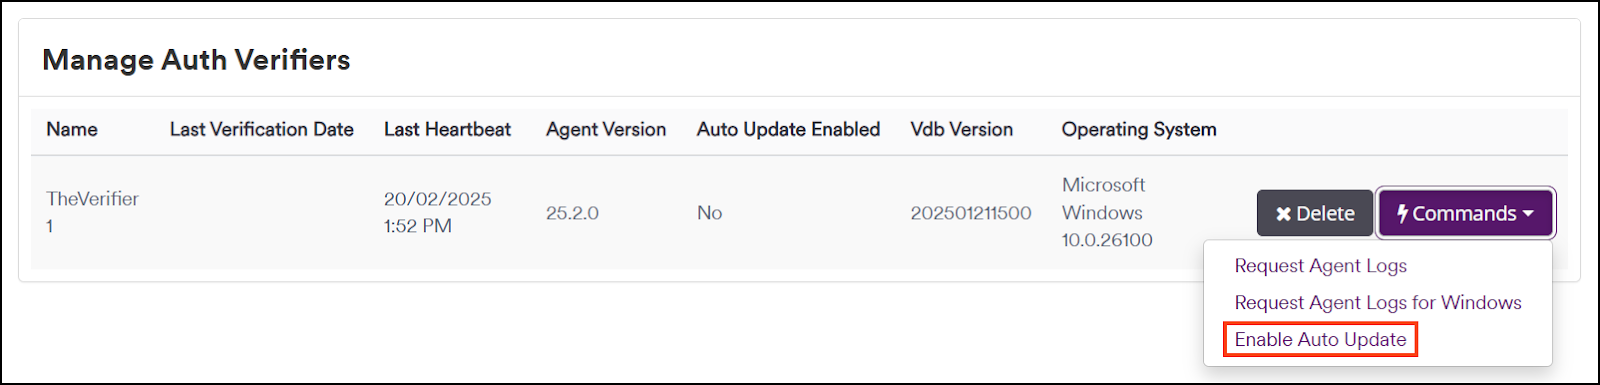
How to enable automatic Authentication Verifier Agent updates
- Select Agents > Manage Verifiers from the left-side menu.
- Next to the relevant agent, select the Command drop-down, then Enable Auto Update.
Changing the default data folder for the authentication verifier agent
You can change the default location where the authentication verifier agent saves its data. This helps you avoid running out of free space due to accumulating data.
By default, the authentication verifier agent saves the data to the C:\Invicti Enterprise folder. However, you can choose to save the data in a different location to avoid using up your free space.
The following instruction explains how to change the location where the authentication verifier agent saves its data. The instruction is valid for new agents or existing agents:
How to change the default data folder
- Navigate to the agent’s folder you want to change to the default folder.
- Open appsettings.json file with your preferred text editor.
- Add the following attribute listed under AgentInfo: "ScanDataFolderPath": "FullPath"
IMPORTANT: Write the full path as shown in the following example: C:\\Users\\[User]\\Documents\\ScanData. |
- Save and exit.
If you modified the existing agent's configuration file, you need to restart the agent service. So, Open services.msc, find 'Netsparker Cloud Scanning Service - [YOUR_AGENT_NAME]', and restart the agent service.
This restart does not affect your saved data. To move the existing data, you need to copy the data and paste it into the new folder.
If this is a new agent, continue following this instruction: Step 2: Configuring authentication verifier agent
Installing multiple authentication verifier agents on Windows
How to install multiple verifier agents on Windows
- Copy all files from the default Verifier Agent’s folder to the new Agent’s folder. The path is: C:\Invicti Enterprise Agent.
- For example, if you decided to use Agent-2 as the new Agent name, you could use this command to copy all files to new Agent’s folder:
xcopy "C:\Invicti Enterprise Agent\*.*" "C:\Invicti Enterprise Agent-2" /yie. |
This creates a new directory in C:\Invicti Enterprise Agent-2 and copies in all the required files.
- Locate the new Agent’s folder and open the appsettings.json file with a text editor. Set the new Agent’s name.
- Open a command prompt in Windows with Administrator rights and install the new Agent as a Windows Service using these commands:
- This command changes the current folder to the new Agent’s folder:
cd C:\Invicti Enterprise Agent-2. |
- This command installs the new Agent as a Windows Service:
Netsparker.Cloud.Agent.exe -i. |
Uninstalling the authentication verifier agent
You can uninstall verifier agents.
How to uninstall the authentication verifier agent
- Open a command prompt in Administrator mode and navigate to the agent's folder.
- Run the following command to stop and delete the Invicti Enterprise Authentication Verifier Agent as a Windows Service:
sc stop "Invicti Cloud Scanning Service - YourAgentName" sc delete "Invicti Cloud Scanning Service - YourAgentName" |
These commands stop and delete the verifier agent service. If required, you can delete the related folder.