Executive Summary Report
The Executive Scan Report provides a summary of the scan results.
- The Executive Summary Report enables you to view all issues and recommendations within a single document.
- It is useful to executives and managers because it provides an overview of your system’s security state, displaying the number, severity, and types of identified vulnerabilities in a quickly digestible format.
- It also provides business impact and suggestions. For example, you can find out the compliance lapses.
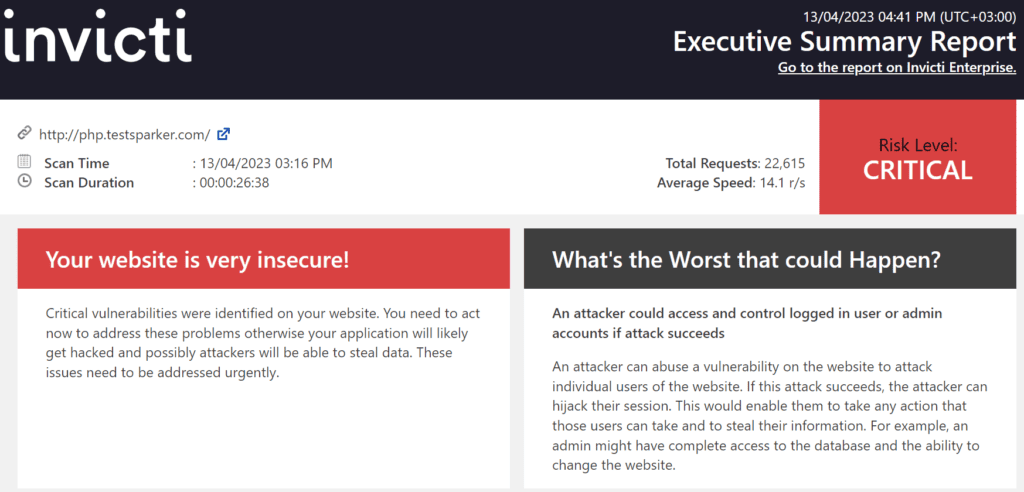
- This report contains brief details about your scan, such as Scan Time and Duration.
- It can be exported in HTML or PDF format.
Click to view a sample Executive Summary Report.
For further information, see Overview of Reports, Report Templates and Built-In Reports.
Executive Summary Report Sections
There are two sections in the Executive Summary Report:
- Scan Metadata
- Vulnerability Summary
- Compliance Summary
Scan Metadata
This table lists and explains the headings in the Scan Metadata:
- Scan Target
- Scan Time
- Scan Duration
- Description
- Total Requests
- Average Speed
- Tags
- Risk Level
For further information, see Progress, and Scan Duration and Speed.
Vulnerability Summary
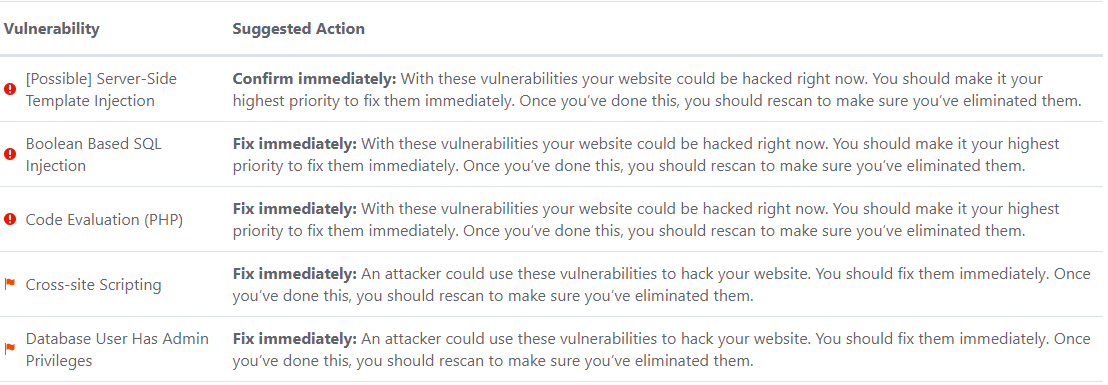
This section provides a summary of information about each discovered vulnerability in the scan, and categorizes them based on severity. For example, if Invicti determines a vulnerability as Critical, it requires immediate attention.
This list consists of:
- VULNERABILITY An issue that malicious hackers can attack
- SUGGESTED ACTION What Invicti recommends

This table lists the Suggested Actions and their business impact.
|
Suggested Action |
Description |
|
Fix Immediately |
This means you should prioritize this vulnerability and act immediately. |
|
Confirm Immediately |
This means you should prioritize this vulnerability and first verify, then start fixing. |
|
Fix Soon |
This means you should start fixing this vulnerability in the shortest possible time. |
|
Confirmed Soon |
This means you should start fixing this vulnerability after verifying it. |
|
Consider fixing after confirmed |
This means you can start working on this vulnerability after confirmation, but it does not pose a critical threat to your system. |
|
Consider fixing |
This means you can start working on this vulnerability, but it does not pose a critical threat to your system. |
|
No Action Required |
This means if you implement this recommendation, it provides an extra layer of security. |
For further information, see Vulnerability Severity Levels.
Compliance Summary
This section categorizes vulnerabilities based on their classification. This table lists and explains the classifications.
|
Classification |
Description |
|
PCI DSS v3.2 |
The PCI DSS (Payment Card Industry Data Saving Standard) sets criteria for companies that rely on payment by credit and/or debit cards. |
|
OWASP 2013 |
The OWASP (Open Web Application Security Project) 2013 Top Ten lists the most critical security risks to web applications. |
|
OWASP 2017 |
The OWASP (Open Web Application Security Project) 2017 Top Ten lists the most critical security risks to web applications. |
|
SANS Top 25 |
The SANS Top 25 lists the most dangerous software errors of the Common Weakness Enumeration (CWE). |
|
HIPAA |
The HIPAA (Health Insurance Portability and Accountability Act) determines criteria for organizations that process health data digitally to comply with the classification. |
|
ISO27001 |
ISO 27001 Information Security Management Systems Standard specifies the correct management of data. It lists the controls and objectives to increase, develop, and manage the security of data. |
|
WASC Threat Classification |
WASC provides information about the vulnerability according to the Web Application Security Consortium threat classification. |
How to Generate an Executive Summary Report in Invicti Enterprise
- Log in to Invicti Enterprise.
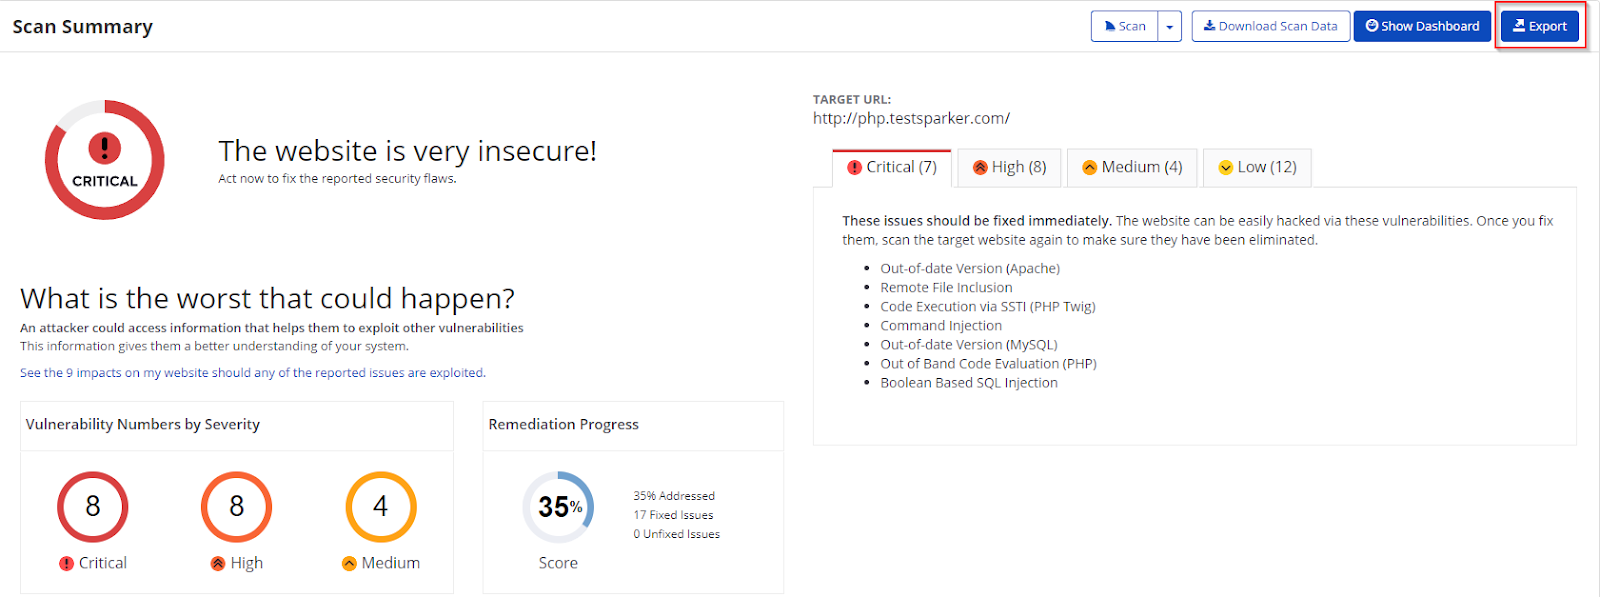
- From the main menu, select Scans > Recent Scans.
- Next to the relevant scan, select Report.
- On the Scan Summary page, select Export.

- From the Report drop-down, select Executive Summary.

- From the Format drop-down, select an option.
- If required, select one of the following to configure your report:
- Exclude Addressed Issues excludes those issues on which you’ve already taken action
- Exclude History of Issues excludes the issue history from the report. If unselected, only the last 10 history items appear in the report. For further information, see Viewing Issues in Invicti Enterprise.
- Export Confirmed includes only those issues that are confirmed.
- Export Unconfirmed includes only those issues that are unconfirmed.
- Select Export.
You can view the report in the saved location.

How to Generate an Executive Summary Report in Invicti Standard
- Open Invicti Standard.
- From the ribbon, select the Reporting tab, then Executive Summary Report.

- Select a save location, then Save.
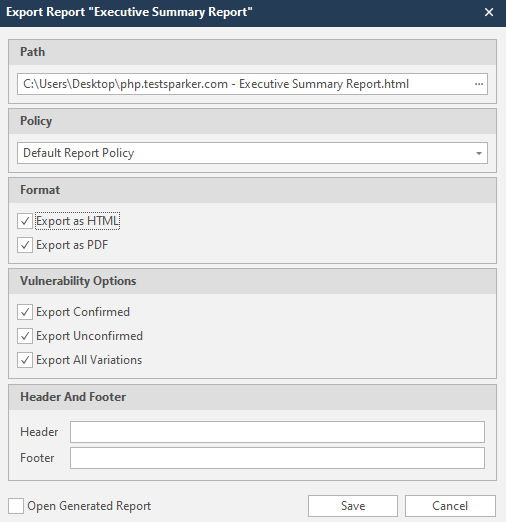
- The Export Report dialog is also displayed at this point, with the Path field already populated from the previous dialog.

- From the Export Report dialog, you can decide on:
- Policy: Select the default policy or customized policy report(s) (see Custom Report Policies).
- Report Format: Select HTML and/or PDF format.
- Vulnerability Options (select one or all):
- Export Confirmed: When selected, the report will include confirmed vulnerabilities.
- Export Unconfirmed: When selected, the report will also include unconfirmed vulnerabilities.
- Export All Variations: Variations mean that if Invicti identified some passive or Information level issues in more than one page, it does not show all these variations. However, users can change this by enabling or disabling this option.
- Header and Footer:
- Enter relevant information that will appear in the header and footer section of the report.
- Open Generated Report: When selected, your report(s) is generated when you select Save.
- Select Save.
You can now view the report in the Save location.