Integrating Invicti Enterprise with ServiceNow Vulnerability Response (Plugin)
ServiceNow Vulnerability Response (ServiceNow VR) is a vulnerability management tool that helps organizations track, prioritize, and share tasks across departments to resolve vulnerabilities. This guide shows you how to set up and configure bi-directional integration between Invicti Enterprise and ServiceNow VR.
This integration allows you to not only send identified vulnerabilities from Invicti Enterprise to ServiceNow VR, but also send any vulnerability status changes from ServiceNow VR back to Invicti Enterprise. You can also configure advanced options such as issue detail, field configuration, and configuration item matching.
NOTE: If you prefer to use an integration script without the advanced configuration options offered by our integration plugin, refer to Integrating Invicti Enterprise with ServiceNow Vulnerability Response using an integration script. |

How to integrate Invicti Enterprise with ServiceNow VR
There are three steps to this integration:
- Step 1: Download the ServiceNow VR plugin
- Step 2: Set up the connection with ServiceNow VR
- Step 3: Configure ServiceNow VR with Invicti Enterprise
After setting up the integration, create a sample issue to test the connection, and optionally configure bi-directional integration between Invicti Enterprise and ServiceNow VR.
Step 1: Download the ServiceNow VR plugin
- Log in to Invicti Enterprise.
- From the main menu, select Integrations > New Integration.
- Select ServiceNow Vulnerability Response.
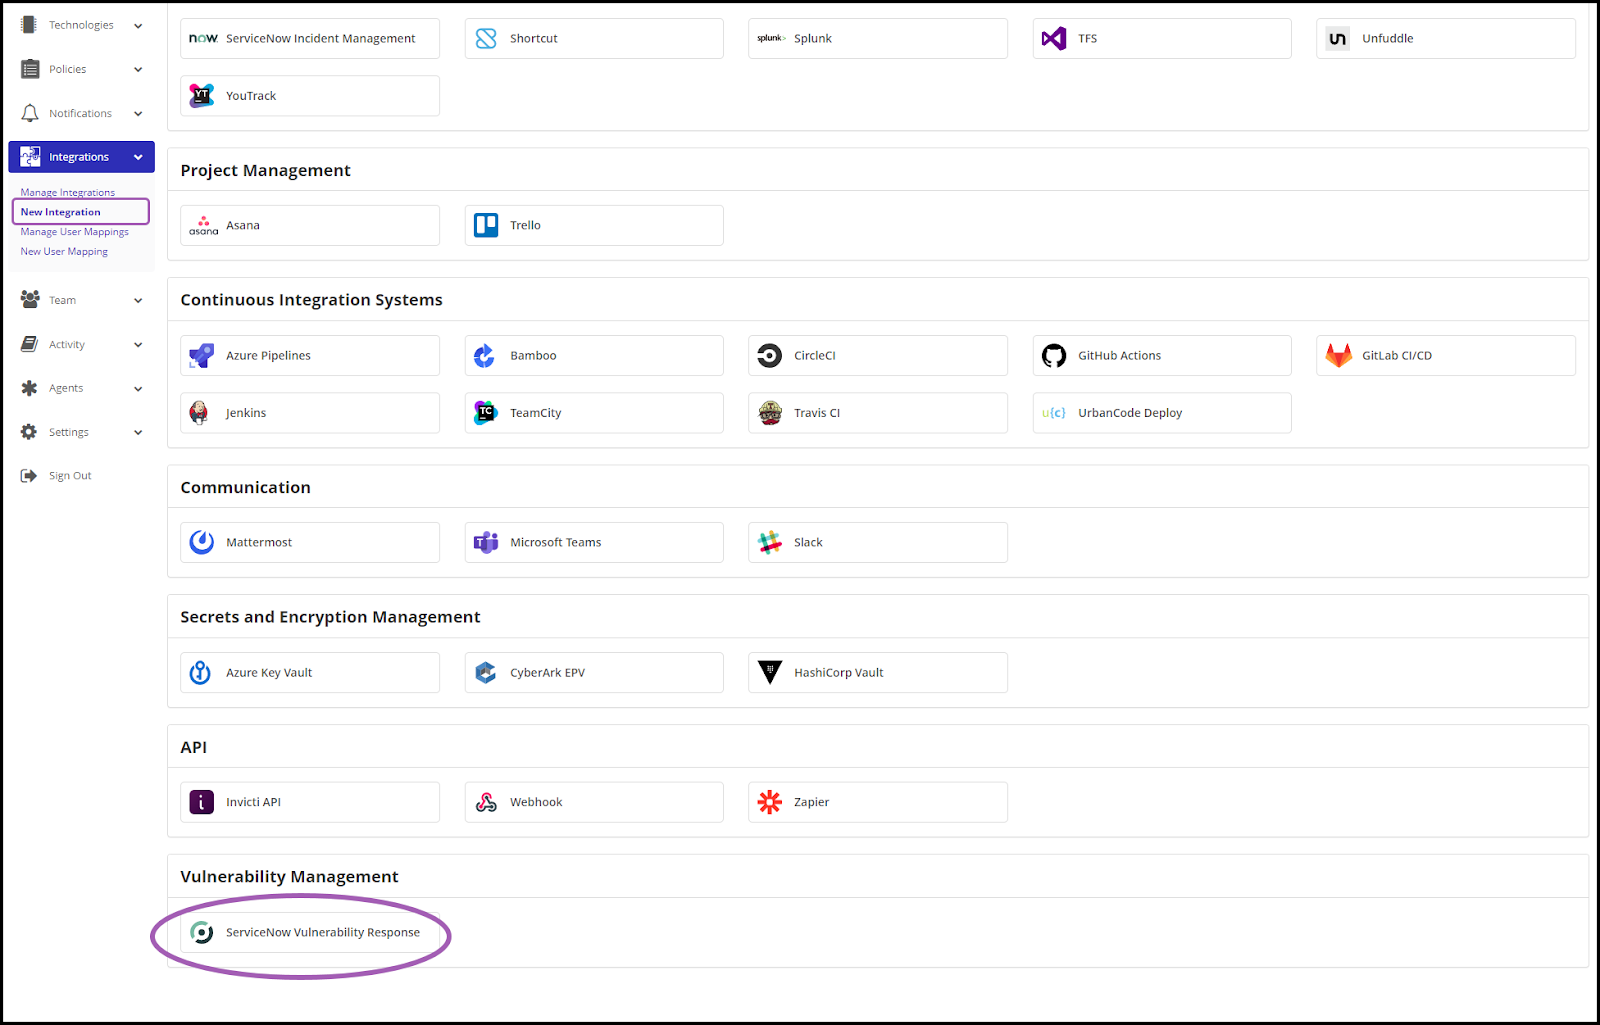
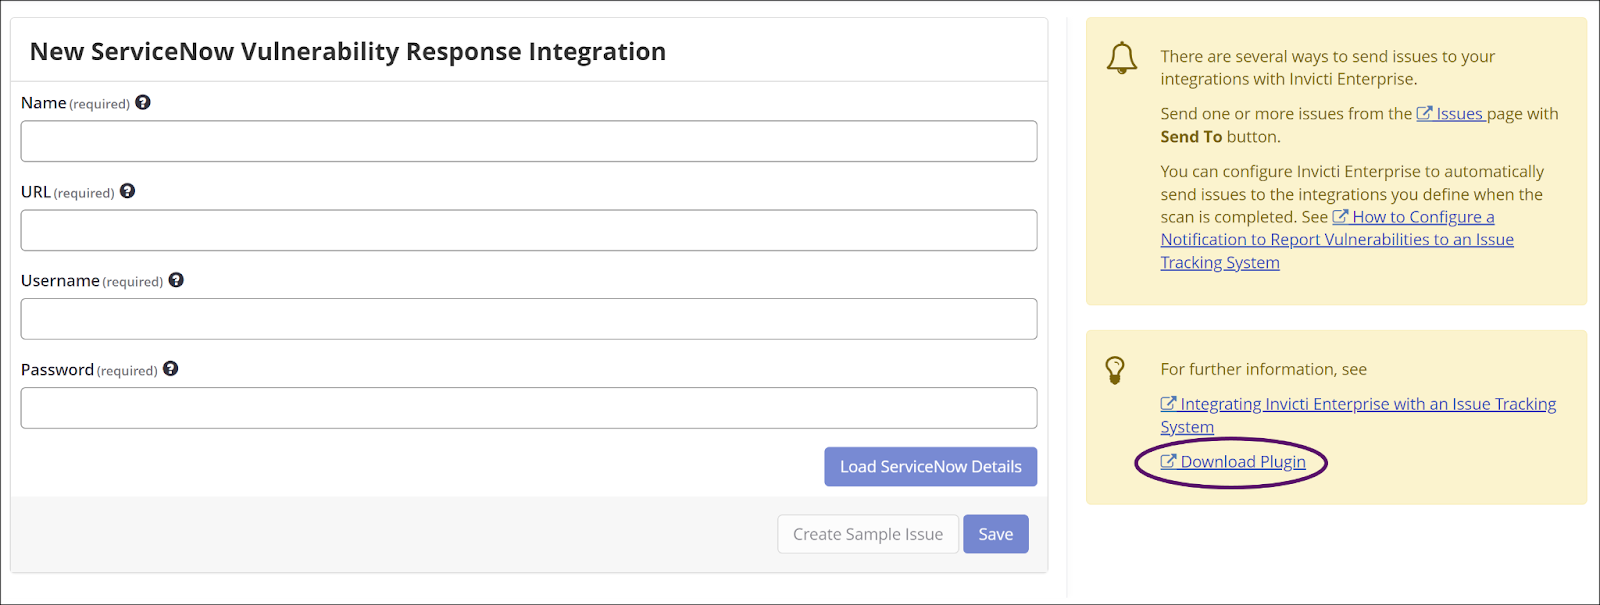
- Click Download Plugin.
You now have the necessary file to continue with Step 2 to set up the connection with ServiceNow VR.
Step 2: Set up the connection with ServiceNow VR
- Log in to your ServiceNow VR platform.
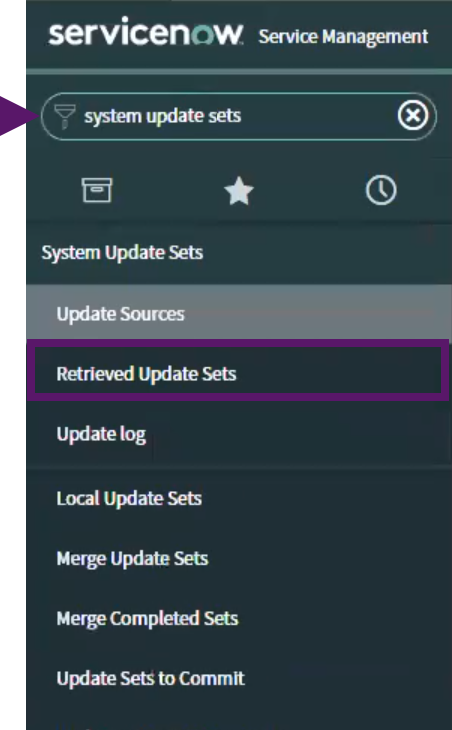
- Search for 'system update sets', then select Retrieved Update Sets from the search results.
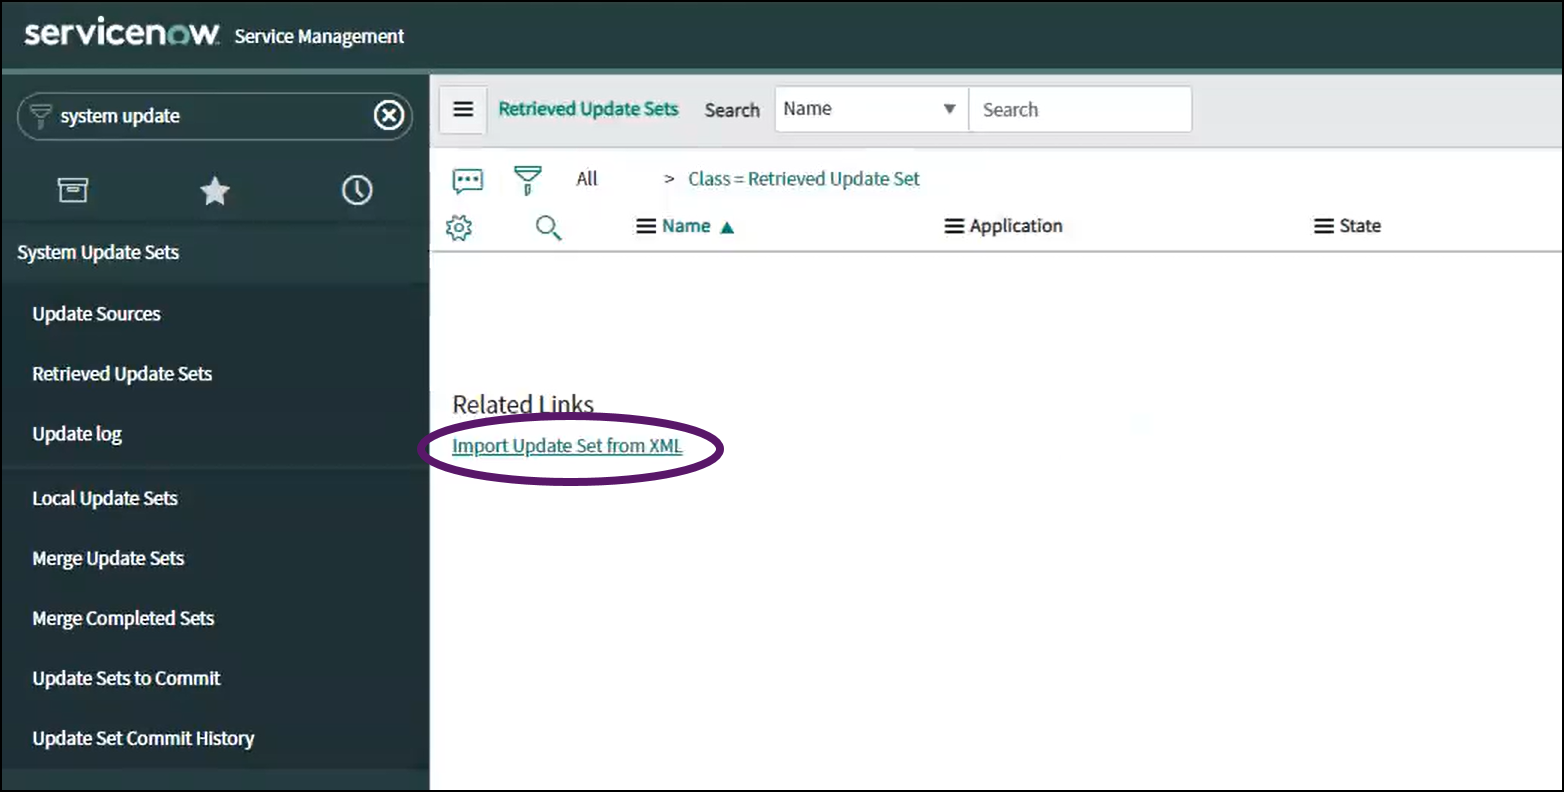
- Click Import Update Set from XML.
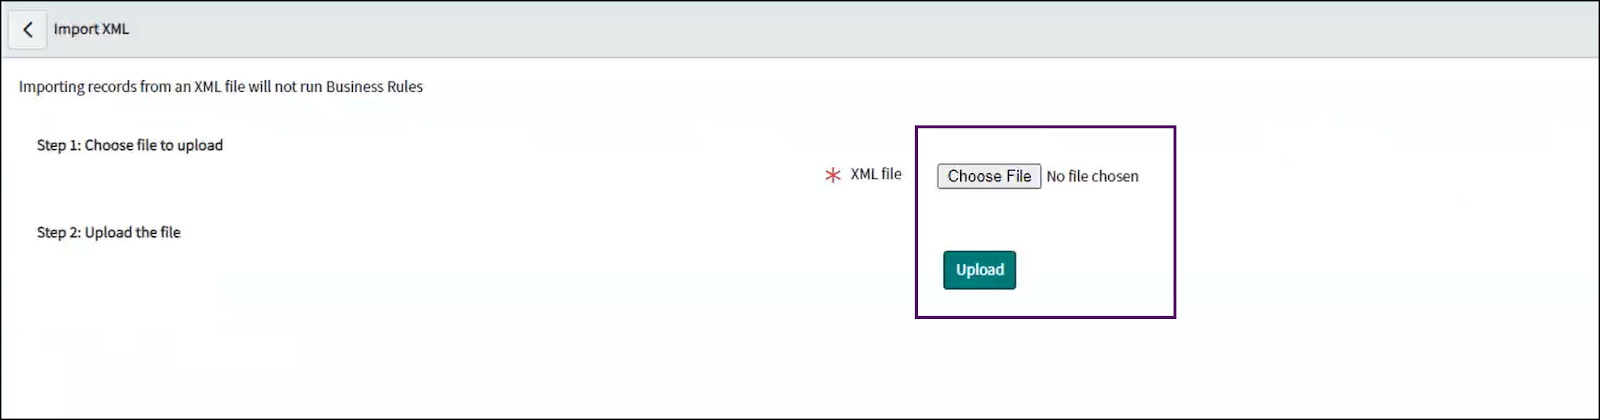
- Click Choose File and select the Invicti Enterprise Vulnerability Response file that you downloaded in Step 1. Then click Upload.
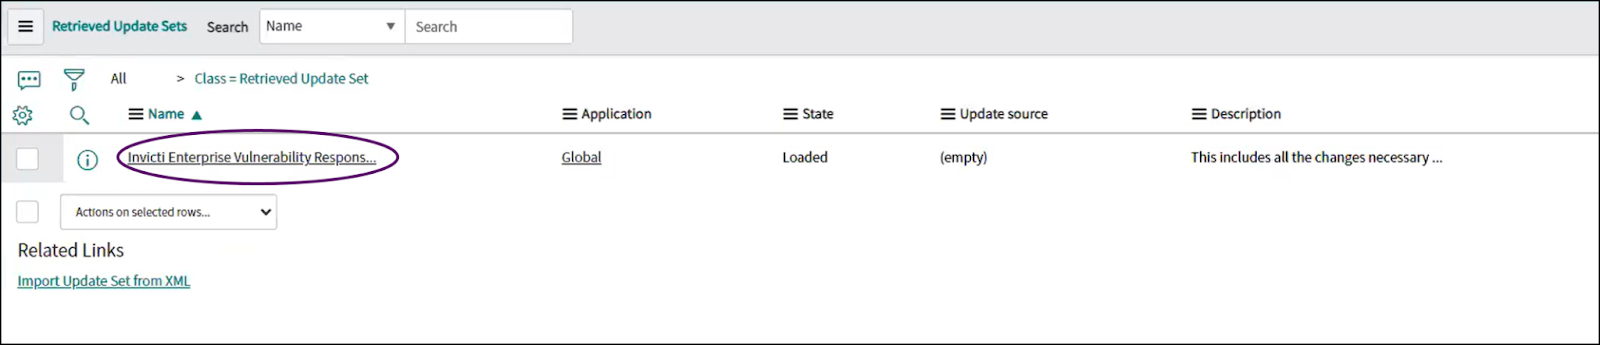
- Click on the file name Invicti Enterprise Vulnerability Response to open the file.
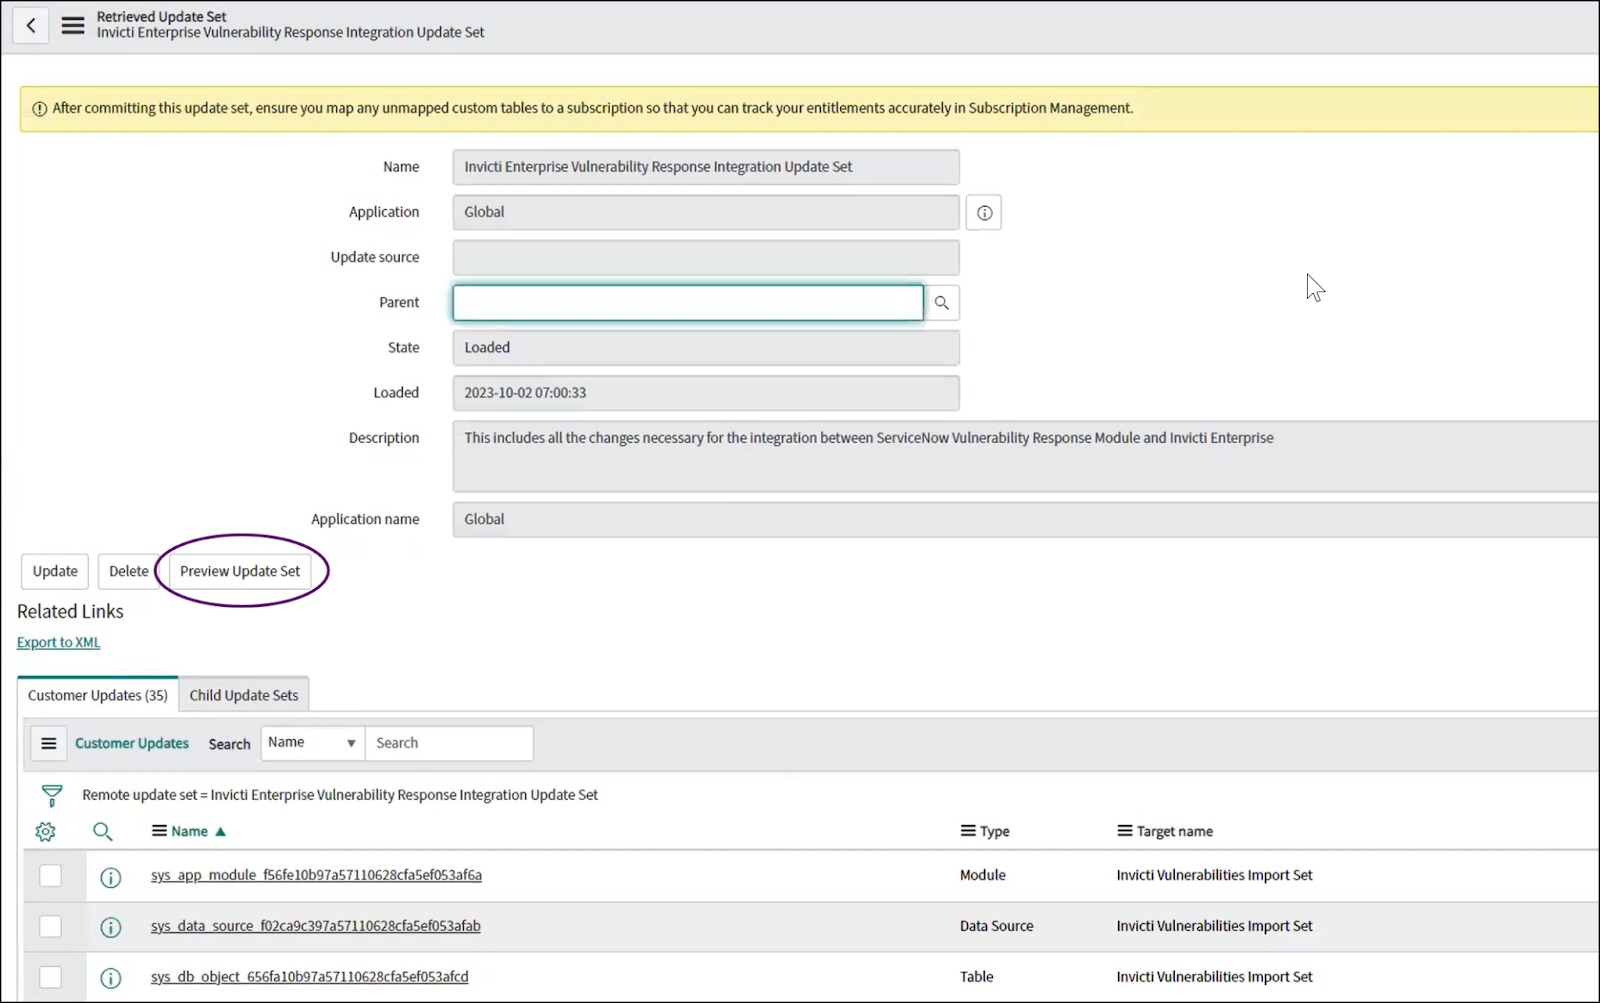
- Click Preview Update Set.
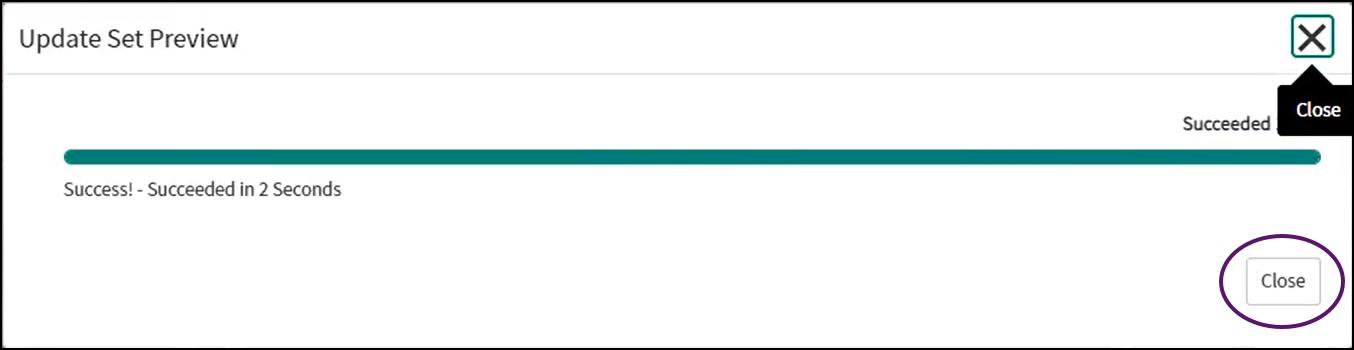
- Click Close when the Update Set Preview dialog box indicates the action has succeeded.
- Click Commit Update Set.
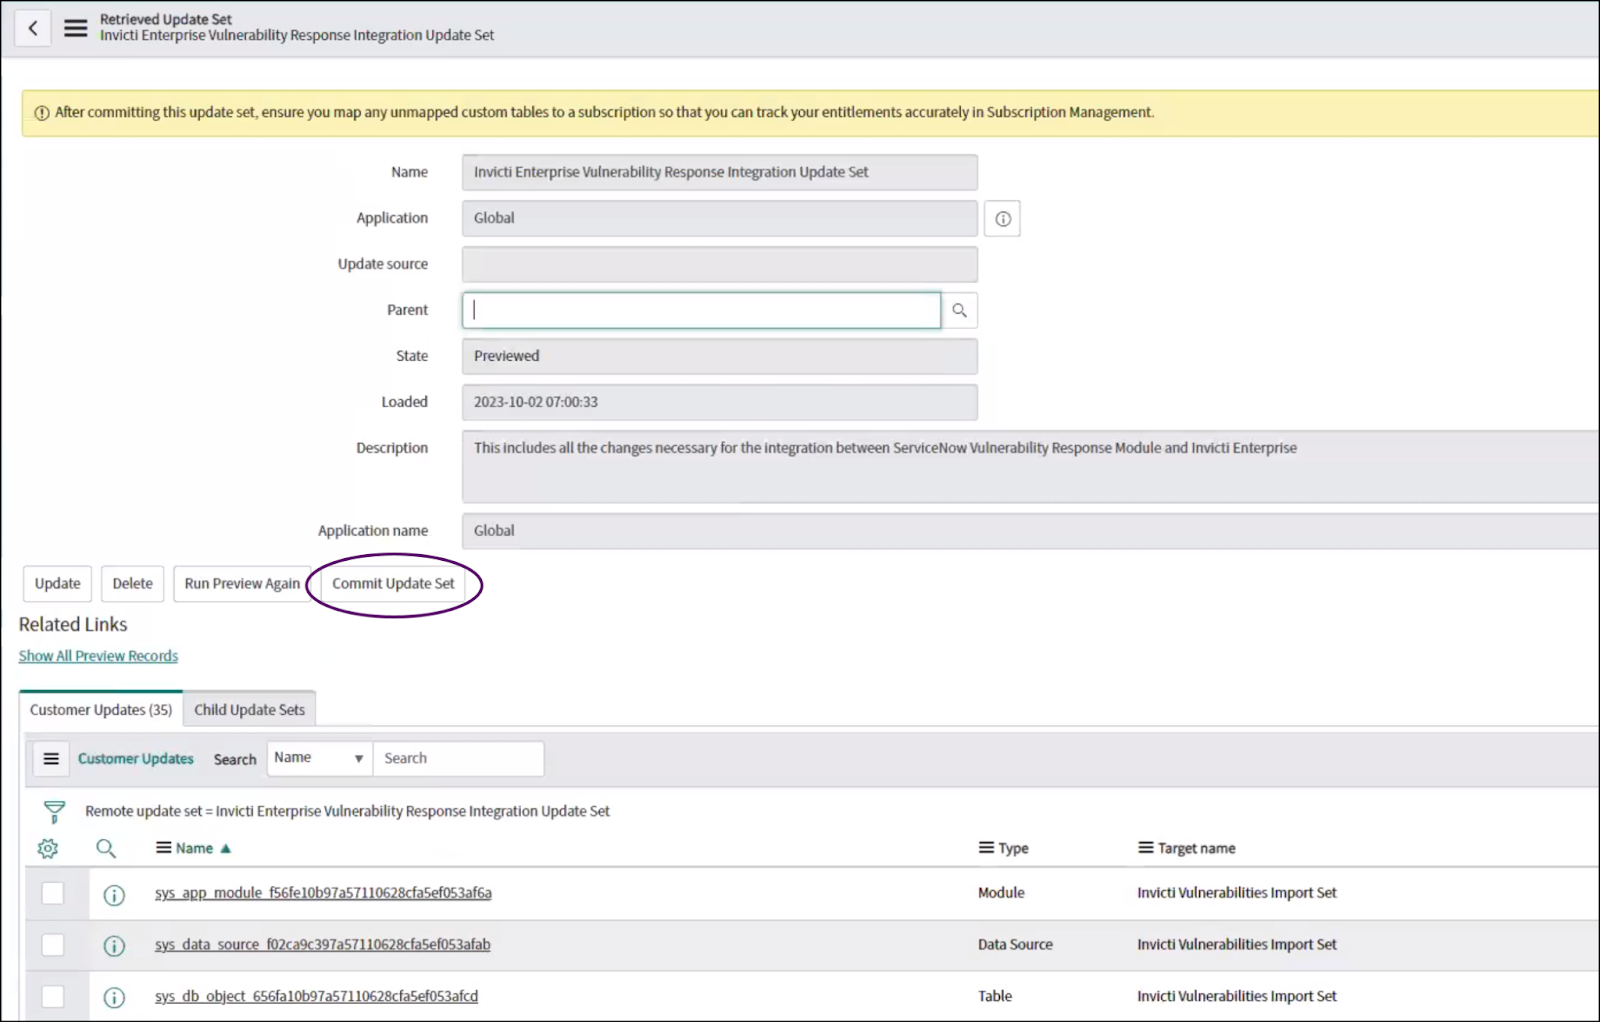
- Click Close when the Update Set Commit dialog box indicates the action has succeeded.

Invicti Enterprise is now connected with your ServiceNow VR instance. Continue with Step 3 to configure ServiceNow VR with Invicti Enterprise.
Step 3: Configure ServiceNow VR with Invicti Enterprise
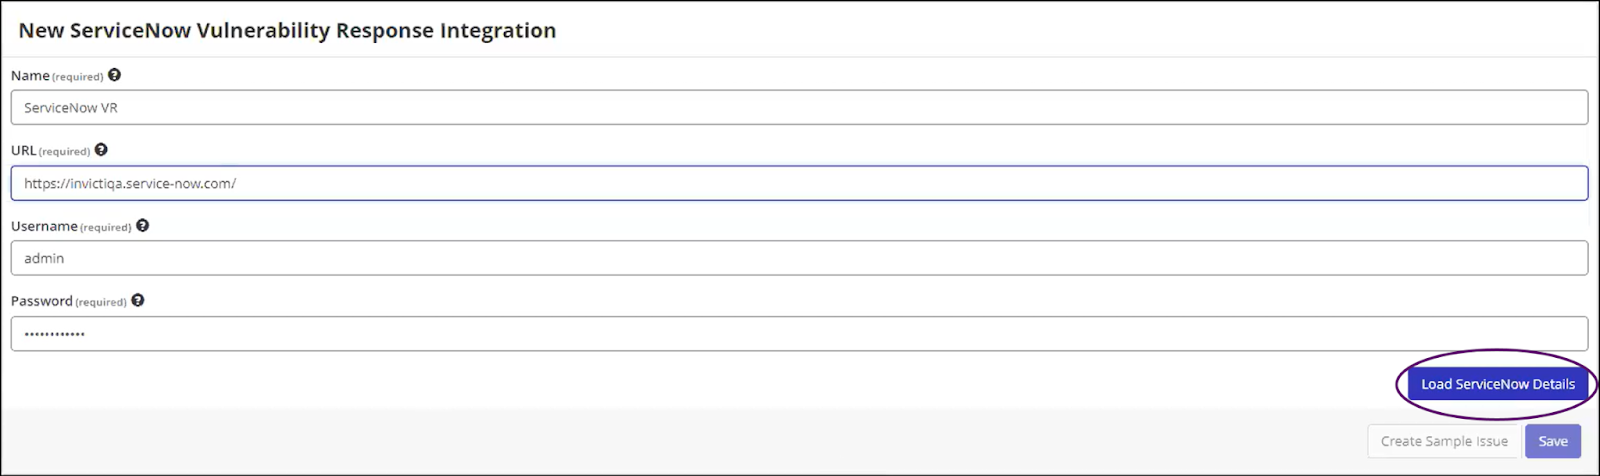
- Log in to Invicti Enterprise.
- From the main menu, select Integrations > New Integration.
- Select ServiceNow Vulnerability Response.

- Enter the following information:
- Name: This is the name for the integration.
- URL: This is the URL for your ServiceNow VR platform.
- Username: This is your ServiceNow VR Username.
- Password: This is your ServiceNow VR Password.

- Click Load ServiceNow Details. If the connection is successful, the Vulnerability Response Configuration section appears.
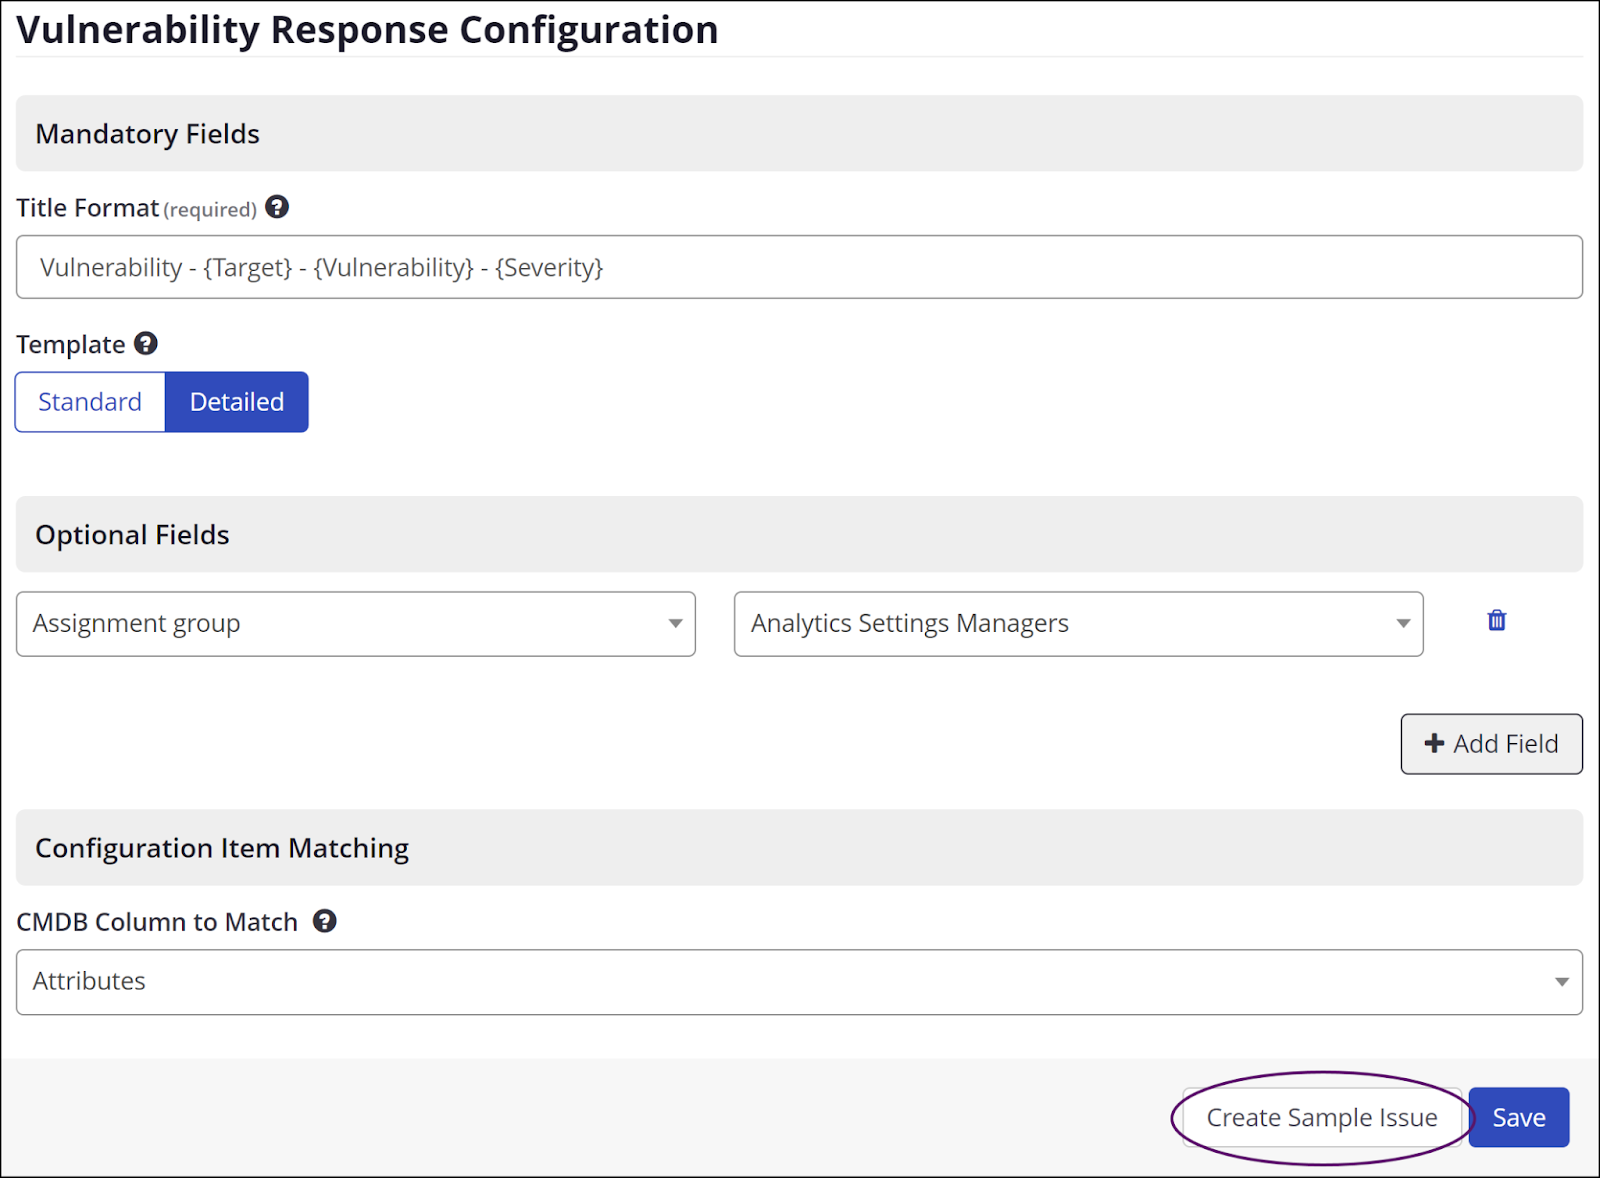
- In the Mandatory Fields section, edit the Title Format field if you want different information pulled into your ServiceNow VR application. The default fields are target, vulnerability, and severity. This is a free text field where you can add any mandatory fields that you want to pull from Invicti Enterprise into ServiceNow VR.

- Choose a template type for the vulnerability description: Standard (fewer issue fields) or Detailed (more issue fields). This determines the vulnerability information that is pushed into the Notes field on ServiceNow VR.

- Use the Optional Fields section to select additional fields you have configured in ServiceNow VR that you want to integrate with Invicti Enterprise.
For example, in the image below we have selected Assignment group and Problem Analyzers, which are a defined group of people in our ServiceNow VR instance. This configuration means that detected vulnerabilities will automatically be sent to ServiceNow VR and assigned to the Problem Analyzers.
To add additional fields for configuration, click + Add Field.
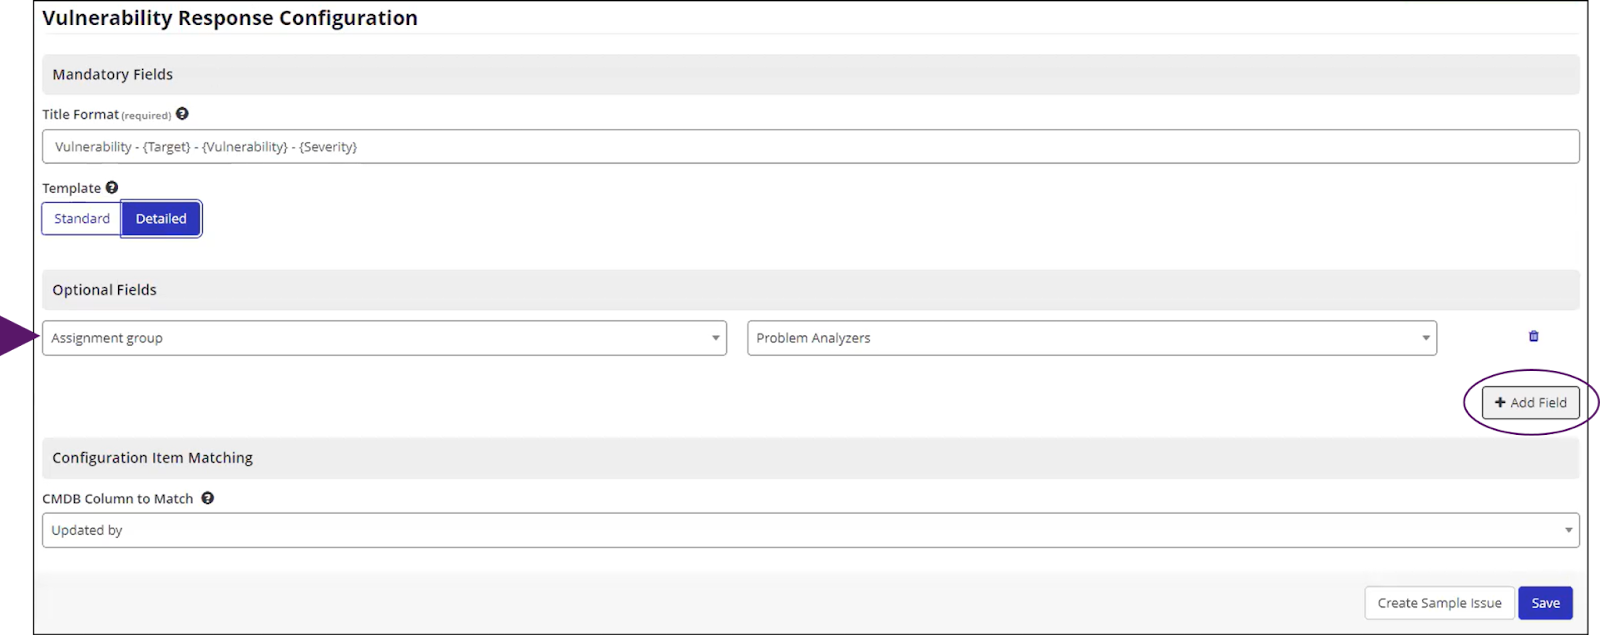
- Select a configuration item from the drop-down list to match targets to your Vulnerability Response configuration.
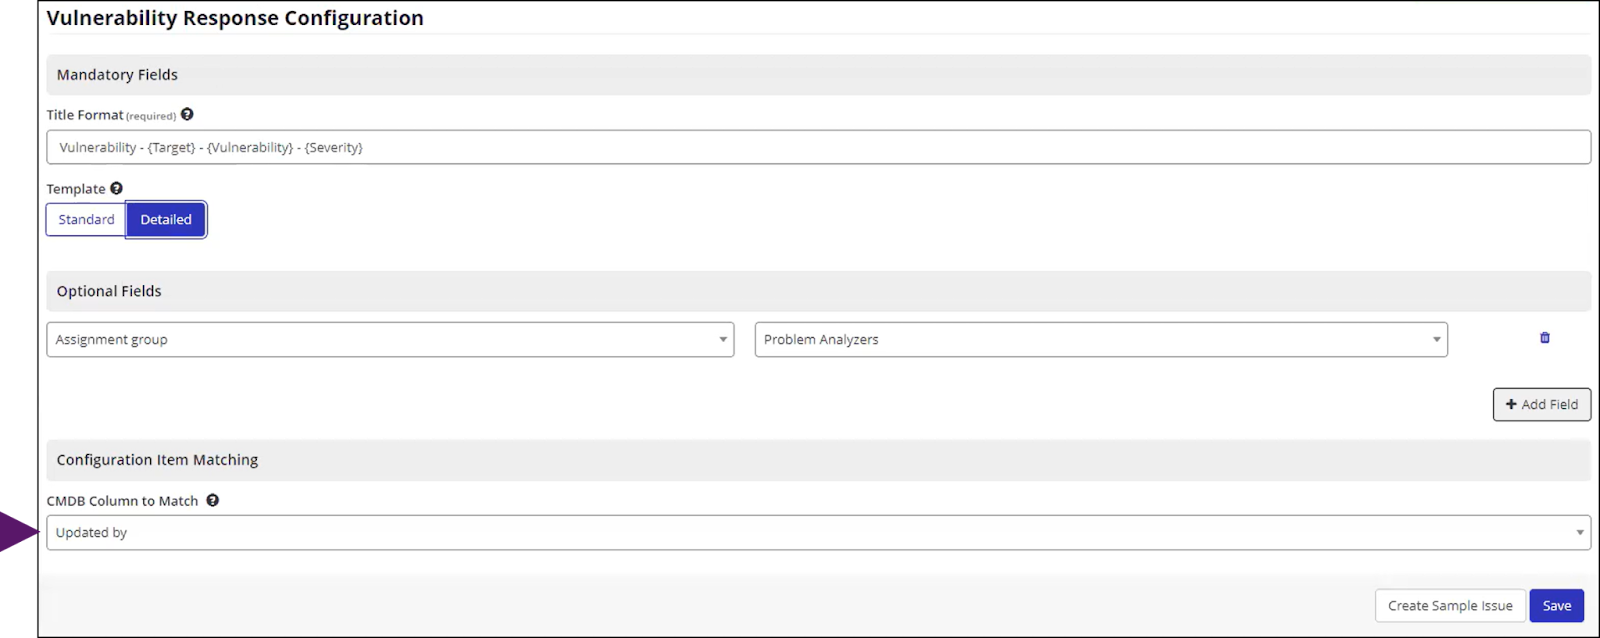
- Click Save.
Your integration with ServiceNow VR is configured and ready to use. Follow the steps below to create a sample issue to test the integration.
NOTE: You will need to repeat these 3 steps whenever the plugin file is updated. |

Create a sample issue to test the integration
- From the Invicti Enterprise main menu, select Integrations > Manage Integrations.
- Next to the relevant ServiceNow VR integration, click Edit.
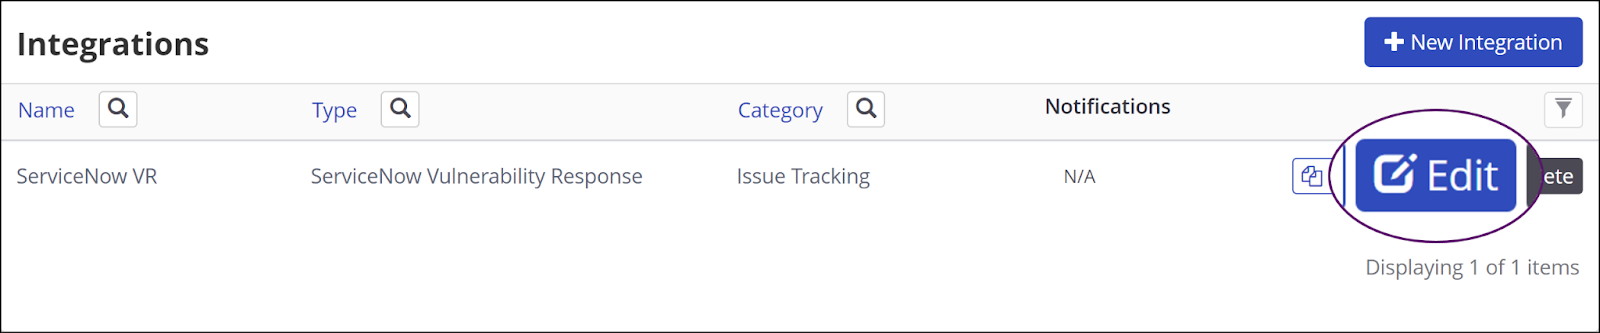
- Select Create Sample Issue.
Invicti Enterprise exports a sample issue to ServiceNow VR to test the integration. If successful, a ticket is opened in ServiceNow VR.
TIP: If you experience any issues while setting up the integration, contact our support team for assistance. |

How to view issues in ServiceNow VR
You can view the issues you have sent to ServiceNow VR on the Open issues page.
If you have previously submitted a vulnerability to ServiceNow VR, it will already be accessible. You cannot submit the same issue twice.
Now that the integration is set up, you can configure bi-directional integration if you want changes to issue status in ServiceNow VR to be reflected in Invicti Enterprise.
Configure bi-directional integration
- In Invicti Enterprise, go to Integrations > Manage Integrations.
- Select Edit next to the relevant ServiceNow VR integration.
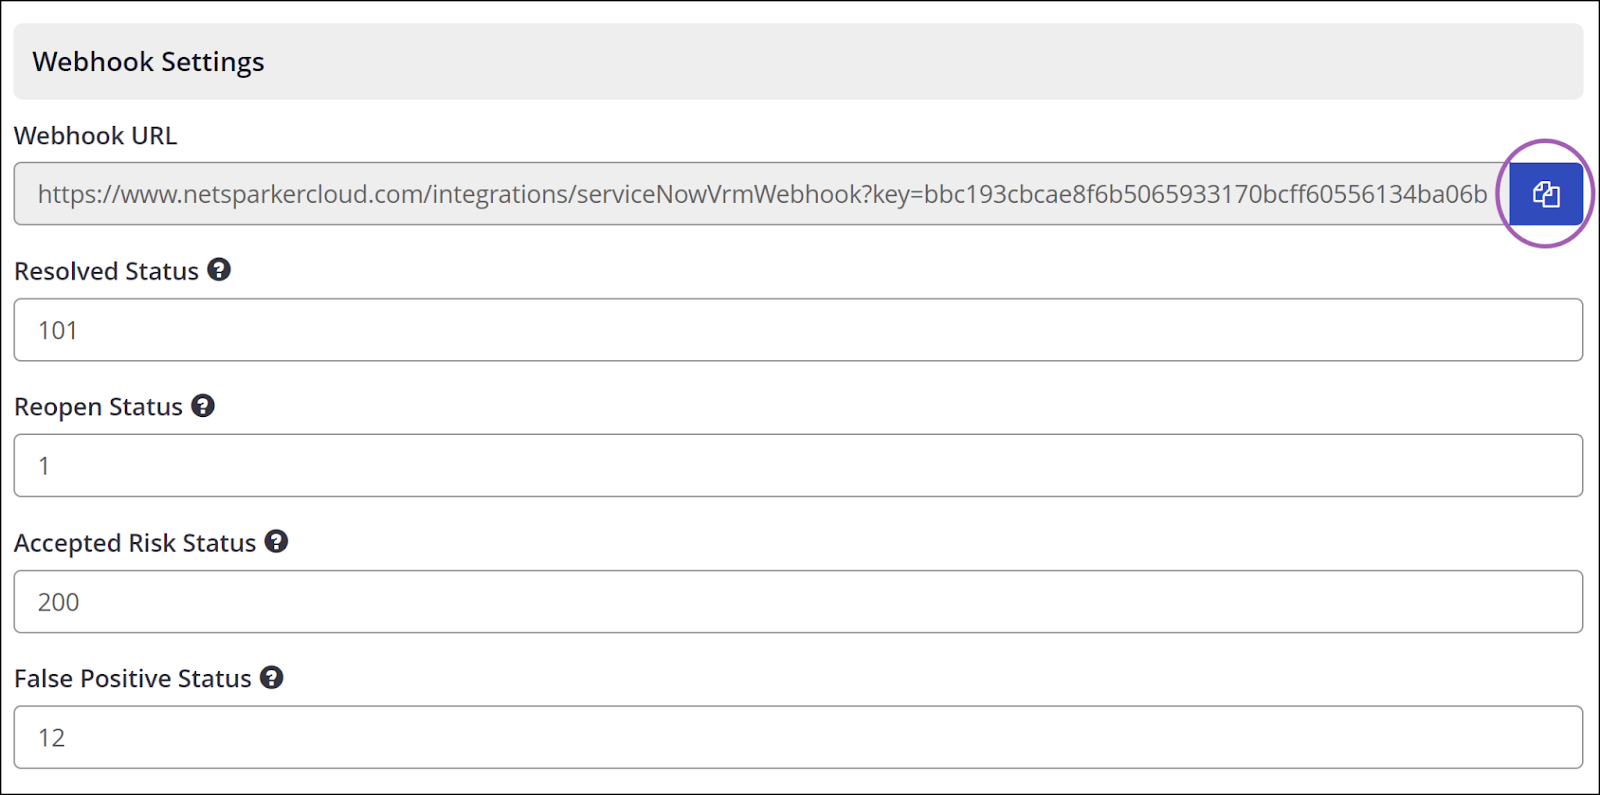
- Scroll down to the Webhook Settings section.
- Click the Copy to clipboard icon at the end of the Webhook URL.
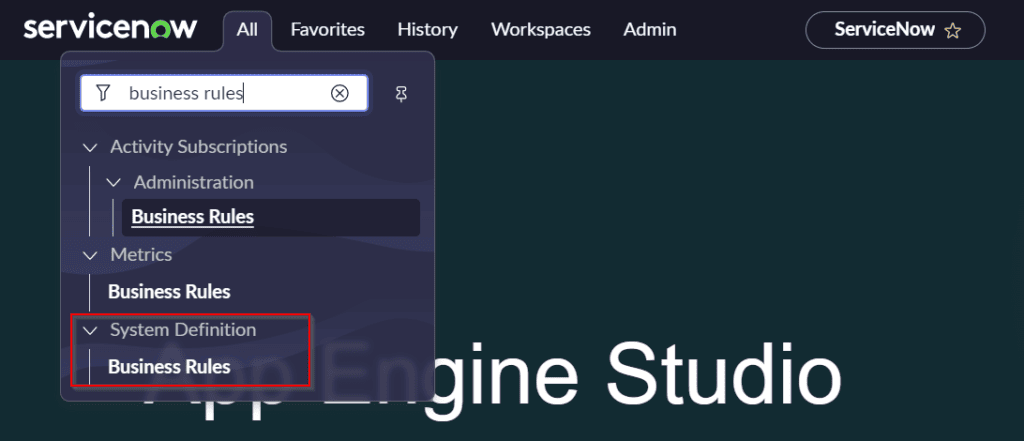
- In ServiceNow VR, use the Filter Navigation textbox to search for 'business rules'.
- Under System Definition, select Business Rules.
- Search for Invicti webhook and select Invicti webhook business rule from the search results.
- Select the Advanced tab.
- Modify the script by pasting the webhook copied from Invicti Enterprise into the endpoint = ' ' parameter.
var endpoint = ‘PASTE YOUR SERVICENOW WEBHOOK HERE’; |
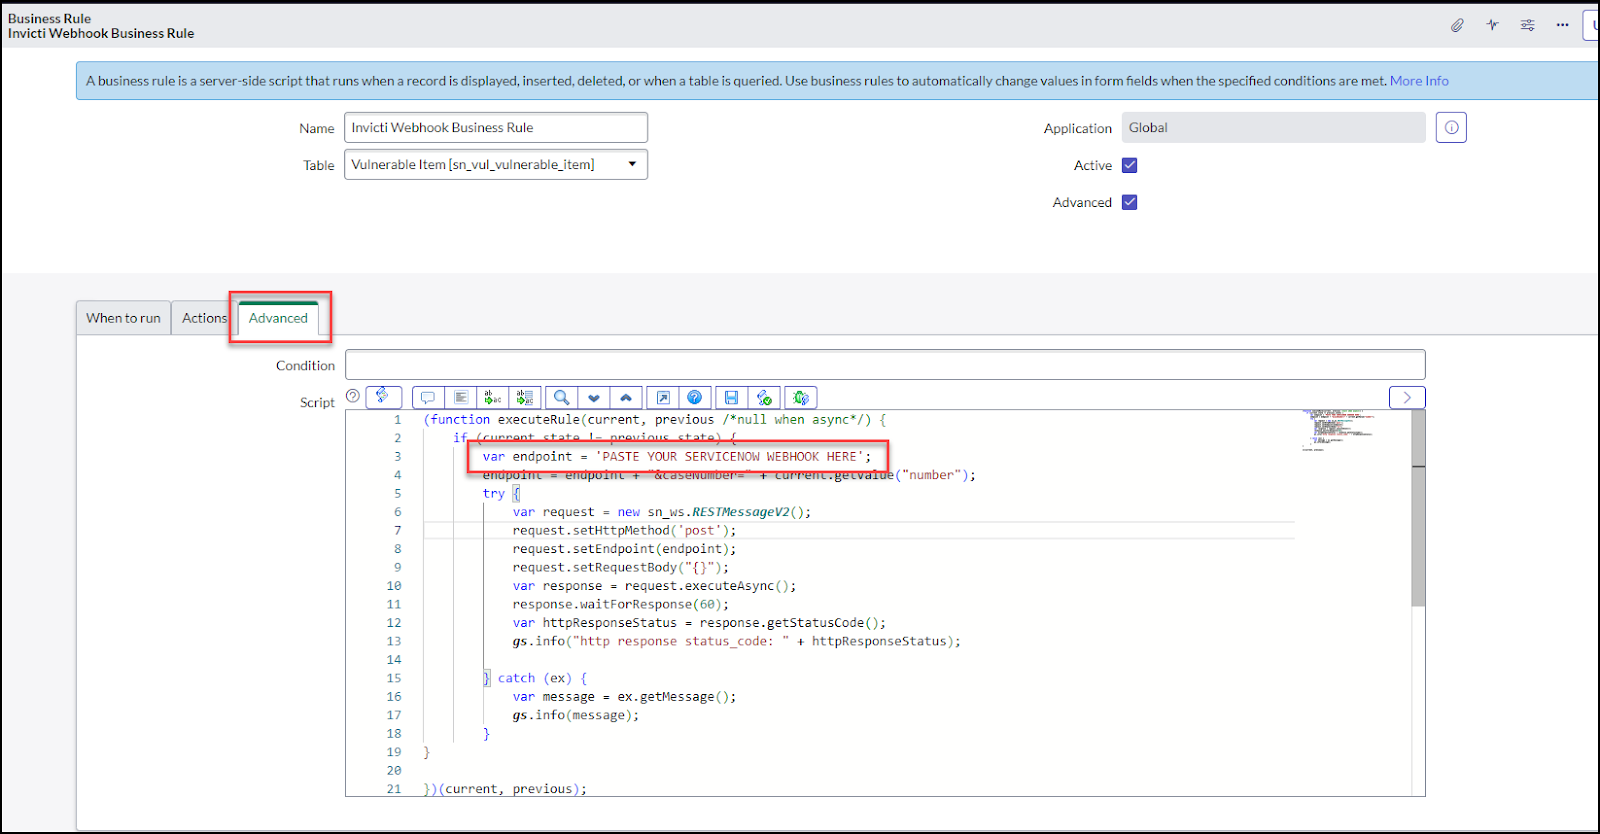
- Click Submit.
Bi-directional integration is now configured. Refer to the following section to configure issue states so that when you change a vulnerability status in ServiceNow VR to your preferred resolved status, the issue is automatically marked as Fixed (Unconfirmed) in Invicti Enterprise, and a retest scan is started.
Configure issue states
In Invicti Enterprise, you can map the issue states to correspond with the status values you have assigned in ServiceNow VR. Follow the instructions below to find and map your status values.
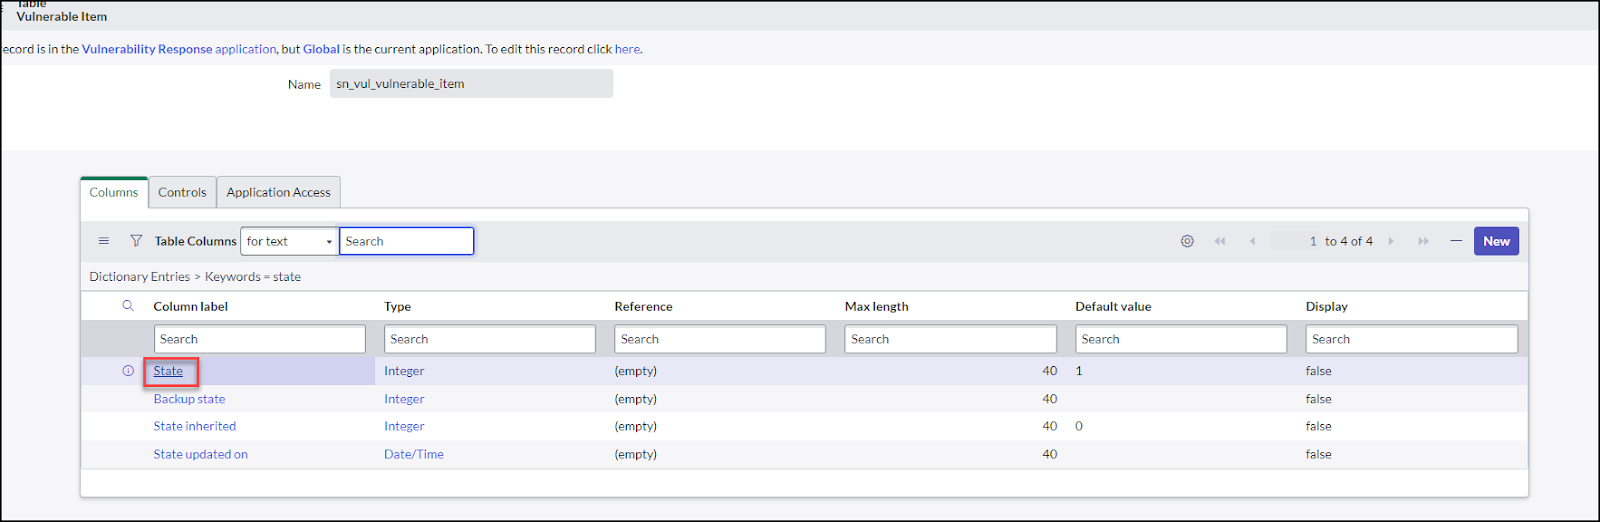
- In ServiceNow VR, use the Filter Navigation textbox to search for 'vulnerable items'.
- Under Vulnerability Response, select Vulnerable items.
- Select one of your vulnerabilities from the list.
- Select Configure table.
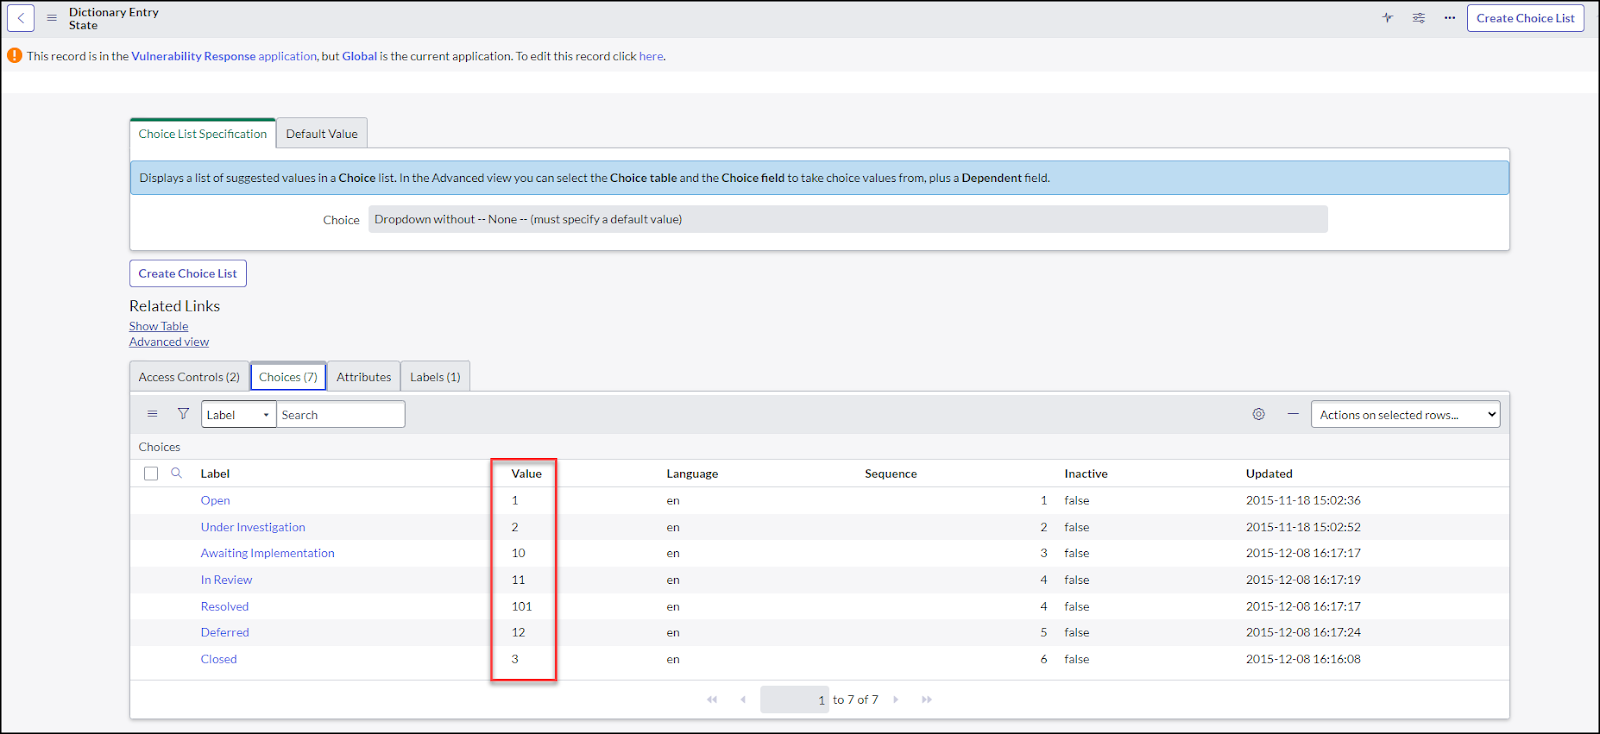
- Select State from within the table.
- Copy the assigned status value to the corresponding issue state field in Invicti Enterprise. For example, if resolved issues are set to "101" in ServiceNow VR, then you need to enter 101 into the Resolved Status field in the Webhook Settings section of the integration in Invicti Enterprise.
NOTE: You cannot have duplicate states. |

Prevent reopening issues in SNOW VR
When the option “Do not re-open issues marked as False Positive or Accepted Risk” is enabled and the vulnerabilities previously marked as False Positive or Accepted Risk are revived during scans, the system doesn’t reopen the issue in ServiceNow Vulnerability Response. This option is disabled by default.
How to enable the option
- Select Integrations > Manage Integrations from the left-side menu.
- Click Edit next to your SNOW VR integration.
- Navigate to Webhook Settings.
- At the bottom of the section, under False Positive Status enable the Do not re-open issues marked as False Positive or Accepted Risk checkbox.
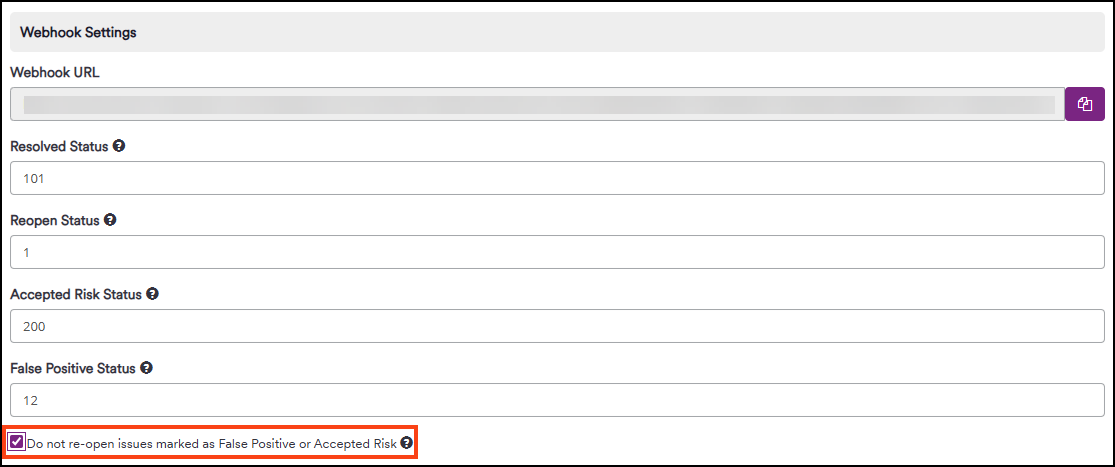
- Click Save to close the settings.
NOTE: When reviewing the history of detected issues, a message will appear if the option is enabled: “The issue will not be reopened in the Issue Tracking System because it has been marked as either a False Positive or an Accepted Risk.” |
