Installing scan agents on Linux (RedHat Distribution)
If you want to scan a website in a demilitarized zone (DMZ), internal networks that are not publicly accessible, you can install Invicti scan agents in your network. The agent will conduct the actual scan job and then report the results back to Invicti Enterprise.
In addition to the scanning agent, you can install an authentication verifier agent in your network that will verify the form authentication on your website. For further information, refer to Installing Authentication Verifier Agents.
You can install the agent on a Linux operating system. If you choose this installation, you must install some dependencies on the system, such as .NET.
This topic explains how to install an Invicti Enterprise scan agent on Linux (RedHat distribution) operating systems. To install the agent in Debian distributions, please see Installing a Scan Agent on Linux (Debian Distribution).
INFORMATION The instructions below were tested on RHEL 9.5. |

These are the stages to this process:
- Download the Invicti Enterprise agent file
- Install the Invicti agent
- Set the Invicti agent as a Linux service
Prerequisites
Hardware Requirements
- Processor: 1.4 GHz minimum (2.0 GHz or faster recommended)
- Memory: 4 GB or higher recommended
- Storage: 10 GB free disk space per internal agent
- If NTLM is used as the authentication method, Ubuntu version 24.04 or its equivalent must be used at a minimum.
Network Requirements
- The agent must access your internal website via HTTP/HTTPS.
- The agent must connect to the Invicti Enterprise Authentication Verifier Server over HTTP(S) (port 443).
Whitelisting Requirements
- Invicti Enterprise On-Demand: US
- Invicti Enterprise On-Demand: US-2
- Invicti Enterprise On-Demand: CA
- Invicti Enterprise On-Demand: EU
- Invicti Enterprise On-Premises
Required Access
- Users must have root privileges to execute the required commands. If root privileges are unavailable, use the Docker-based scan agent instead. For instructions, refer to Installing a Docker Scan Agent.
Download the Agent
To install the scan agent, download the installation files to a machine on your internal network. These are the steps to download a Scan Agent in Invicti Enterprise On-Demand:
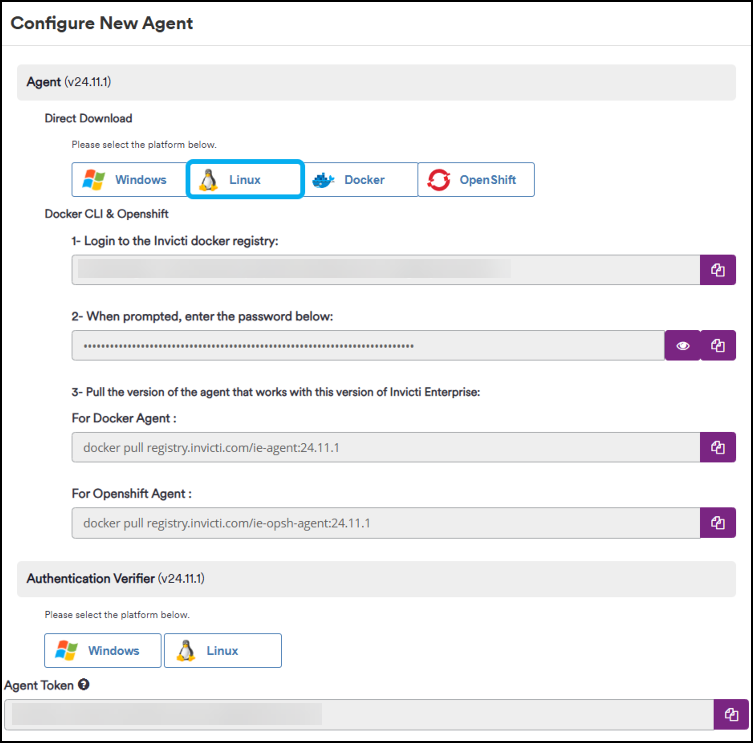
- In Invicti Enterprise, select Agents > Manage Agents from the left-side menu.
- Click Configure New Agent.

- From the Agent - Direct Download section, select Linux to download the required files to install the verifier agent.
Install the agent
To install the Invicti Agent follow these instructions:
INFORMATION: Disable SELinux before starting the installation. For further information about disabling SELinux, see Changing SELinux states and modes. |

- Open a terminal window.
- Install the epel-release repository (ignore this step for Fedora distribution):
sudo subscription-manager repos --enable codeready-builder-for-rhel-9-$(arch)-rpms sudo dnf update dnf install https://dl.fedoraproject.org/pub/epel/epel-release-latest-9.noarch.rpm sudo dnf update |
- Install dependent packages:
sudo dnf install -y nano tar mono-complete libgdiplus p7zip p7zip-plugins |
WARNING: RHEL 9 has removed support for NTLM authentication and no longer includes the gssntlmssp package. As a result, Invicti Enterprise agents installed on RHEL 9 will not be capable of handling NTLM authentication. Please ensure your systems and configurations account for this limitation when using Invicti Enterprise with RHEL 9. Previous versions of RHEL (and other RedHat/Fedora based distributions) may still support NTLM authentication, but it is best to consider this as a security concern; to add support for this: sudo dnf install -y gssntlmssp |

- Install the Headless Chrome browser dependencies:
sudo dnf install -y pango.x86_64 libXcomposite.x86_64 libXcursor.x86_64 libXdamage.x86_64 libXext.x86_64 libXi.x86_64 libXtst.x86_64 cups-libs.x86_64 libXScrnSaver.x86_64 libXrandr.x86_64 GConf2.x86_64 alsa-lib.x86_64 atk.x86_64 gtk3.x86_64 xorg-x11-fonts-100dpi xorg-x11-fonts-75dpi xorg-x11-utils xorg-x11-fonts-cyrillic libX11-xcb.so.1 libnss3.so xorg-x11-fonts-Type1 xorg-x11-fonts-misc |
- Next, extract the TAR file:
To extract the scan agent, run the following commands:
cd /home/[YOUR_USER] tar -xvf <Invicti_Enterprise_Linux_Scanner_Agent_{Version}> --one-top-level |
NOTES:
|

- Open appsettings.json file via any text editor you prefer:
cd /home/[YOUR_USER]/<Invicti_Enterprise_Linux_Scanner_Agent_{Version}> nano appsettings.json |
These settings will be used by the scan agent:
- AgentName: This can be anything you want. This text will be displayed when you are starting a new scan. (If you are going to install more than one instance of the agent, you must set a unique agentName value for each instance, something you will use later.)
- AgentType: This can be Standard or Cloud. If you want to use Cloud Provider for scanning, AgentType must be Cloud.
- ApiToken: In Invicti Enterprise, the Agent Token is displayed in the Configure New Agent window. Copy the value into the apiToken. (For further information, see How to Get an Agent Token for the Scan Agent.)
- ApiRootUrl: This is the URL of Invicti Enterprise or the Invicti Enterprise On-Premises.
Changing the default data folder for the scanner Agent To change the default data folder, add the following attribute under AgentInfo in the appsettings.json file: "ScanDataFolderPath": "FullPath" For example, you can set the path like this: /home/[YOUR_USER]/[data folder]/
|

Set the Invicti Agent as a Linux Service
An internal scanning agent should be configured as a Linux service so that it can poll the Invicti Enterprise servers regularly and can take the scan initiation command from the server.
Additionally, you can update the scan agent or enable it to auto-update itself. For further information about the agent update, see Auto-Update Support for Scanner Agents.
You can complete this process as follows:
Add a unit file for an Invicti Agent
Follow these steps to add a unit file for the Invicti Agent:
- Open a terminal
- cd /etc/systemd/system
- sudo touch [YOUR_AGENT_NAME].service
- sudo nano [YOUR_AGENT_NAME].service
IMPORTANT: The AgentName specified in the appsettings.json file must match the unit file name of the agent. Consistency between these names is required for proper operation. |

- Add the following script into [YOUR_AGENT_NAME].service
# For internal agents version 2.0.2.157 or newer [Unit] Description=netsparker.service description [Service] Type=notify KillMode=process Restart=always RestartSec=30 SyslogIdentifier=[YOUR_USER] KillSignal=SIGINT User=[YOUR_USER] WorkingDirectory=[YOUR_AGENT_DIRECTORY_PATH] ExecStart=[Your Agent Directory path]/Netsparker.Cloud.Agent ExecStop=/usr/bin/pkill -f "[YOUR_AGENT_DIRECTORY_PATH]/Nhs/NetsparkerHelperService.exe" [Install] WantedBy=multi-user.target |
- Save and close the document.
Configure Sudoers for an Invicti Agent
To configure Sudoers for the Invicti agent, follow these steps:
- Create a new sudoers file:
sudo touch /etc/sudoers.d/[YOUR_AGENT_NAME]-systemctl |
- Edit the file with visudo:
sudo visudo -f /etc/sudoers.d/[YOUR_AGENT_NAME]-systemctl |
- Add the following script to grant the necessary permissions:
[YOUR_USER] ALL=(ALL:ALL) NOPASSWD: /usr/bin/systemctl start [YOUR_AGENT_NAME].service [YOUR_USER] ALL=(ALL:ALL) NOPASSWD: /usr/bin/systemctl stop [YOUR_AGENT_NAME].service |
- Save and close the file.
Start Invicti Enterprise Agent as a Linux Service
- Reload the system daemon to recognize the new service:
sudo systemctl daemon-reload |
- Start the agent service:
sudo systemctl start [YOUR_AGENT_NAME].service |
You can now check the status of the connection between Invicti Enterprise and the scan agent. From the Agents menu, click Manage Agents. The Agents window is displayed.

NOTE: You can set a proxy for the scanning agent in Invicti Enterprise. For further information about the proxy, see Setting Proxy in Scanner Agents. Using Proxy Auto-Configuration? For further information, see Using Proxy Auto-Configuration file. |
Defining and Scanning an Internal Website in Invicti Enterprise
Now that you have installed a scanning agent into your infrastructure, you should configure Invicti Enterprise to let it know which websites should be scanned with an internal agent rather than with the built-in agents.
How to Define an Internal Website in Invicti Enterprise
- Log in to Invicti Enterprise.
- Select Websites > New Website from the left-side menu.
- Enter your internal website details (see Adding a Website in Invicti Enterprise).
- From the Agent mode field, select Internal.
- Select Save.
How to Scan an Internal Website with Agent
- In Invicti Enterprise, select Scans > New Scan from the left-side menu.
- From the Target URL field, select your Internal Website (if the field is not already populated).
- The Preferred Agent field is already selected by default. Your newly installed scanning Agent is displayed as an option. If you installed more than one instance, select the one which can access your Internal Website. If any of them can access your Internal Website, select the default option Any of the available agents. By selecting this, one of the idle agents will scan your website.
- Select Launch. (For simplicity, optimization and other settings are ignored in this procedure.)
Your scan has been started in the Queued state. Shortly, you will see that its status changes to Scanning. Once it is completed, you will be able to explore the vulnerabilities found on your website.
Installing Multiple Agents on the Same Operating System
You can install more than one scan agent in Linux. Follow these steps:
- Open a terminal window.
- Create a new folder for the new agent.
- Copy the TAR file into the new folder, and extract the TAR file
- Follow the instructions in Installing the Agent and Setting Agent as a Linux Service.
Make sure that you enter a different name for the new agent.
For further information about managing agents, see Managing Groups.