Installing scan agents via Docker
You can install the Invicti Enterprise scan agent on any operating system that has Docker Linux installed. Using Docker eliminates the need to install unnecessary files, such as drivers or operating system kernels, and removes the hassle of manually managing dependencies, ensuring a smoother installation process.
This document provides guidance on installing and running the scan agent using Docker. It includes a list of environment variables and explains how to retrieve scanner agent logs.
Our documentation assumes that Docker and Docker Compose Plugin are installed on your system. While deploying agents without Docker Compose is possible, it requires manually converting the docker-compose.yml configuration into equivalent Docker run commands. This process may involve replicating environment variables, volume mappings, network settings, and other parameters defined in the Compose file. Refer to the official Docker documentation for more information.
Installing and running a scan agent via Docker has four steps. Ensure your system meets the prerequisites listed below, follow the instructions outlined in each step, and refer to our whitelisting guidelines to ensure uninterrupted operation:
Whitelisting guidelines
Refer to these documents to whitelist the correct IP addresses based on your region:
- Whitelisting requirements for Invicti Enterprise On_Demand - US region
- Whitelisting requirements for Invicti Enterprise On_Demand - US-2 region
- Whitelisting requirements for Invicti Enterprise On_Demand - EU region
- Whitelisting requirements for Invicti Enterprise On_Demand - CA region
- Whitelisting requirements for Invicti Enterprise On-Premises
Prerequisites
- You already have a Docker host deployed, including the Docker compose plugin.
- Ensure that the user you use to log in to the Docker host is a member of the Docker group or you have sudo rights.
- Docker - to verify Docker installation on your OS, run the 'docker --version' command in Terminal. If you have Docker, Terminal shows the version information. Otherwise, it shows an error message. For more information about installing Docker, refer to the Docker website.
- 4 GB RAM or higher is recommended per agent.
- 2 CPU cores per agent as a minimum.
How to install a scan agent via Docker
Installing and running a scan agent via Docker has two steps. Ensure your system meets the prerequisites listed above, then follow the instructions outlined in each step.
Import the Scan Agent docker image
Option 1: Pull the Docker scan agent from the registry
- In Invicti Enterprise, select Agents > Manage Agents from the left-side menu
- Click the + Configure New Agent button
- Copy and retain the following information for later use on your docker host:
- the docker login command for the registry at invicti.registry.com
- your password for the registry
- the docker pull command to pull the image from the registry into your docker host
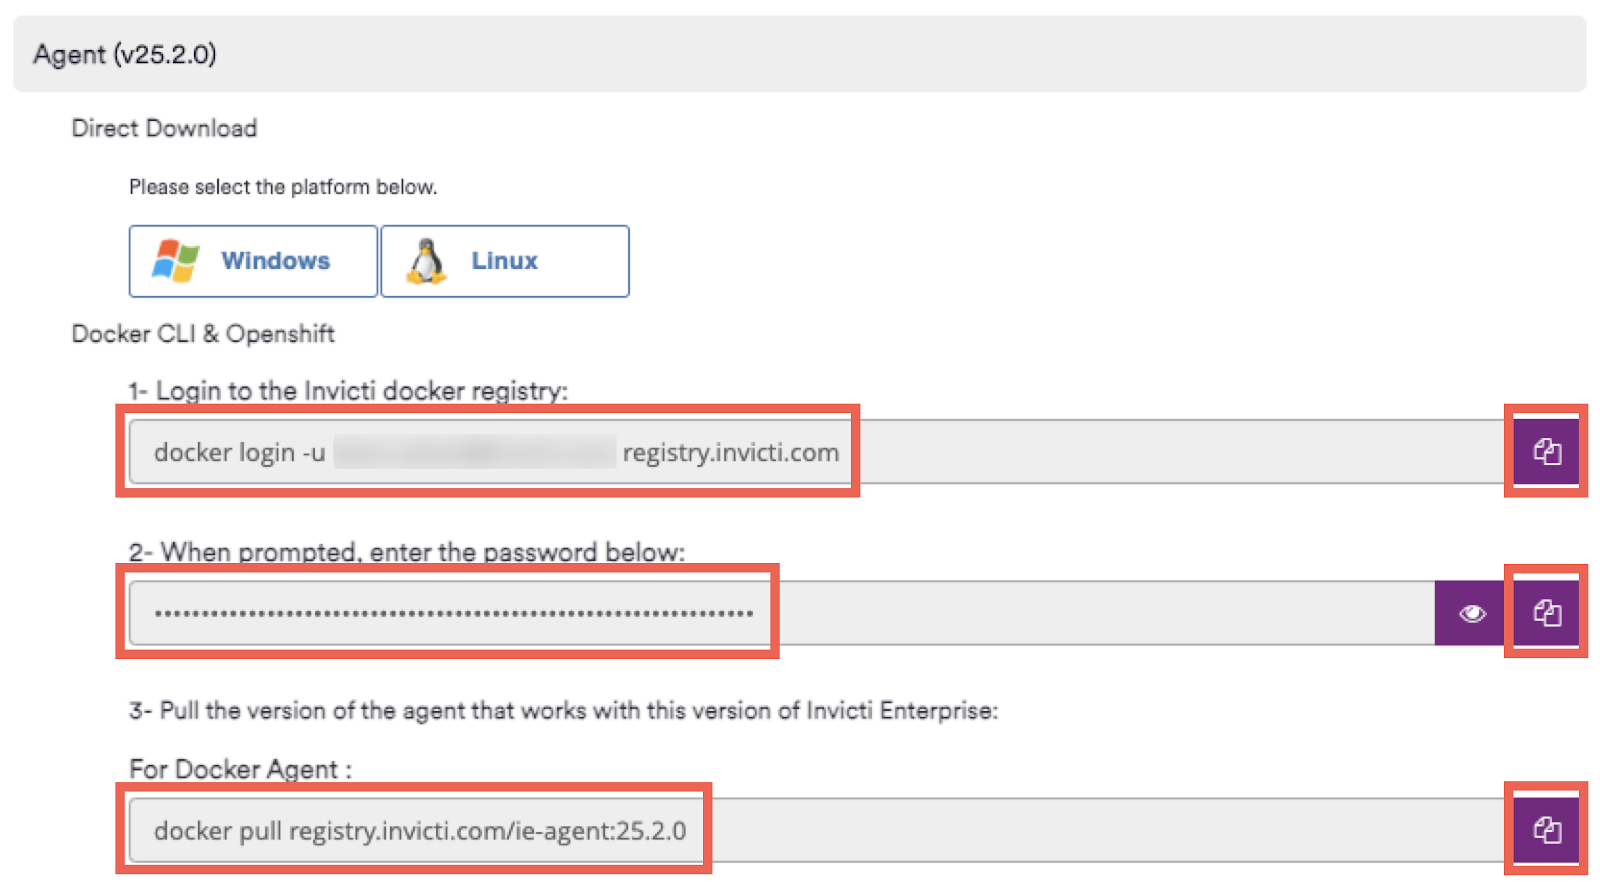
- on your docker host:
- from your console, login to the registry (command copied earlier):
docker login -u <your email address> registry.invicti.com |
- …and at the prompt, enter the password you copied earlier
- pull the image from the registry (command copied earlier):
docker pull registry.invicti.com/ie-agent:25.2.0 |
Option 2: Download the docker image from the web application
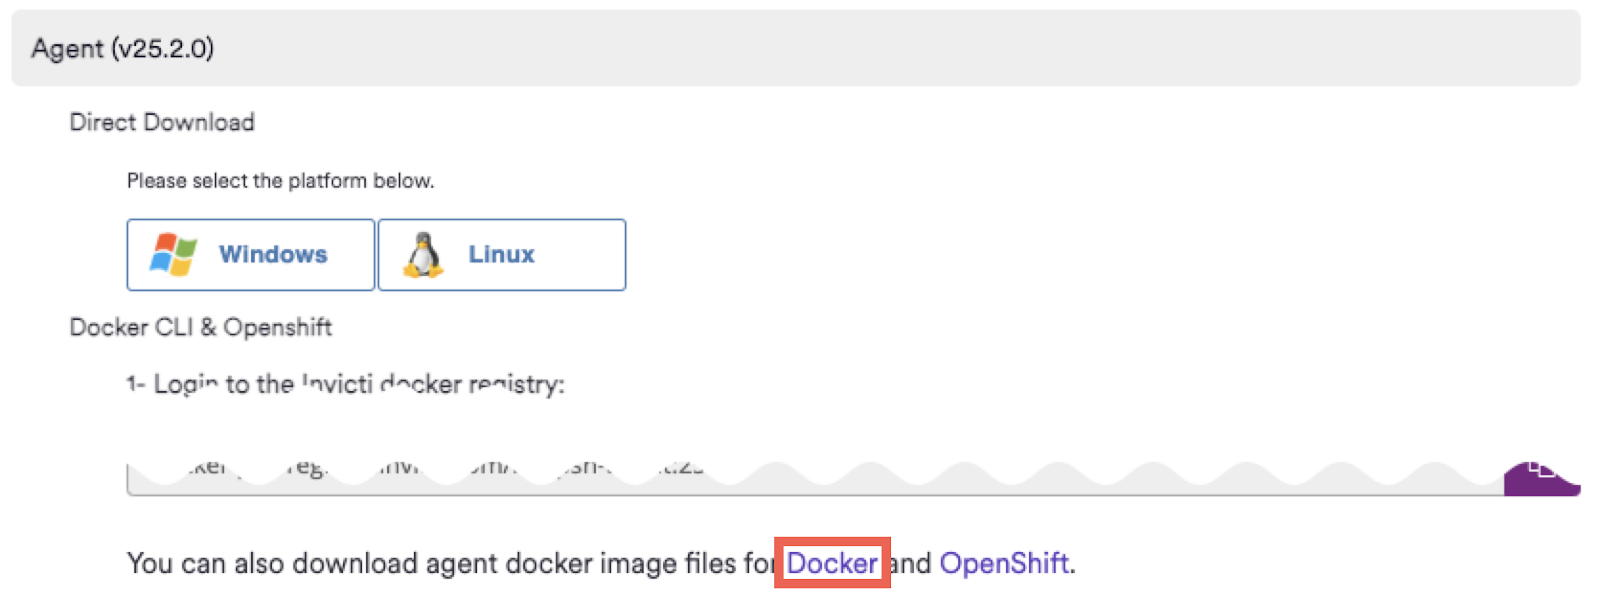
- In Invicti Enterprise, select Agents > Manage Agents from the left-side menu
- Click the + Configure New Agent button
- At the bottom of the Agent section, click the Docker link to download the Agent image file
- Copy the Agent image file to your docker host into your home folder
- on your docker host:
- Import the image into your docker host
docker load < Agent-25.4.1.tar.gz |
Step 2: Deploying the scanner agent
- On your docker host:
- from your console, create a folder for the agent configuration and navigate to the folder:
user@debian:~$ mkdir ~/docker_agent user@debian:~$ cd ~/docker_agent user@debian:~/docker_agent$ |
- Create a compose.yml file in the folder (using a text editor like nano) with the following contents. Ensure that you adjust the values for:
- ApiRootUrl (the URL for your web application)
- ApiToken (retrieved from the Configure New Agent page)
- AgentName (this needs to be unique per scanner agent)
- image
- if you are pulling images from a registry, you should
- adjust the version number to match Configure New Agent page
- uncomment the relevant line in the code block below
- if you are importing a downloaded docker image file
- uncomment the relevant line in the code block below
services: ie-agent: container_name: dsa01 restart: always volumes: - dsa01vol:/app/Logs environment: ApiRootUrl: https://www.netsparkercloud.com ApiToken: abcdabcdabcdabcdabcdabcdabcdabcdabcdabcdabcd= AgentName: "dsa01" AgentMode: Scanner IgnoreSslCertificateErrors: "false" ClamAvServiceAddress: dav01 ClamAvServicePort: 3310 networks: - net01 # uncomment the following image: directive if pulling from registry.invicti.com image: registry.invicti.com/ie-agent:25.2.0 # uncomment the following image: directive if importing from a downloaded image file # image: agent:latest clamav: container_name: dav01 restart: always image: clamav/clamav:latest networks: - net01 ports: - "3310:3310" volumes: dsa01vol: null networks: net01: name: net01 |
- Start your Docker scanner agent using the command below. If you encounter a permission error, ensure that the user you are using belongs to the Docker user group or run the command with sudo.
user@debian:~/docker_agent$ docker compose up -d [+] Running 3/3 ✔ Volume "dsa01_vol01" Created 0.0s ✔ Container dav01 Started 0.6s ✔ Container dsa01 Started 0.6s user@debian:~/docker_agent$ |

- In the Invicti Enterprise web application, select Agents > Manage Agents from the left-side menu.
- Look for the new agent to confirm that it has started. Depending on the resources available to the Docker and web application machines, this may take a few minutes.
Updating Agent images
If you are pulling Docker images from a registry, update the version tag in your Docker Compose file to the latest available version, then run docker compose pull followed by docker compose up to update the agent to the latest version.
IMPORTANT: Scan Agent auto-updates don't work with Docker agents. Use the abovementioned method to update the scan agents.
|


Environment variables
For Docker agents, the appsettings.json file is not used and will be ignored.
The sample compose.yml file includes an environment section with a minimal set of variables required to start the container. You can add other variables as needed. Refer to the following list for some additional variables you can configure:
Variable | Description | Example |
ProxyMode | Proxy mode for the agent. |
|
ProxyAddress | IP/Hostname for the proxy. | 172.18.130.254 |
ProxyDomain | Authentication domain for the proxy. | Workgroup |
ProxyPort | Port number for the proxy. | 8080 |
ProxyUserName | The username for the proxy. | user |
ProxyPassword | Password for the proxy. | Use a strong password that avoids using names, common words, or predictable patterns. |
ProxyUseDefaultCredentials | A setting that specifies whether to use the system's default credentials when authenticating to a proxy. |
|
ProxyByPassList | Proxy bypass list as a JSON string | |
ProxyByPassOnLocal | A setting that specifies whether the proxy should or should not use local network requests. |
|
IgnoreSslCertificateErrors | A setting that specifies whether the agent should trust TLS certificates that are not valid. |
|
RequiresHttpRequester | A setting that specifies whether to use HTTPRequester. |
|
Optional parameters for custom certificates
If you want to inject custom certificates into the docker agent, you need additional parameters while creating a container:
-v /etc/pki/tls/certs:/home/invicti/certificates -e "CERT_1_PATH=/home/invicti/certificates/<certificate_name>.cer" -e "CERT_1_PASSWORD=<password>" |
- “/etc/pki/tls/certs” represents the path to certificates on the Docker host, {cert path - docker host}
- “/home/invicti/certificates” represents the path to certificates in the container, {cert path - docker container}
- Replace <certificate_name>.cer with the actual name of the certificate being used.
- If the certificate has a password, replace <password> with the password. If there is no password, omit this part: -e "CERT_1_PASSWORD=<password>".
Optional parameters for an outbound proxy
-e "ProxyAddress={domain name or IP address of the proxy server}" -e "ProxyPort={proxy port}" -e "ProxyMode=CustomProxy" |
Obtaining scanner agent logs
You can view the scanner agent logs directly by running the following command. Replace <container_id> with the ID or name of the container running the scanner agent.
docker logs <container_id> |
NOTE: To find the exact ID or name, use 'docker ps' to list all running containers or 'docker ps -a' if the agent is not currently running. |
