Integrating Invicti Standard with Webhooks
Invicti Standard allows you to integrate with many issue tracking systems using its Send To Actions feature. However, there are some applications for which Invicti Standard does not currently offer integration. Instead, Invicti Standard offers webhook integration for applications that support incoming webhooks. Webhooks are not applications, but they provide a way for an application to get data from other applications with real-time information.
In this topic, Slack’s incoming webhook is used to export reported vulnerabilities.
For further information, see Configuring the User Interface for Custom Send To Actions in Invicti Standard and Configuring Auto Send To Actions in Invicti Standard and What Systems Does Invicti Integrate With?.
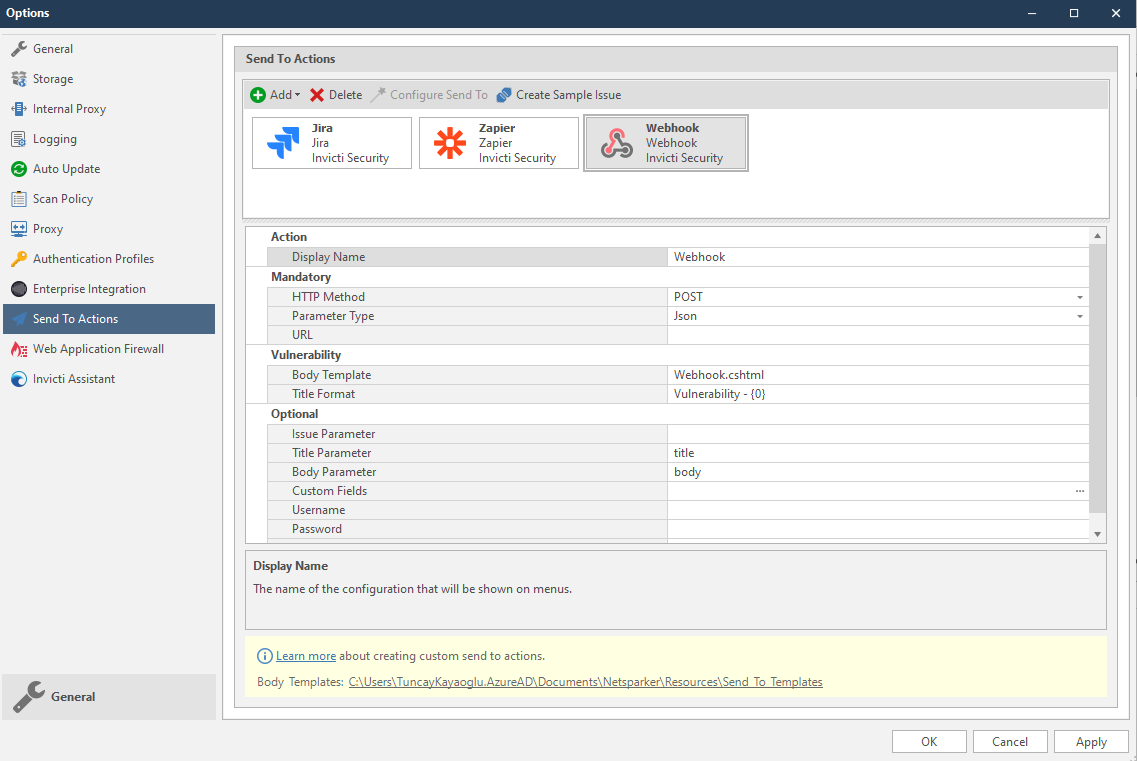
Webhook Fields
The table lists and explains the Webhooks fields in the Send To Actions tab.
|
Button/Section/Field |
Description |
|
Add |
Click to add an integration. |
|
Delete |
Click to delete the integration and clear all fields. |
|
Create Sample Issue |
Once all relevant fields have been configured, click to create a sample issue. |
|
Action |
This section contains general fields about the Send to Action. |
|
Display Name |
This is the name of the configuration that will be shown in menus. |
|
Mandatory |
This section contains fields that must be completed. |
|
HTTP Method |
This is the HTTP method. The method can be:
|
|
Parameter Type |
This is the data format to be sent. The parameter type can be:
If the HTTP Method is POST or PUT, then this field must be completed. |
|
URL |
This is the webhook URL to which issues are sent. |
|
Vulnerability |
This section contains fields with vulnerability details. |
|
Body Template |
This is the template file to be used while rendering issue contents. |
|
Title Format |
This is the string to be used while formatting the vulnerability title. |
|
Optional |
This section contains optional fields. |
|
Issue Parameter |
This is the parameter name of the issue. |
|
Title Parameter |
This is the parameter name of the issue title. |
|
Body Parameter |
This is the parameter name of the issue body. |
|
Custom Fields |
Click the ellipsis to open the Custom Fields Editor dialog. |
|
Username |
This is the username for the HTTP authentication. The Username and Password fields are used for Basic Authorization. If the application doesn’t require authorization, leave them empty. |
|
Password |
This is the password for the HTTP authentication. |
|
HTTP Headers |
This is the HTTP Headers to be added to the HTTP request. |
How to Integrate Invicti Standard with Webhooks
- Open Invicti Standard.
- From the Home tab, click Options. The Options dialog is displayed.
- Click Send To Actions.

- From the Add dropdown, select Webhook. The Webhook fields are displayed.
- In the Mandatory section, complete the connection details:
- HTTP Method
- Payload Type
- URL
- In the Vulnerability section you can change the Body Template and Title Format.
Body templates are stored in %userprofile%\Documents\Invicti\Resources\Send To Templates. If you use your own custom templates, store them in this location.
- In the Optional settings you can specify:
- Issue Parameter
This parameter is required when XML body is used. If this field is set a name <b>IssueParameterName</b>, the XML body will be as shown.
<IssueParameterName>
    <Title></Title>
    <Body></Body>
</IssueParameterName>
If the JSON body is used, it will be as shown.
{
    "IssueParameterName": {
        "title": "",
        "body": ""
    }
}- Title Parameter
Some applications may use subject or summary for titles. This value is used to change the parameter name when sending data.
- Body Parameter
Some applications may use description or detail for the body. This value is used to change the parameter name when sending data.
- Custom Fields
These fields are used to add additional data to the request. For example, the issue should be assigned to a user, and the webhook API has an assignee field. When adding Assignee, user1 values, the request body will be created like this:
<IssueParameterName>
    <Title></Title>
    <Body></Body>
    <Assignee>user1 </Assignee>
</IssueParameterName>- To set custom field values, in the Custom Fields field, click the ellipsis button.
- In the Edit Custom Field Value field, enter the relevant value.

- Click OK.
- Username
- Password
- HTTP Headers
If additional headers (such as Content-Type, Accept or x-auth-token) are needed for requests, this field can be used.
- Create a webhook on the application. (For this procedure, we use Slack as an example of how to create Incoming Webhooks.)

- Click the ellipsis button, and create the required HTTP headers. Invicti automatically adds a
content-typeheader according to the selected payload type.

- Click OK.
- Click Create Sample Issue to confirm that Invicti Standard can connect to the configured system. The Send To Action Test confirmation dialog is displayed.

- You can view the test issue in your application.

How to Export Reported Vulnerabilities to Projects using a Webhook
- Open Invicti Standard.
- From the ribbon, select the File tab. Local Scans are displayed. Double-click the relevant scan to display its results.

- In the Issues panel, right click the vulnerability you want to export and select Send to Slack. (Alternatively, from the ribbon, click the Vulnerability tab, then Send to Slack.) A confirmation message and link is displayed at the bottom of the screen.

- Click the Webhook Send to Action is executed for the selected vulnerability. link to view the newly-created issue in the application (in this case, Slack).
- The vulnerability is automatically exported to the application. You can view it in the application (in this case, a Slack channel).
