Support
Getting Started

Installing and configuring Invicti Enterprise On-Premises

This document is for:
Invicti Enterprise On-Premises

Invicti Enterprise is available as an On-Demand and On-Premises solution. Invict Enterprise On-Premises is identical to the hosted version in terms of features and capabilities, but since it runs on your own servers and network, there are a few things to note:

  • You can scan any internal web application without the need to allow incoming access through corporate firewalls.
  • No internet connection is required.
  • Invicti Enterprise On-Premises can also be easily deployed on Amazon Web Services (AWS), Microsoft Azure, Google Cloud, or any other type of private cloud environment.
  • If your business has to adhere to strict regulatory compliance requirements and policies or you have concerns with your data being stored on our servers, you can still take advantage of Invicti Enterprise's workflow tools, scaling, and scanning capabilities. That is because the On-Premises edition can be installed on your own servers that are managed by your own team.
  • No data will leave the On-Premises edition of Invicti Enterprise.

This article explains how to install Invicti Enterprise On-Premises.

NOTE: All Invicti editions support IPv6 both as servers and agents. This means you can configure the Invicti Enterprise On-Premises server to use IPv6, and Invicti Enterprise can scan websites that use IPv6.

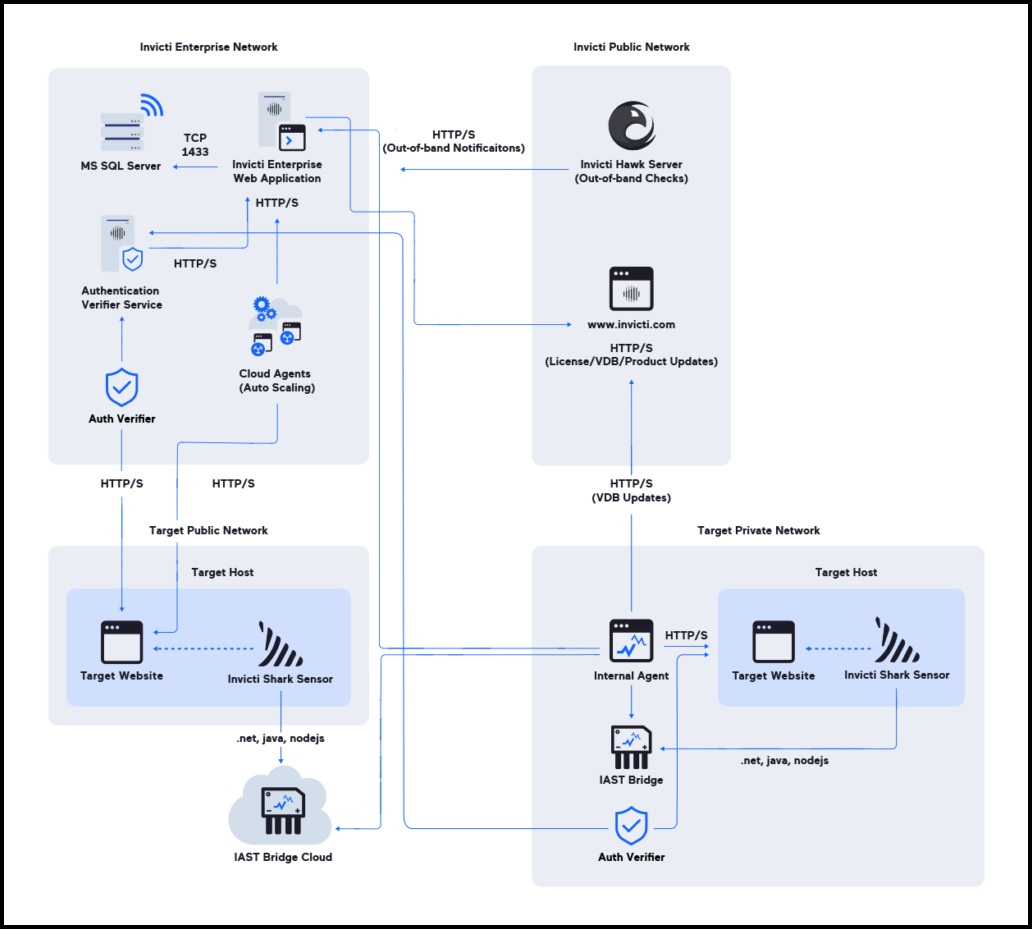
Components and architecture

Invicti Enterprise On-Premises contains five parts which are explained in the table below:

Component

Explanation

Application Server

This provides the web interface that enables the efficient administration and automation of scans. This is the application that users will see and use via the Invicti Enterprise UI.

Agent

This is a service application that executes scans and informs the Invicti Enterprise Application Server of the results. A single agent can only run one scan at a time. If you want to run more than one scan at a time, you will need to install more agents.  

Authentication Verifier

This is a service application that verifies form-based login authentication configuration. This is an optional component. If you are scanning websites that require form authentication, you need to install it.

Authentication Verifier Service

This is a service application that establishes communication between the Authentication Verifier Agent and the Invicti Enterprise Application Server. This is an optional component. If you are scanning websites that require form authentication, you need to install it.

IAST Bridge

This is a service application that is used to relay information from the Shark agent to the scanning agent. This is an optional component. If you are using Invicti Shark (IAST) for Java, .NET, and Node.js, you need to install this bridge.

The following diagram shows the architecture of Invicti Enterprise On-Premises.

Prerequisites

This section lists the minimum requirements for installing each of the components of Invicti Enterprise On-Premises.

IMPORTANT: Some antivirus or anti-malware software may prevent Invicti Enterprise On-Premises from working or cause it to run very slowly. To ensure you can use Invicti On-Premises effectively, we recommend adding Invicti files and folders to your antivirus (or other protection scanning software) exception list (also known as a 'whitelist' or 'allowlist').

For more information about the Invicti files and folders we recommend excluding from your antivirus software, refer to Excluding Invicti files from antivirus scans.

Minimum requirements for the Invicti Enterprise Application Server

All components (the Application Server, the Agent, the Authentication Verifier, the Authentication Verifier Service, the IAST Bridge, and the Database Server) can be installed on the same server if the hardware meets the listed requirements.

TIP: We highly recommend that you install the Agents on separate servers to maximize stability and performance.

Software requirements

  • Windows Server 2016 or above (Windows Server 2019 recommended)
  • Web Server (IIS) role should be installed on the server
  • IIS 10
  • .NET Framework 4.8

Hardware requirements

  • 1.4 GHz Processor (2 GHz or faster recommended)
  • 4 GB RAM (8 GB or higher recommended)
  • 5 GB Free Disk space (20 GB or higher recommended)

Access requirements

  • RDP credentials and access as a user with Administrator rights
  • Can be installed by an Invicti Engineer (or the user) using the provided installer

Minimum requirements for the Invicti Enterprise Agent

These are the minimum requirements for installing the Invicti Enterprise Agent.

Software requirements

  • Windows Server 2016 or above (Windows Server 2019 recommended)
  • .NET 6

Hardware requirements

  • 1.4 GHz Processor (2 GHz or faster recommended)
  • 4 GB RAM or higher recommended
  • 10 GB free disk space for each internal agent

Network requirements

  • The Agent needs to be able to access the Invicti Enterprise Application Server’s HTTP(S) (443/80) port

Access requirements

  • Installation of the Agent requires Administrator rights
  • Ensure that the following groups do not have permission to modify or write service executables and that these groups do not have Full Control permission to any directories that contain service executables: Everyone, Users, Domain Users, Authenticated Users

Minimum requirements for the Authentication Verifier Service and Authentication Verifier

These are the minimum requirements for installing the Invicti Enterprise Authentication Verifier Service and Authentication Verifier Agent.

Software requirements

  • Windows Server 2016 or above (Windows Server 2019 recommended)
  • .NET 6 for Authentication Verifier Agent
  • .NET 6 for Authentication Verifier Service
  • IIS 10 for Authentication Verifier Service

Hardware requirements

  • 1.4 GHz Processor (2 GHz or faster recommended)
  • 1 GB RAM (4 GB or higher recommended)
  • 2 GB Free Disk space (5 GB or higher recommended)

Network requirements

  • The Authentication Verifier Agent needs to be able to access the Authentication Verifier Service's HTTP(S) port. (Default port: 5000)
  • Enterprise users should access the Invicti Authentication Verifier Service Hub publicly. (Default port: 5000)
  • The Authentication Verifier Service needs to be able to access the Invicti Enterprise Application Server’s HTTP(S) (443/80) port.

Access requirements

  • Installation of the Authentication Verifier and Authentication Verifier Service requires Administrator rights
  • Ensure that the following groups do not have permission to modify or write service executables and that these groups do not have Full Control permission to any directories that contain service executables: Everyone, Users, Domain Users, Authenticated Users

Minimum requirements for IAST Bridge

These are the minimum requirements for installing the Invicti IAST Bridge.

Software requirements

  • Windows Server 2016 or above (Windows Server 2019 recommended)

Hardware requirements

  • 1.4 GHz Processor (2 GHz or faster recommended)
  • 4 GB RAM or higher recommended

Network requirements

  • The IAST Bridge Service needs to be able to listen to the Invicti Enterprise Application Server’s HTTP(S) (7880) port

Access requirements

  • Installation of the IAST Bridge requires Administrator rights
  • Ensure that the following groups do not have permission to modify or write service executables and that these groups do not have Full Control permission to any directories that contain service executables: Everyone, Users, Domain Users, Authenticated Users

Minimum requirements for the Database Server

These are the minimum requirements for the Database Server.

IMPORTANT: The database is not provided by Invicti. You must set it up yourself.

Software requirements

  • Microsoft SQL Server 2016 or above (Microsoft SQL Server 2019 recommended)

Hardware requirements

  • 1.4 GHz Processor (2 GHz or faster recommended)
  • 1 GB RAM (4 GB or higher recommended)
  • 6 GB Free Disk space

Network requirements

  • The Invicti Enterprise Application Server needs to access this database server for the relevant port (1433 by default) or it needs to be on the same server

Access requirements

  • An SQL Server database login with the db_owner role
  • The Name of an empty SQL Server database
  • The Database Collation field should be configured as case insensitive

NOTE: The db_owner permission is required during installation and updating. The db_datareader and db_datawriter roles are enough for daily operation.

Downloading the installer files

TIP: Check out our video walk-through to learn how to install Invicti Enterprise On-Premises: Invicti Enterprise On-Premises Installation

How to download the installer files

  1. Download to your server the InvictiEnterprise.zip file that was emailed to you.
  2. Extract the .zip file to a directory.
  3. Check that these five files are in the directory:
  • WebAppSetup.exe (Invicti Enterprise Application Server installer)
  • AgentSetup.exe (Invicti Enterprise Agent installer)
  • AuthVerifierSetup.exe (Invicti Enterprise Authentication Verifier installer)
  • AuthVerifierServiceSetup.exe (Invicti Enterprise Authentication Verifier Service installer)
  • IASTBridgeSetup.exe (Invicti IAST Bridge installer)

Installing the Invicti Enterprise Application Server

The Invicti Enterprise Application Server is installed using a wizard. The wizard has two parts:

  • The Invicti Enterprise Web Application
  • The Authentication Verifier Service

NOTE: The Authentication Verifier Service is an optional part of this installation process. You can install the Authentication Verifier Service whenever you want. For more information about installing the verifier service, refer to Authentication Verifier Settings.

The following instructions explain how to install the Web Application and Verifier Service at the same time.

How to install the Invicti Enterprise Application Server and Authentication Verifier Service

  1. Run the WebAppSetup.exe file and select Next.
  2. On the End-User License Agreement step, accept the license agreement, and select Next.

  1. On the Ready to Install step, select Install to install the Web Application Server, and wait for a while.

  1. The installation asks you to install the prerequisite: The Authentication Verifier Service.
  2. On the Welcome to the Prerequisites Setup Wizard window, select Next to continue.

  1. On the Select Installation Folder step, select Next to install the Authentication Verifier Service to the default folder. Or select Browse to select an installation folder. Select Next.

  1. On the Completing the Invicti Enterprise Authentication Verifier Service Setup Wizard step, select Finish to complete the installation.

  1. On the Completing the Invicti Enterprise Web Application Setup Wizard step, select Finish to complete the Web Application Setup process.


Next steps:

  1. Configure the Invicti Enterprise Web App
  2. Install the Invicti Enterprise Scanner Agent
  3. Install the Invicti Enterprise Authentication Verifier
  4. Install the Invicti Enterprise IAST Bridge

Configuring the Invicti Enterprise Web Application Server using the Installation Wizard

From the server URL on which the Invicti Enterprise application is installed, you need to run the Invicti Enterprise Installation Wizard to complete the installation.

TIP: You can also install the Invicti Enterprise Web Application in silent mode. For more information, refer to Installing Invicti Enterprise On-Premises in Silent Mode.

How to configure the Invicti Enterprise Web Application Server using the installation wizard

  1. The first step of the Installation Wizard is to configure the database connection.
  2. Complete the fields to enable Invicti to build the necessary database structure and populate it with data. Then, click Next.
  3. On the Encryption page, select Download the Secret Key to download your key. Then, click Next.

  1. On the License page, select Import a License (.nsc file) and import your license file. Then, click Next.
  2. On the Account page, complete the fields to set up your account administrator account. Then, click Next.
  3. On the General page, the fields in the General step are already populated with some default values. You can change them as required. Then, click Next.
  4. On the Cloud page, if you use cloud providers like Amazon AWS, you can configure the settings in this step (refer to Cloud Provider Settings). If you don't use a cloud provider, deselect the Cloud Integration checkbox. Then, click Next.

  1. On the Scanner Agent Settings page, copy the Access Token if you want to install the scanner agents following the installation wizard process. These agents will be used to scan target applications.

It is possible to skip this step by selecting the Continue without installing an agent checkbox.

You can install agents whenever you want. If you want to install an agent at this step, execute the file AgentSetup.exe from the zip file. (For more information on agents, refer to Agents in Invicti Enterprise On-Premises). Select Next.

  1. On the Authentication Verifier Settings page, copy the Access Token if you want to install the authentication verifier agents following the installation wizard process. Then, click Next.

TIP: The Authentication Verifier is one of the five components of Invicti Enterprise that is used to verify Form Authentication settings. It is an optional component. For more information, refer to Authentication Verifier Settings.

If the websites you are scanning do not use form authentication, you do not need this component.

It is also possible to skip this step and set it up later in Invicti Enterprise. Refer to the Installing Invicti Enterprise Authentication Verifier section of this article.

  1. On the Email and SMS pages, configure SMS and email notifications to inform users instantly about the status of a web application security scan, or when specific vulnerabilities are identified on the web applications you are scanning. For further information, refer to Managing Notifications.

NOTE: To send invitations to new users or other email notifications, you need to configure SMTP settings. You also need to have a Twilio account to be able to receive SMS notifications.

It is possible to skip this step and the next step by deselecting the Enable Email Notifications and Enable SMS Notification checkboxes.

  1. Select Finish to complete the installation wizard.

Configuring a proxy for the Invicti Enterprise Web Application

You may need to configure a proxy for the Invicti Enterprise Web Application. For information about setting a proxy for the agent, refer to Setting Proxy in Scanner Agents.

IMPORTANT: This instruction assumes that you installed Invicti Enterprise On-Premises to the default location, which is C:\Program Files (x86). If not, please change the relevant step in the instructions accordingly.

How to configure a proxy for the Invicti Enterprise Web Application

  1. Press the Windows key  + E.
  2. Paste the following file path into the address bar: C:\Program Files (x86)\Invicti Enterprise Web Application.
  3. Open Web.config with a text editor and locate the proxy configuration line.

 <system.net>

    <!--<defaultProxy>

      <proxy usesystemdefault="True" proxyaddress="http://127.0.0.1:8888/"/>

    </defaultProxy>-->

  </system.net>

  1. Remove the comment characters from the proxy configuration line.
  2. Enter your proxy configuration.
  3. Save and close the Web.config file.
  4. Restart the IIS for changes to take effect.

TIP: In addition to the proxy address, you can also add information such as a bypass list to the proxy configuration. It looks like the following:

<system.net>  

    <defaultProxy>  

        <proxy  proxyaddress="http://127.0.0.1:8080"  

                bypassonlocal="True"/>  

        <bypasslist>  

            <add address="[a-z]+\.invicti\.com$" />  

        </bypasslist>  

    </defaultProxy>  

</system.net>

How to change the installation folder for the Invicti Enterprise Web Application

The installer does not provide an option to select the folder location, however, you can change the location once the installation is complete. To do this, follow these steps:

  1. Copy the installation folder (C:\Program Files (x86)\Invicti Enterprise Web Application) to the target disk.
  2. Open IIS.
  3. From Sites, select NetsparkerCloud.
  4. Select Advanced Settings.
  5. Replace the physical path with the new path.

Configuring notification settings

In the Invicti Enterprise Application Server security scanner, you can configure SMS and email notifications to inform users instantly about the status of a web application security scan or when specific vulnerabilities are identified on the web applications you are scanning.

NOTE: To send invitations to new users or other email notifications, you need to configure SMTP settings. You also need to have a Twilio account to be able to receive SMS notifications.

For more information, refer to Managing Notifications.

How to configure notification settings

  1. Log in to Invicti Enterprise with an Administrator account.
  2. From the main menu, select Settings > Email.
  3. Complete the form on the Email Settings page. If your SMTP server does not require a username and password, you can leave these settings empty.
  4. To configure your Twilio settings, from the main menu, select Settings > SMS.
  5. Complete the form on the SMS Settings page.

Installing the Invicti Enterprise Agent

The Invicti Enterprise Agent is installed using a wizard.

TIP: You can also install the Invicti Enterprise Agent in silent mode. For more information, refer to Installing the Invicti Enterprise Agent in Silent Mode.

How to install the Invicti Enterprise Agent

  1. Run the AgentSetup.exe file.
  2. On the Invicti Enterprise Agent Setup window, select Next.
  3. On the Select Installation Folder step, select Next to install the Agent to the default folder. Or select Browse to select an installation folder. Then, click Next.

  1. On the Agent Settings window, enter the Agent Name, API URL, and API Token. The Agent Name and API URL fields are already completed. (Agent Name can be configured to any value to help distinguish them from one another, and the API URL should point to the WebApp URL.) Then, click Next.

TIP: To find your API Token, from the main menu, go to Agents > Manage Agents > Configure New Agent. Copy the Agent Token.

NOTE: If you have already configured SSL/TLS for your NE Application Server, then you should enter that URL and ensure that you use HTTPS (for example: https://ncserver/).

  1. On the Ready to Install step, select Install.

  1. Click Finish to complete the installation.

How to prevent the Agent from starting automatically

Once the agent is installed in your environment via the wizard or command prompt, the agent starts automatically. If you prefer to prevent this behavior, you need to take the following steps:

  1. Open a command prompt in Administrator mode.
  2. Run cd to navigate the folder containing AgentSetup.exe.
  3. Run AgentSetup.exe LAUNCH_SERVICE_PROP = 0

If you want to start the agent later, there are two methods available:

Method 1:

  1. Open a command prompt in Administrator mode.
  2. Run cd to navigate the folder containing AgentSetup.exe.
  3. Run AgentSetup.exe -s

Method 2:

  1. Press Windows+R, type 'services.msc' and press Enter.
  2. Find 'Netsparker Enterprise Scanning Service - [YOUR_AGENT_NAME]'.
  3. Right-click on it, and select Properties.
  4. Make sure the Startup type is set to Automatic, and click Start.

Configuring Agent Selection

If you wish, you can select a specific agent while launching a scan.

How to configure Agent selection

  1. Log in to the Invicti Enterprise Application Server with an Administrator account.
  2. From the main menu, select Settings > General.
  3. Enable the Agent Selection Enabled checkbox and select Save.

  1. From the main menu, select Scans > New Scan.
  2. In the General tab, select the Preferred Agent drop-down and select an option.

  1. Complete the fields as required.

Installing multiple Agents on the same operating system

If you want to install more than one agent on the same system, first install the Invicti Enterprise Agent, as usual, using the AgentSetup.exe file.

How to install multiple Agents on the same operating system

  1. Copy all files from the default Agent’s folder to the new Agent’s folder. The default installation path is: C:\Program Files (x86)\Invicti Enterprise Agent.

For example, if you decided to use Agent-2 as the new Agent name, you could use this command to copy all files to the new Agent’s folder:

xcopy "C:\Program Files (x86)\Invicti Enterprise Agent\*.*" "C:\Program Files (x86)\Invicti Enterprise Agent-2" /yie

This will create a new directory in C:\Program Files (x86)\Invicti Enterprise Agent-2 and copy in all the required files.

  1. Locate the new Agent’s folder and open the appsettings.json file with a text editor. Set the new Agent’s name.
  2. Open a command prompt in Windows with Administrator rights and install the new Agent as a Windows Service using these commands:
  • This command changes the current folder to the new Agent’s folder:

cd C:\Program Files (x86)\Invicti Enterprise Agent-2

  • This command installs the new Agent as a Windows Service:

Netsparker.Cloud.Agent.exe /i

  • This command starts the new Agent’s Windows Service:

Netsparker.Cloud.Agent.exe /s

Installing the Invicti Enterprise Authentication Verifier

The Invicti Enterprise Authentication Verifier is installed using a wizard.

NOTE: The Authentication Verifier Agent communicates with the Authentication Verifier Service to verify the login. You can install the Authentication Verifier Agent without installing the verifier service. However, the verifier agent works properly only if you install the Authentication Verifier Service first.

For further information, refer to Authentication Verifier Settings.

How to install the Invicti Enterprise Authentication Verifier

  1. Run the AuthVerifierSetup.exe file.
  2. On the Welcome to the Invicti Enterprise Authentication Verifier Setup Wizard window, select Next.

  1. Select Browse if you want to install the Authentication Verifier to a different folder than the default folder. Then, click Next.

  1. On the Authentication Verifier Settings step, enter the API URL and API Token. The API URL field is already completed. (It should point to the WebApp URL.) In the API Token field, enter your token. You can find this in API Settings. Select Next to contine.

  1. Select Install.

TIP: For information about installing multiple verifier agents, refer to Installing multiple authentication verifier agents.  

Installing the Invicti Enterprise IAST Bridge

The Invicti Enterprise IAST Bridge is installed using a wizard. For more information about Invicti Shark (IAST), refer to Deploying Shark (IAST) in Invicti Enterprise On-Premises.

How to install the Invicti IAST Bridge

  1. Run the IASTBridgeSetup.exe file.
  2. On the Welcome to the Invicti IAST Bridge Setup Wizard window, select Next.

  1. Select Browse if you want to install the IAST Bridge to a different folder than the default folder. Then, click Next.

  1. On the Agent Settings window, enter the Service Port. By default, it is 7880. Then, click Next.

  1. Select Install to complete the installation.

TIP: For information about setting up a custom bridge URL for Invicti Shark (IAST), refer to Setting a custom bridge service for Invicti Shark (IAST).

Securing Invicti Enterprise

Now that your Invicti Enterprise installation is complete, you need to make it secure. For more information, refer to Security Hardening for Invicti Enterprise On-Premises.


« Back to the Invicti Support Page

Invicti Help Center

Our Support team is ready to provide you with technical help.

Go to Help Center This will redirect you to the ticketing system.