What are Scan Profiles in Netsparker Enterprise and How Can They Be Managed?
The settings of a web application security scan can be saved as a Scan Profile in Netsparker Enterprise so they can be used again for other scans. Read this FAQ for more information on how to manage Scan Profiles in Netsparker Enterprise.
Prior to launching a web security scan with Netsparker Enterprise you can configure a number of scan settings. These settings can be saved as a Scan Profile so they can be loaded and used for other web security scans at a later stage, hence avoiding the need to configure the scanner before each scan. Below is a list of the configurable pre-scan settings in Netsparker Enterprise:
- URL of target website to be scanned
- Initial path of scan
- Scan Policy
- Scheduling options
- Scope of the scan
- URL Rewrite mode
- List of regular expressions (RegEx) to match URLs that should be excluded or included in the security scan
- Custom cookies
- List of URLs of pages which are not linked from anywhere in the website and must be included in the scan.

Note: Scan Profiles only apply to single website scans. They cannot be used for website groups scans.
Default Settings Values
All the scan settings have a default value and unless configured otherwise, the default value will be used for the web security scan. Therefore if for example you do not configure the initial path of the scan, Netsparker Enterprise will start scanning the website from the URL you specified.
Managing Netsparker Enterprise Scan Profiles
Saving Scan Settings as a Netsparker Enterprise Scan Profile
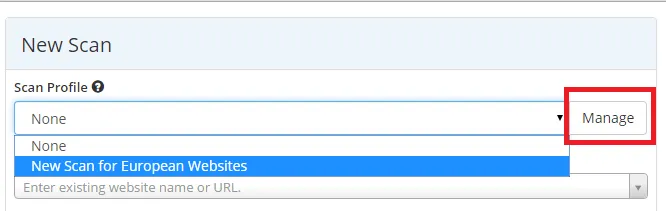
- Once you configure the scan settings click the Manage button highlighted in the above screenshot.
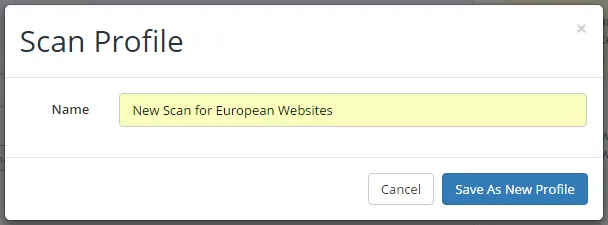
- Specify a name for the new Scan Profile and click the Save As New Profile.
Usinga Saved Scan Profile for a Web Security Scan
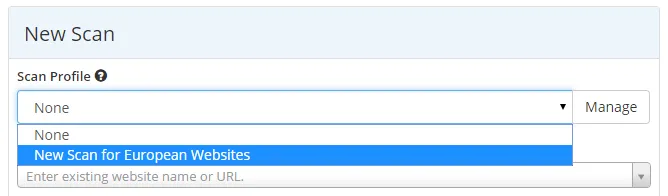
To load the saved scan profile for a new security scan select it from the Scan Profile drop-down menu at the top of the New Scan page.
Updating Saved Scan Profiles
To change or update a saved scan profile follow the below procedure:
- Select the scan profile you would like to update from the Scan PRofile drop-down menu in the New Scan page.
- Do all the necessary changes and click the Manage button next to the Scan Profile drop-down menu once ready.
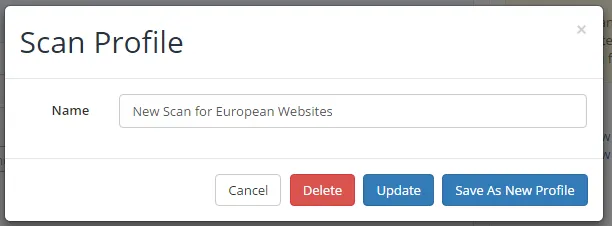
- Click the Update button to save the new changes to the saved scan profile.
Alternatively you can save the updated scan profile as a new one by clicking the Save As New Profile button and specifying a new name.
Deleting Scan Profiles
To delete a scan profile load it from the Scan Profile drop-down menu, click the Manage button and the Delete button.
Experience the future of AppSec
