Building Secure by Default: A Guide to 0-CVE Container Images
Learn to build and maintain 0-CVE container images to enhance security in your containerized applications and discover best practices for secure by default.
In the world of containerized applications, security is no longer a secondary concern but a critical priority. One of the most impactful steps you can take to secure your container environments is to use zero-CVE (Common Vulnerabilities and Exposures) images. While most container images available in the wild carry dozens or even hundreds of known vulnerabilities, starting with zero-CVE images is both feasible and effective.
In this blog post, we’ll explore how to build zero-CVE images easily, why they matter, and which modern practices can help you maintain this security standard.
Multi-Stage Builds: Clean Separation
Multi-stage builds are a powerful Docker feature that allow you to separate the build environment from the runtime image. This strategy significantly reduces image size and removes unnecessary tools and libraries that could otherwise serve as potential entry points for attackers.
Why it matters:
- Build-time dependencies never make it to the production image.
- You ship only what you need – no compilers, package managers, or shells.
- You greatly reduce the attack surface.
A sample Dockerfile showcasing a multi-stage build for a Go application:
This Dockerfile demonstrates how to compile a Go application in a secure, full-featured build environment, and then copy only the resulting binary into a minimal, production-ready image using Distroless. This approach helps eliminate unnecessary tools from the final image, further enhancing security and efficiency
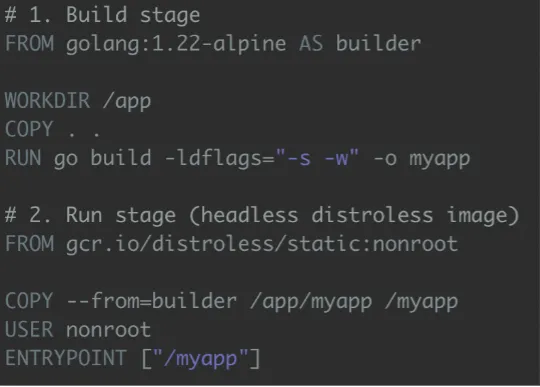
This lightweight Go application outputs a message to the terminal and is used to illustrate the advantages of using multi-stage builds and minimal base images in containerized environments

Running the compiled containerized Go app using Docker:
In this step, we run the final image built using the multi-stage Dockerfile. As shown, the application executes successfully and outputs:
"Hello from Docker!"
Why this approach works:
By leveraging Distroless images that contain no package managers, shells, or unnecessary utilities, we significantly reduce the potential attack surface. This technique aligns perfectly with the goal of building zero-CVE images for secure production environments
2. Headless Images: Fewer Components, Lower Risk
A "headless" image is one that includes the bare minimum required to run your application. Popular headless base images include:
- Alpine
- Scratch
- Distroless
These images are intentionally minimal, which naturally leads to fewer vulnerabilities.

Comparison of standard vs. distroless Node.js images:
The table above illustrates the security and size advantages of using a distroless image. While a traditional Node.js image is approximately 1GB and may contain 100+ known CVEs, the distroless alternative is significantly smaller and contains zero known vulnerabilities.
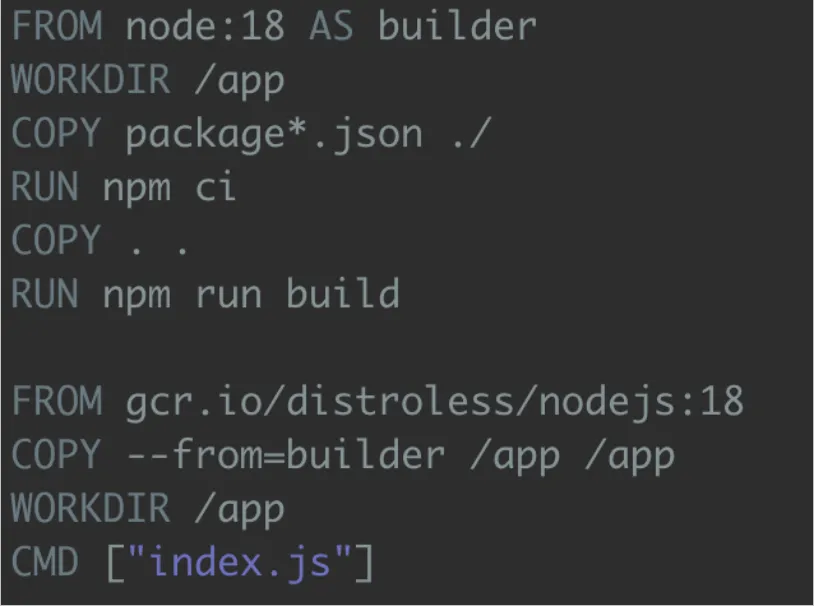
Multi-stage Dockerfile for a Node.js application:
In this example, we use a standard Node.js image to install dependencies and build the application. Then, the final production stage runs the app using a much smaller distroless image. This approach reduces image size, eliminates development tools, and enhances overall security.
This simple Express.js application defines a single route that returns a greeting and listens on port 3000. It's ideal for demonstrating the use of a headless image in action.
Building and running the Docker container:
We build the container using a multi-stage Dockerfile and run it on port 3000. To verify it's working, we send a request using curl. The container responds correctly, confirming that the application functions as expected—even when running on a minimal base image.

Final Docker Image Size:
The resulting Docker image is just 166MB – much smaller than a typical Node.js image – and free from the vulnerabilities commonly found in full-featured base images.
3. Chainguard Images: Security by Default
Chainguard takes things a step further by providing container images that are built with zero known vulnerabilities from the start. These images are:
- Built with secure defaults
- Continuously scanned and updated
- Delivered with SBOMs (Software Bill of Materials)
- Digitally signed to ensure authenticity
Minimal NGINX configuration file used with Chainguard image:
This configuration listens on port 8080 and returns a simple HTTP 200 OK response. It demonstrates how lightweight services can be deployed securely using Chainguard’s hardened base images.
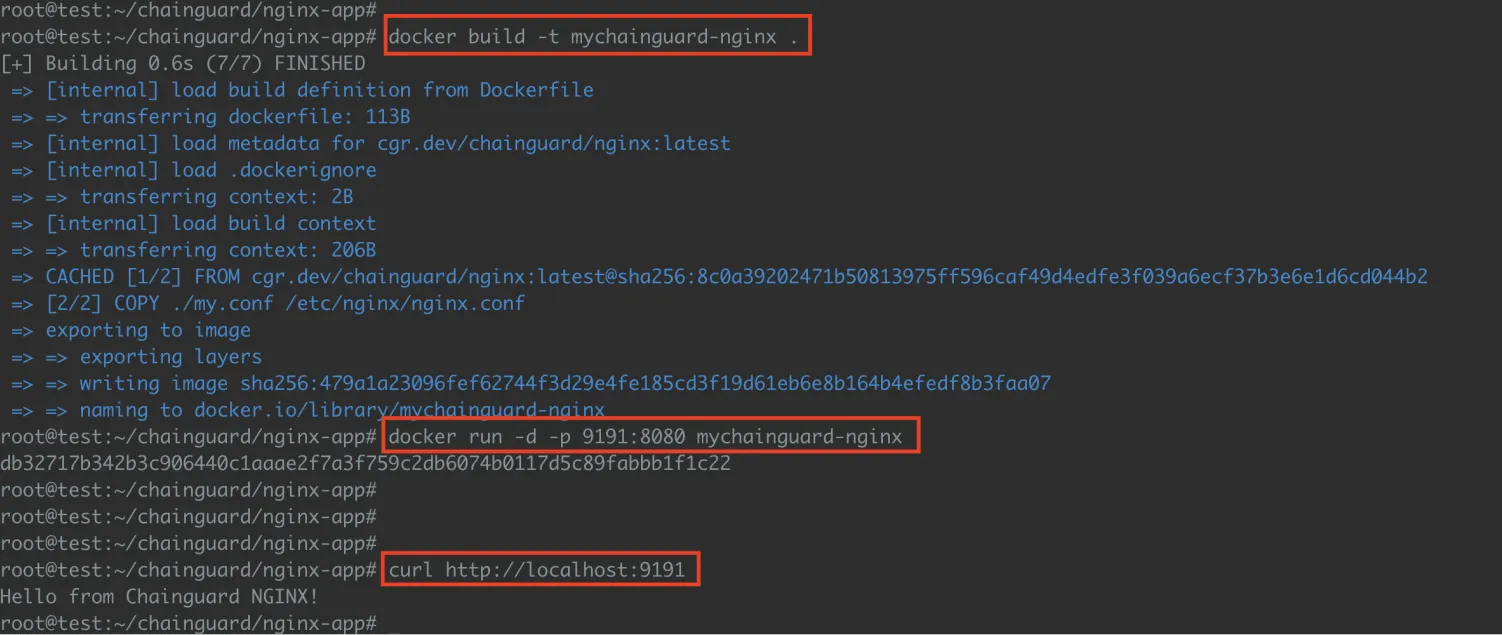
Building and running a secure container using Chainguard’s hardened image:
We build the container using the official Chainguard NGINX base image and run it on port 9191. A simple curl request confirms that the server is running properly: securely and efficiently.
Trusted container image powered by SBOM and digital signing:
Chainguard images are delivered with both signed metadata and a Software Bill of Materials (SBOM), ensuring complete transparency into what’s inside your container. This significantly enhances software supply chain security and helps maintain regulatory compliance.
4. VEX Attestation: Context-Aware Vulnerability Filtering
In modern software development, detecting vulnerabilities is easy, but knowing which ones truly matter is the real challenge. That’s where VEX (Vulnerability Exploitability eXchange) comes in.
VEX is a standardized way to communicate the exploitability status of vulnerabilities in software components. Instead of treating every CVE as a critical issue, a VEX document tells you whether a vulnerability is:
- affected – your software is vulnerable
- not_affected the software uses the vulnerable package, but the vulnerability isn't reachable or exploitable
- fixed – already patched
- under_investigation – being assessed
These statements are signed and can be shared with consumers or processed by security tools, giving both devs and security teams better context.
Why Integrate VEX into CI/CD?
Incorporating VEX into your CI/CD pipeline helps your team filter out non-exploitable vulnerabilities, enabling you to:
- Reduce noise from vulnerability scanning tools,
- Prioritize real risks instead of chasing false positives,
- Maintain compliance by documenting vulnerability status clearly.
You can consume VEX documents alongside SBOMs using tools like grype, guac, or Chainguard’s Wolfi images. For example, a GitHub Actions step could validate a VEX file before deployment, or your container scanning job could skip known non-exploitable issues.
Using VEX in Practice with Trivy and GitHub Actions
Inside your project directory, create a file named vex-cyclonedx.json with the following content:
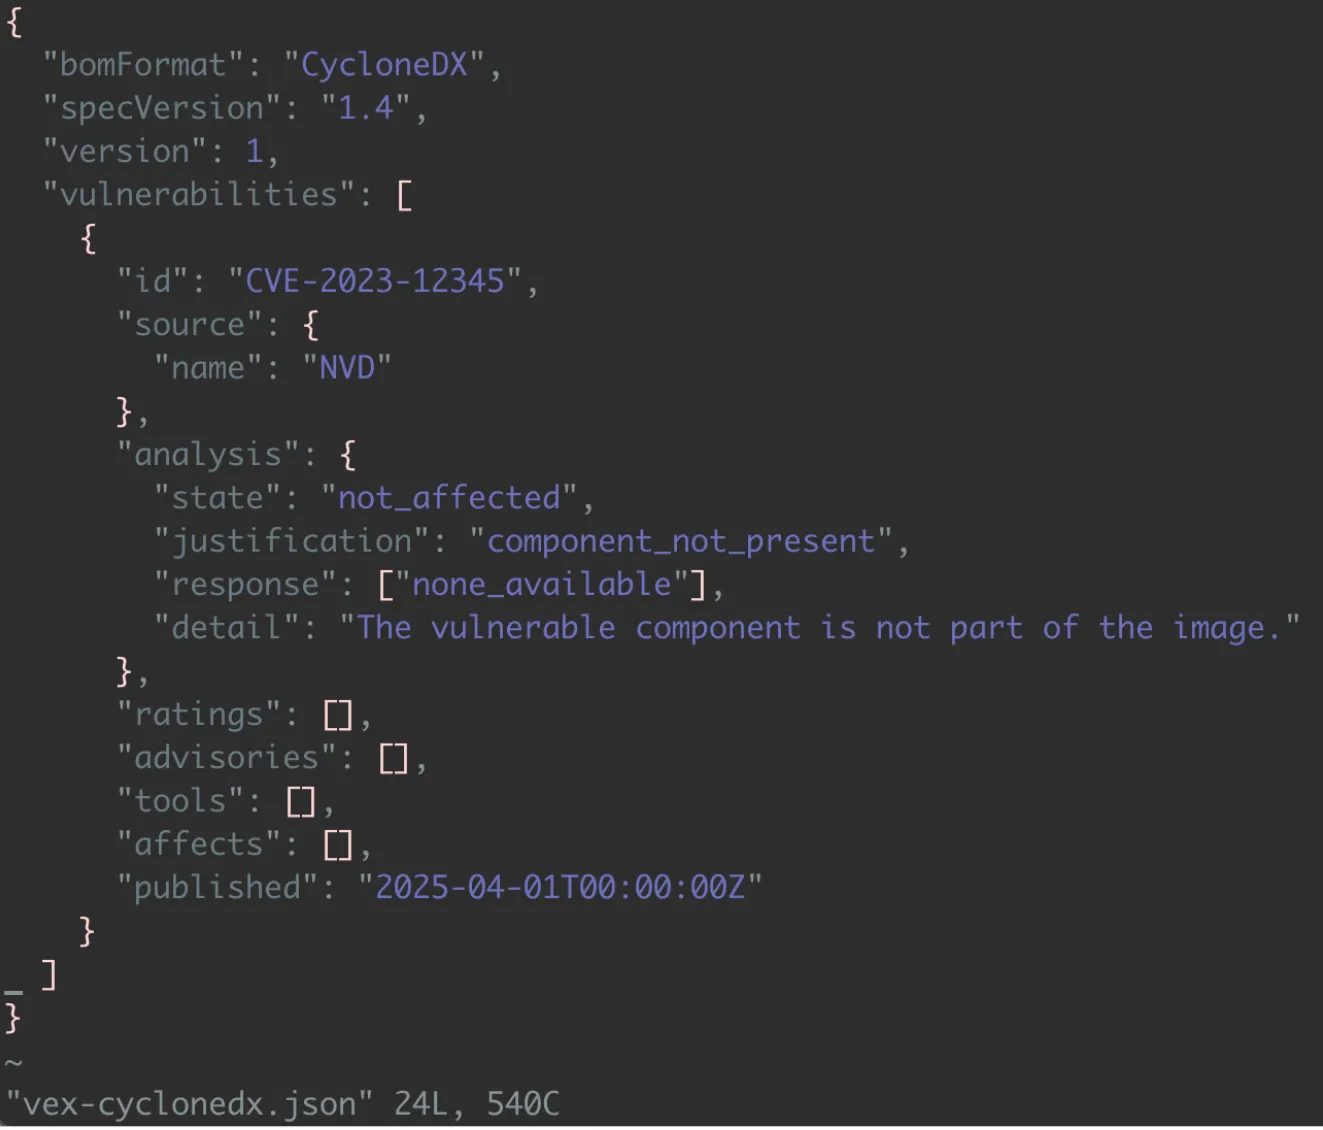
This document explicitly marks CVE-2023-12345 as not_affected, with the justification component_not_present, meaning the vulnerable component simply doesn’t exist in the image – no patching required, and no risk.
Run VEX-Enhanced Scan with Trivy
Next, you can generate a Software Bill of Materials (SBOM) in CycloneDX format using Trivy:
This means Trivy is generating a clean SBOM that can be paired with your vex-cyclonedx.json file to provide full context to downstream tools.
Visualizing the Impact of VEX: Before and After
When you scan your container image without VEX, every vulnerability is treated as a potential risk. However, by applying a VEX document, you can immediately reduce noise and focus on the actual threats.
Here’s an example scan output using Trivy with VEX enabled:

- Total vulnerabilities detected: 48
- Many are marked as fixed, will_not_fix or affected
- Thanks to VEX, issues like CVE-2024-12345 (which do not affect the image) are filtered out
- glibc pakge includes critical vulnerabilities, but some are already patched (fixed), reducing the remediation pressure.
Automating VEX in CI/CD
Here’s how you could incorporate VEX validation into your GitHub Actions workflow:
You can even make your CI/CD pipeline fail only if the vulnerability is exploitable.
VEX gives you signal instead of noise. Combined with a minimal or zero-CVE image strategy, you no longer need to chase every alert and you can focus on real, actionable threats.
And by using tools like Trivy, CycloneDX, and signed VEX documents, you can turn your container security posture from reactive to context-aware and resilient by design.
DIY: Custom Builds: Manual Control for Maximum Security
For teams with strict compliance needs or handling sensitive workloads, relying on third-party images can introduce unknown risks and bloated dependencies.
By building your software stack manually, from the base image to every library, you gain full visibility and control over what goes into production. This DIY approach allows you to eliminate unnecessary components, patch known vulnerabilities, and maintain a minimal attack surface tailored to your environment.
A Fully Static Minimal Go Binary Image Using scratch
If your application is written in Go, you can create a fully static binary and package it in a container with absolutely no additional layers — not even an OS. This results in an ultra-minimal image that contains nothing but your binary.
root@test:~/DIY# GOOS=linux GOARCH=amd64 CGO_ENABLED=0 go build -ldflags="-s -w" -o myapp hello.go
- CGO_ENABLED=0 -> removes dependency on C libraries
- -ldflags="-s -w" -> strip symbols and omit debug information
- Create a Dockerfile (Using scratch Base Image)
- Now package your binary into a container using the most minimal base possible:
This image contains no shell, no package manager, and no operating system — only your statically compiled binary.
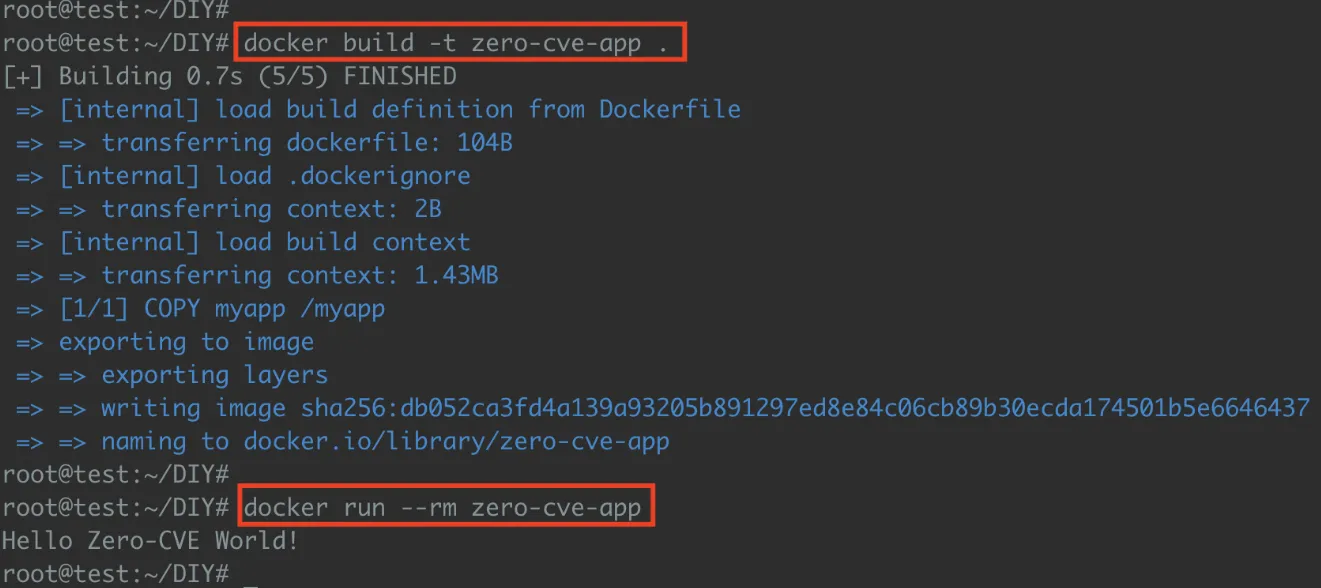
This method results in an extremely small, secure image with zero attack surface beyond your own binary.
To ensure our image is truly minimal and secure, we can scan it using vulnerability scanners like Trivy, Grype, or Snyk. Below is an example using Trivy:
Since our image includes no OS packages and we've explicitly excluded the Go binary from the scan (to avoid false positives from embedded stdlib metadata), Trivy has nothing left to analyze. As expected, it completes silently, confirming that the image is truly minimal and free of any known CVEs.
Why This Matters
Security teams often struggle with bloated base images that pull in hundreds of unnecessary libraries and dependencies – each a potential entry point for attackers. By stripping everything down to just your application, you:
- Shrink the attack surface
- Reduce image size dramatically
- Simplify vulnerability management
- Comply with strict DevSecOps and regulatory requirements
Conclusion
By taking a DIY approach to building container images, you significantly reduce the risk introduced by third-party layers and unknown software components. Whether you’re working with statically compiled Go binaries and the scratch image, or minimizing dynamic languages like Python with tools like docker-slim, the result is the same: smaller, safer, and more compliant containers.
This method is particularly valuable in highly regulated environments where full control over every dependency is a necessity, not a luxury.
Frequently asked questions
Experience the future of AppSec
